IBM Cloud Pak for Data on the AWS Cloud
Quick Start Reference Deployment

February 2021
Clarinda Mascarenhas, Sharath Aithal, Partha Komperla, and Sumit Kumar, IBM
Vinod Shukla and Jim McConnell, AWS Quick Start team
| Visit our GitHub repository for source files and to post feedback, report bugs, or submit feature ideas for this Quick Start. |
This Quick Start was created by IBM in collaboration with Amazon Web Services (AWS). Quick Starts are automated reference deployments that use AWS CloudFormation templates to deploy key technologies on AWS, following AWS best practices.
Overview
This Quick Start deployment guide provides step-by-step instructions for deploying the Cloud Pak for Data on a Red Hat OpenShift Container Platform cluster on the AWS Cloud. With this Quick Start, you can automatically deploy a multimaster, production instance of Cloud Pak for Data.
This Quick Start is for enterprise users to connect, catalog, govern, transform, and analyze data, regardless of location. Cloud Pak for Data includes an enterprise data catalog that helps to create a cohesive information architecture.
| Amazon may share user-deployment information with the AWS Partner that collaborated with AWS on the Quick Start. |
IBM Cloud Pak for Data on AWS
Cloud Pak for Data is an analytics platform that helps prepare data for artificial intelligence (AI). It enables data engineers, data stewards, data scientists, and business analysts to collaborate using an integrated multicloud platform.
Cloud Pak for Data uses IBM’s deep analytics portfolio to help organizations meet data and analytics challenges. The required building blocks (collect, organize, analyze, infuse) for information architecture are available using Cloud Pak for Data on AWS.
Get a quick, interactive tutorial with Cloud Pak for Data by test-driving key features with the no-cost trial. The trial version does not require installation or deployment to get started, and lets you experience the benefits of integrated services spanning data science, DataOps, data management, ModelOps, automated AI, and more.
Cloud Pak for Data can use AWS services and features, including virtual private clouds (VPCs), Availability Zones, security groups, Amazon Elastic Block Store (Amazon EBS), Amazon Elastic File System (Amazon EFS), and Elastic Load Balancing to build a reliable and scalable cloud platform.
This reference deployment provides AWS CloudFormation templates to deploy Cloud Pak for Data on a new OpenShift cluster. This cluster includes:
-
A Red Hat OpenShift Container Platform cluster created in a new or existing VPC on Red Hat CoreOS (RHCOS) instances, using the Red Hat OpenShift installer provisioned infrastructure. See the OpenShift Container Platform installation overview for details about the underlying OpenShift deployment architecture.
-
A highly available storage infrastructure with Portworx, Amazon EFS, or Red Hat OpenShift Container Storage (OCS).
-
Scalable OpenShift compute nodes running Cloud Pak for Data services.
For more information about Cloud Pak for Data, see IBM Cloud Pak for Data.
Cost
You are responsible for the cost of the AWS services used while running this Quick Start. There is no additional cost for using the Quick Start.
The AWS CloudFormation templates for Quick Starts include configuration parameters that you can customize. Some of the settings, such as the instance type, affect the cost of deployment. For cost estimates, see the pricing pages for each AWS service you use. Prices are subject to change.
| After you deploy the Quick Start, create AWS Cost and Usage Reports to deliver billing metrics to an Amazon Simple Storage Service (Amazon S3) bucket in your account. These reports provide cost estimates based on usage throughout each month and aggregate the data at the end of the month. For more information, see What are AWS Cost and Usage Reports? |
Software licenses
You can get started with a 60-day trial or use your existing Cloud Pak for Data entitlement. Additional costs depend on the storage type for your platform. You can choose among three storage classes: Amazon EFS, Portworx, or OCS. EFS costs are charged automatically to your AWS account. You have an option to use a Portworx trial version or an evaluation version of OCS. Visit Portworx or OCS for licensed versions.
For Cloud Pak for Data pricing information, or to use your existing entitlements, contact your IBM sales representative at +1 (877) 426-3774. For more information about licensing terms, see the IBM License Agreement.
Architecture
Deploying this Quick Start for a new virtual private cloud (VPC) with default parameters builds the following Cloud Pak for Data environment in the AWS Cloud.
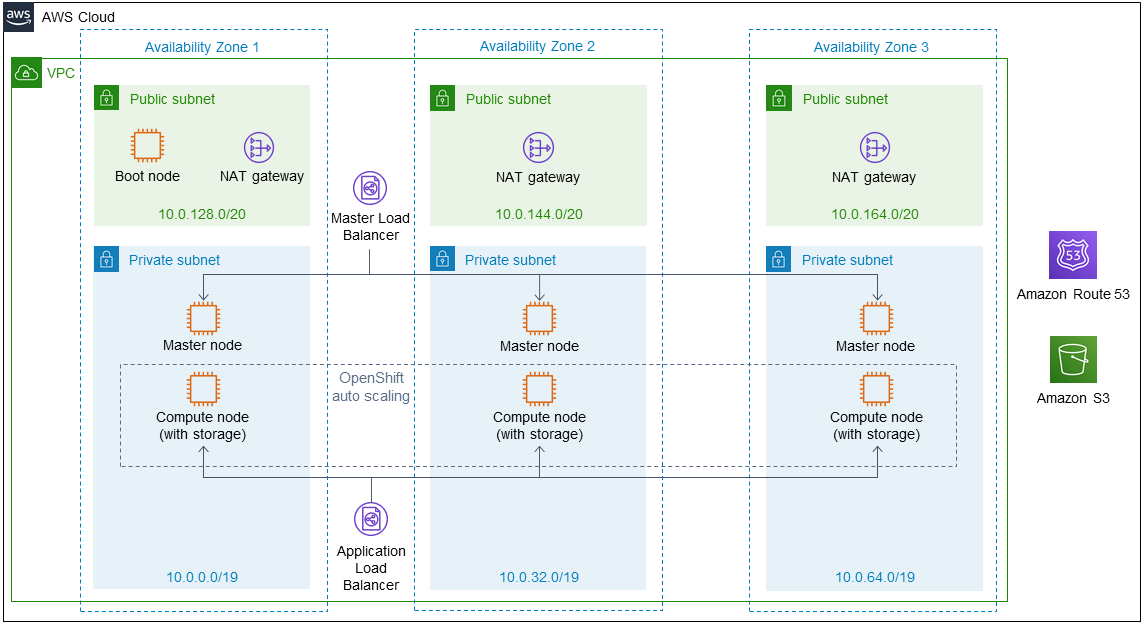
As shown in Figure 1, the Quick Start sets up the following:
-
A highly available architecture that spans one or three Availability Zones.*
-
A VPC configured with public and private subnets, according to AWS best practices, to provide you with your own virtual network on AWS.*
-
In the public subnets:
-
A boot node Amazon Elastic Compute Cloud (Amazon EC2) instance that also serves as a bastion host to allow inbound Secure Shell (SSH) access to EC2 instances in the private subnets.
-
Managed network address translation (NAT) gateways to allow outbound internet access for resources in the private subnets.*
-
-
In the private subnets:
-
OpenShift Container Platform (OCP) master nodes in up to three Availability Zones.
-
OCP compute nodes that combine services by Cloud Pak for Data (Collect, Organize, and Analyze).
-
For container-persistent data, Elastic Block Store disks that are mounted on the compute nodes.
-
-
A Master Load Balancer, which spans the private subnets, for accessing the OCP compute nodes. This provides web-browser access to Cloud Pak for Data.
-
An Application Load Balancer, which spans the private subnets, for accessing the OCP compute nodes.
-
OpenShift auto scaling for the OCP compute nodes.
-
Amazon Route 53, as your public Domain Name System (DNS), for resolving domain names for the IBM Cloud Pak for Data management console.
-
Amazon S3 for storing the pull secret and deployment logs.
*The template that deploys the Quick Start into an existing VPC skips the components marked by asterisks and prompts you for your existing VPC configuration.
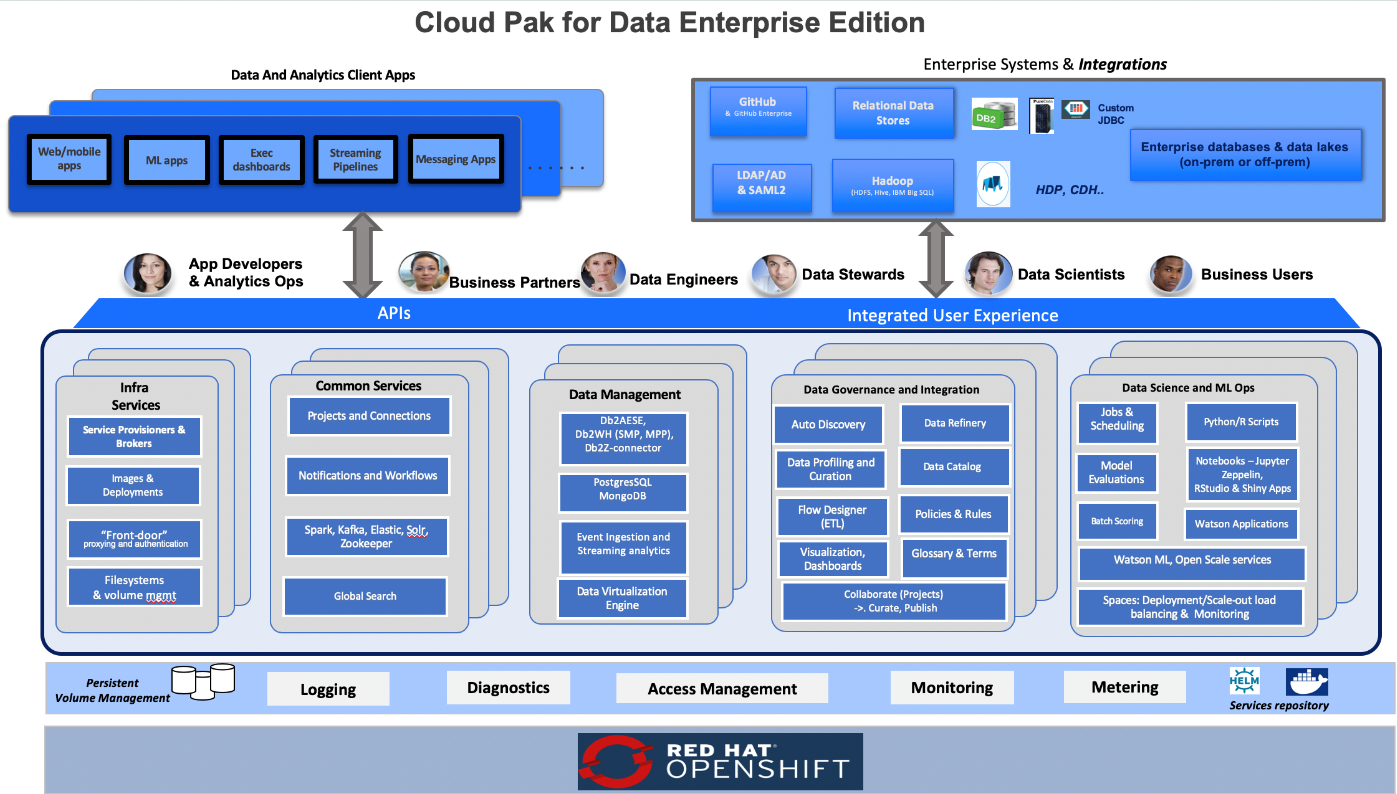
Cloud Pak for Data microservices are preconfigured on compute nodes. The following diagram shows the platform architecture.
Planning the deployment
Specialized knowledge
This deployment requires a moderate level of familiarity with AWS services. If you’re new to AWS, visit Getting Started with AWS and Training and Certification. These sites provide materials for learning how to design, deploy, and operate your infrastructure and applications on the AWS Cloud.
This Quick Start assumes basic familiarity with Cloud Pak for Data components and services. If you‚are new to Cloud Pak for Data and Red Hat OpenShift, see Additional resources.
This Quick Start also assumes familiarity with the OpenShift command line interface and Linux.
AWS account
If you don’t already have an AWS account, create one at https://aws.amazon.com by following the on-screen instructions. Part of the sign-up process involves receiving a phone call and entering a PIN using the phone keypad.
Your AWS account is automatically signed up for all AWS services. You are charged only for the services you use.
Technical requirements
Before you launch the Quick Start, your account must be configured as specified in the following table. Otherwise, deployment might fail.
Resource quotas
If necessary, request service quota increases for the following resources. You might need to request increases if your existing deployment currently uses these resources and if this Quick Start deployment could result in exceeding the default quotas. The Service Quotas console displays your usage and quotas for some aspects of some services. For more information, see What is Service Quotas? and AWS service quotas.
| Resource | This deployment uses |
|---|---|
VPCs |
1 |
Elastic IP addresses |
3 |
Classic Load Balancers |
2 |
Network Load Balancers |
1 |
i3.large instances |
1 |
m5.2xlarge instances |
3 |
m5.4xlarge instances |
3 |
m4.4xlarge instances |
3 (if storage is OCS) |
Supported Regions
This deployment includes 3 Availability Zones, which isn’t currently supported in all AWS Regions. For a current list of supported Regions, see Regions and Availability Zones in the AWS documentation.
| Certain Regions are available on an opt-in basis. See Managing AWS Regions. |
EC2 key pairs
Make sure that at least one Amazon EC2 key pair exists in your AWS account in the Region where you plan to deploy the Quick Start. Make note of the key pair name. You need it during deployment. To create a key pair, see Amazon EC2 key pairs and Linux instances.
For testing or proof-of-concept purposes, we recommend creating a new key pair instead of using one that’s already being used by a production instance.
IAM permissions
Before launching the Quick Start, you must sign in to the AWS Management Console with IAM permissions for the resources that the templates deploy. The AdministratorAccess managed policy within IAM provides sufficient permissions, although your organization may choose to use a custom policy with more restrictions. For more information, see AWS managed policies for job functions.
Sign up for a Red Hat subscription
This Quick Start requires a Red Hat subscription. During the deployment of the Quick Start, provide your OpenShift installer-provisioned infrastructure pull secret.
If you don’t have a Red Hat account, you can register for one through the Red Hat website. (Registration may require a non-personal email address). To procure a 60-day evaluation license for OpenShift, follow the instructions at Evaluate Red Hat OpenShift Container Platform.
The OpenShift pull secret should be uploaded to an S3 bucket. The Quick Start pulls this secret file from the specified S3 bucket location to provision the cluster.
Cloud Pak for Data subscription
When you deploy the Quick Start, you can enable the production instance by entering the API key, which comes as part of the Cloud Pak for Data entitlement. If you don’t have a paid entitlement, you can create a 60-day trial subscription key.
Note: After 60 days, please contact IBM Cloud Pak for Data sales.
Storage subscription
You can choose one of three container-storage options for this Quick Start.
-
Portworx: When you choose Portworx as the persistent storage layer, you must specify your install spec from your Portworx account. You can generate new spec using the spec generator. Choose the edition you want, and then enter the values for the following fields.
-
Basic details:
-
Check Use the Portworx Operator
-
Portworx version: 2.6
-
ETCD: BuiltIn
-
-
Storage details:
-
Environment: Cloud/AWS
-
Choose type of disk: ‚Create using a spec‚
-
Leave the disk type and size as defaults
-
Add additional disk for storage (500 GB recommended per node)
-
-
Network details:
-
Data network interface: auto
-
Management network interface: auto
-
-
Customize details:
-
OpenShift version: 4.x
-
Enable CSI in Advanced Settings.
Accept the Portworx license agreement terms and save the spec with a name. On the Spec list page, choose the spec you created, and then choose Download.
Upload this file to the S3 bucket, and share the value as input for the Portworx spec parameter.
-
-
-
OCS: The Red Hat OCS license is linked as a separate entitlement to your Red Hat subscription. If you do not have a separate subscription for OCS, a 60-day trial version is installed.
-
Amazon EFS: An EFS instance is provisioned in your account and Region when you choose this option.
Deployment options
This Quick Start provides two deployment options:
-
Deploy Cloud Pak for Data into a new VPC. This option builds a new AWS environment consisting of the VPC, subnets, NAT gateways, security groups, bastion hosts, and other infrastructure components. It then deploys Cloud Pak for Data into this new VPC.
-
Deploy Cloud Pak for Data into an existing VPC. This option provisions Cloud Pak for Data in your existing AWS infrastructure.
The Quick Start provides separate templates for these options. It also lets you configure Classless Inter-Domain Routing (CIDR) blocks, instance types, and Cloud Pak for Data settings, as discussed later in this guide.
Deployment steps
Sign in to your AWS account
-
Sign in to your AWS account at https://aws.amazon.com with an IAM user role that has the necessary permissions. For details, see Planning the deployment earlier in this guide.
-
Make sure that your AWS account is configured correctly, as discussed in the Technical requirements section.
Launch the Quick Start
| You are responsible for the cost of the AWS services used while running this Quick Start reference deployment. There is no additional cost for using this Quick Start. For full details, see the pricing pages for each AWS service used by this Quick Start. Prices are subject to change. |
-
Sign in to your AWS account, and choose one of the following options to launch the AWS CloudFormation template. For help with choosing an option, see deployment options earlier in this guide.
| If you’re deploying Cloud Pak for Data into an existing VPC, make sure that your VPC has two private subnets in different Availability Zones for the workload instances, and that the subnets aren’t shared. This Quick Start doesn’t support shared subnets. These subnets require NAT gateways in their route tables, to allow the instances to download packages and software without exposing them to the internet. Also make sure that the domain name option in the DHCP options is configured as explained in DHCP options sets. You provide your VPC settings when you launch the Quick Start. |
Each deployment takes about 3 hours to complete.
-
Check the AWS Region that’s displayed in the upper-right corner of the navigation bar, and change it if necessary. This is where the network infrastructure for Cloud Pak for Data will be built. The template is launched in the us-east-2 Region by default.
-
On the Create stack page, keep the default setting for the template URL, and then choose Next.
-
On the Specify stack details page, change the stack name if needed. Review the parameters for the template. Provide values for the parameters that require input. For details on each parameter, see the Parameter reference section of this guide.
-
On the Configure stack options page, you can specify tags (key-value pairs) for resources in your stack and set advanced options. When you’re finished, choose Next.
-
On the Review page, review and confirm the template settings. Under Capabilities, select the two check boxes to acknowledge that the template creates IAM resources and might require the ability to automatically expand macros.
-
Choose Create stack to deploy the stack.
-
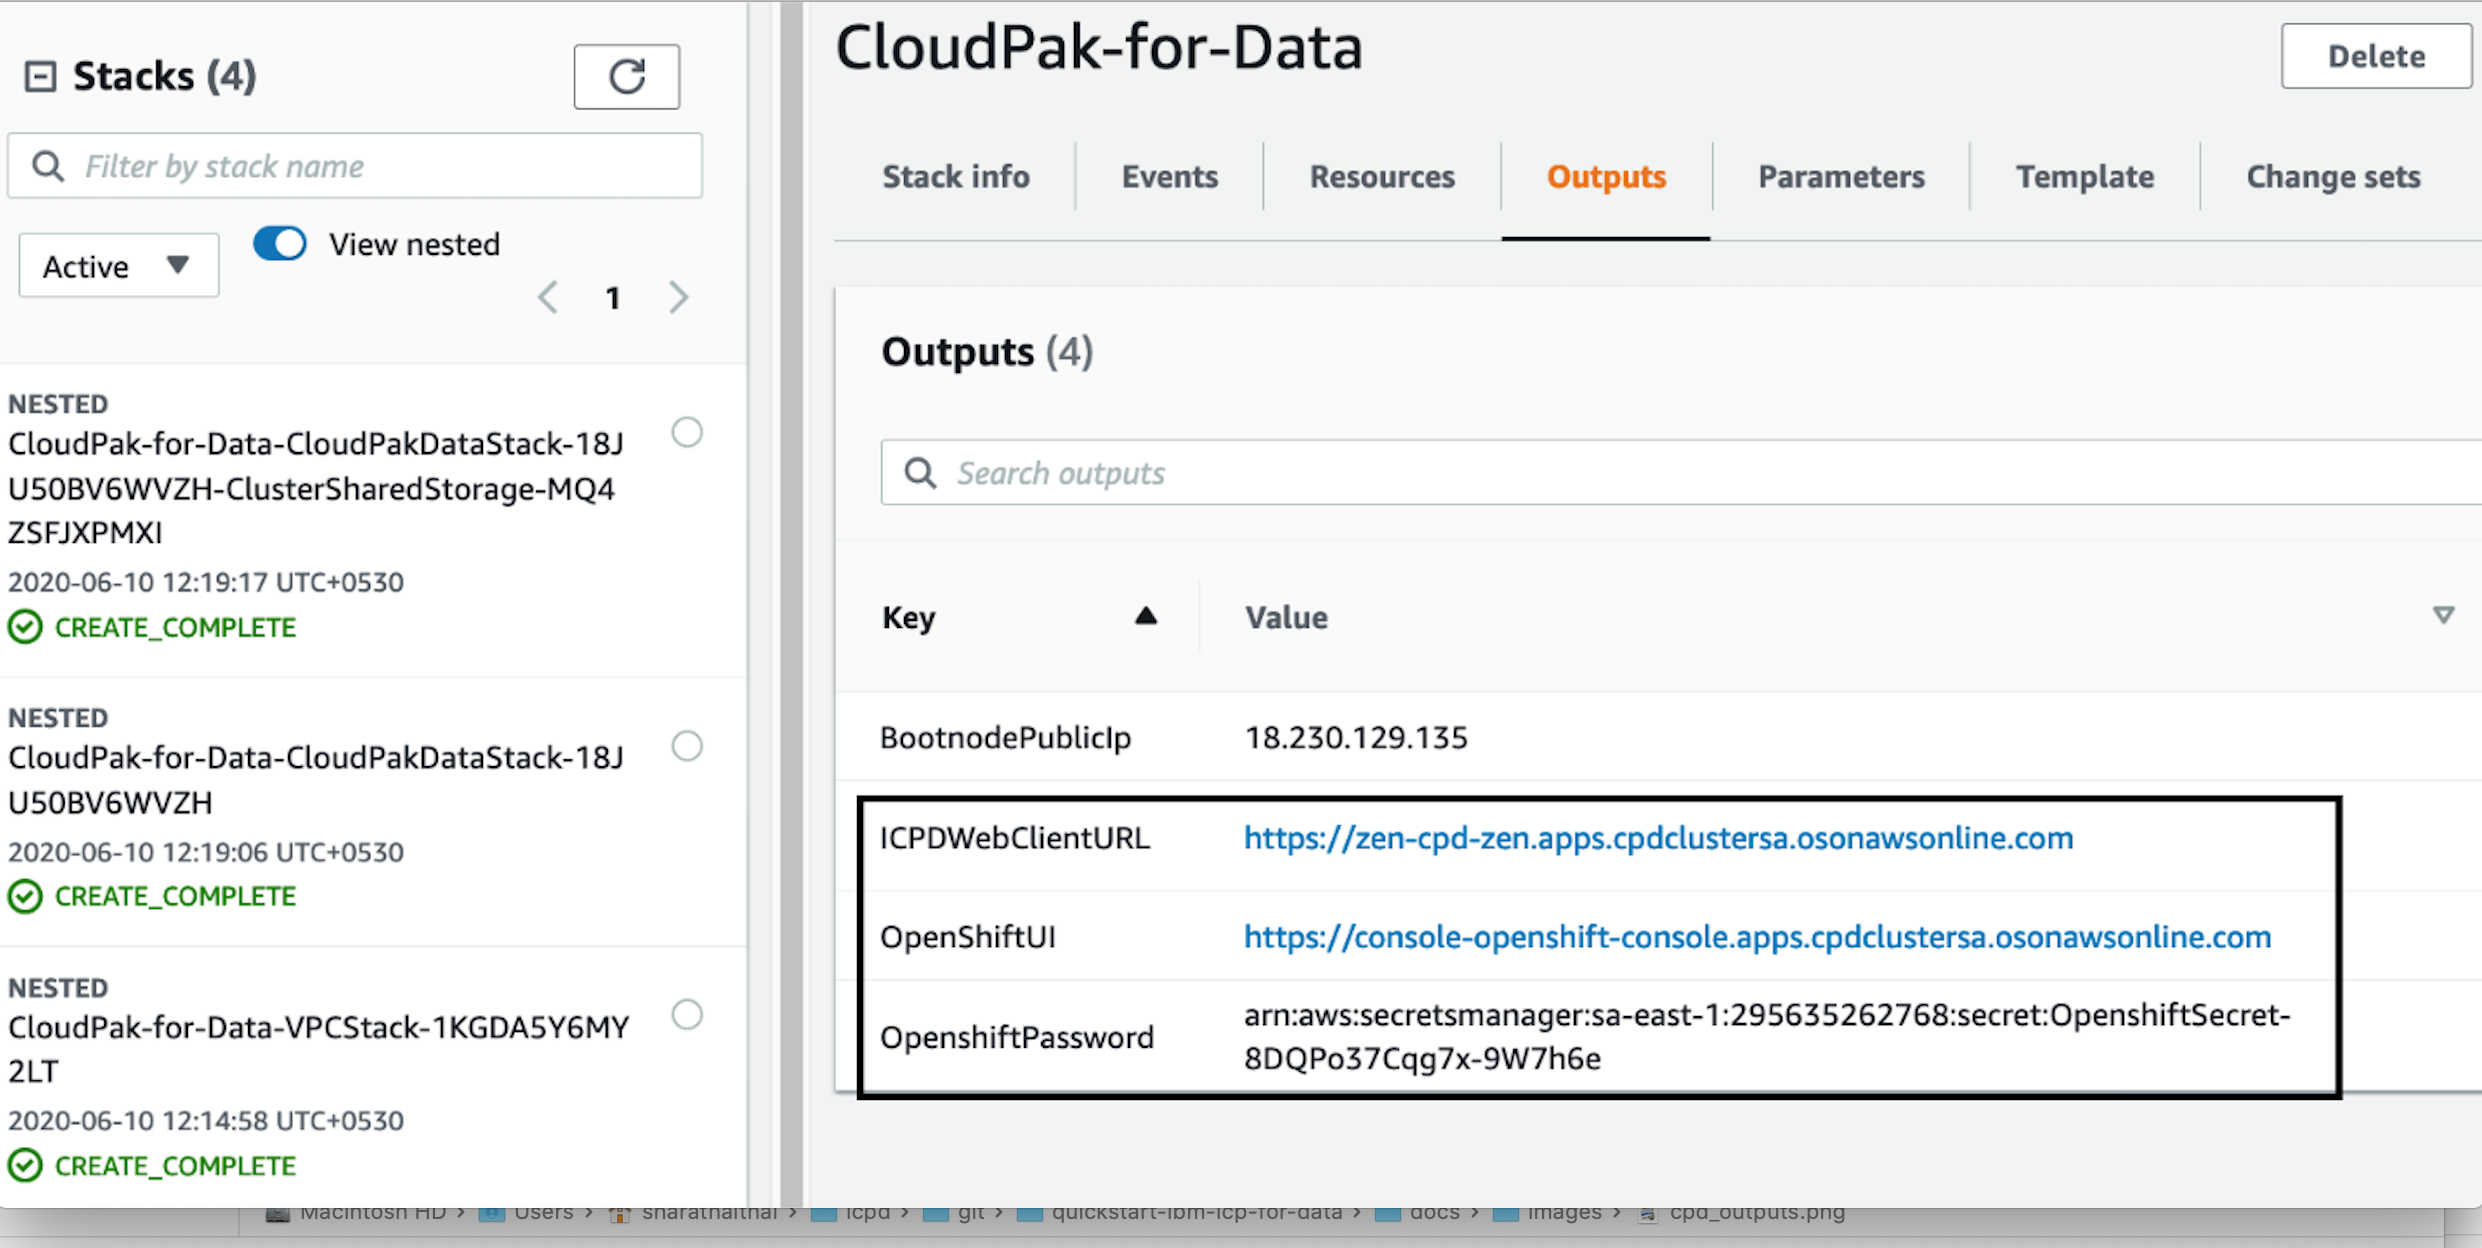
Monitor the status of the stack. When the status is CREATE_COMPLETE, the Cloud Pak for Data deployment is ready.
-
Use the values displayed in the Outputs tab for the stack, as shown in Figure 3, to view the created resources.
Test the deployment
When the AWS CloudFormation template successfully created the stack, all server nodes ran with the software installed in your AWS account. In the following steps, connect to Cloud Pak for Data web client to verify the deployment, and then use the web client to explore Cloud Pak for Data features.
-
To access the Cloud Pak for Data web client, go to the ICPDWebClientURL output of the root stack as shown in Figure 3. For a list of supported browsers, see Supported web browsers.
-
A new tab opens in your browser. If you configured the hostname resolution for the cluster DNS name in the URL, you will see either the Cloud Pak for Data web client login page or a warning from your browser that the HTTPS connection is unsafe. By default, the public key infrastructure (PKI) certificate that is created for the Cloud Pak for Data cluster is self-signed, leading to the unsafe connection warning from your browser.
-
Log in to the Cloud Pak for Data web client by using the default administrator username admin and password you supplied while creating the stack.
-
Once you log in, the welcome page is displayed as shown in Figure 4.
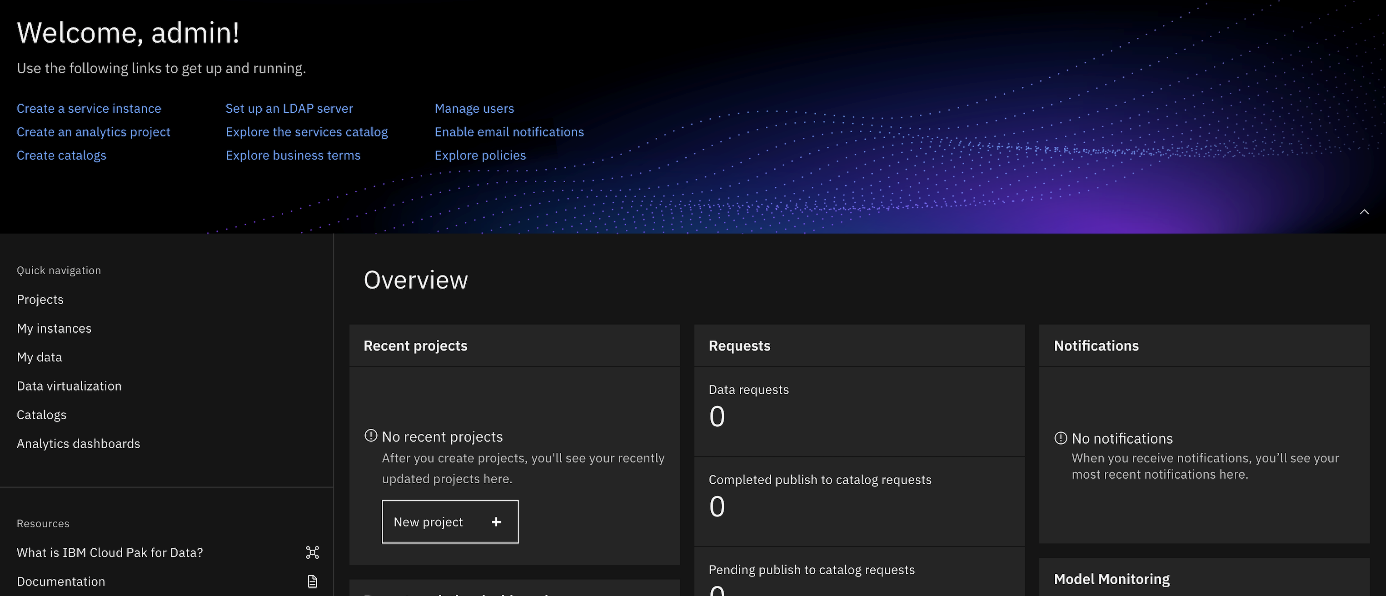
For resources on platform features and capabilities, see the Cloud Pak for Data product hub. To understand its capabilities, see the video tutorials.
Post deployment steps
Manage your cluster using the OpenShift Console
To access the Openshift web console, go to the OpenShiftUI output of the root stack.
-
Log in to the Openshift web console by using the default administrator username admin and password you supplied while creating the stack.
-
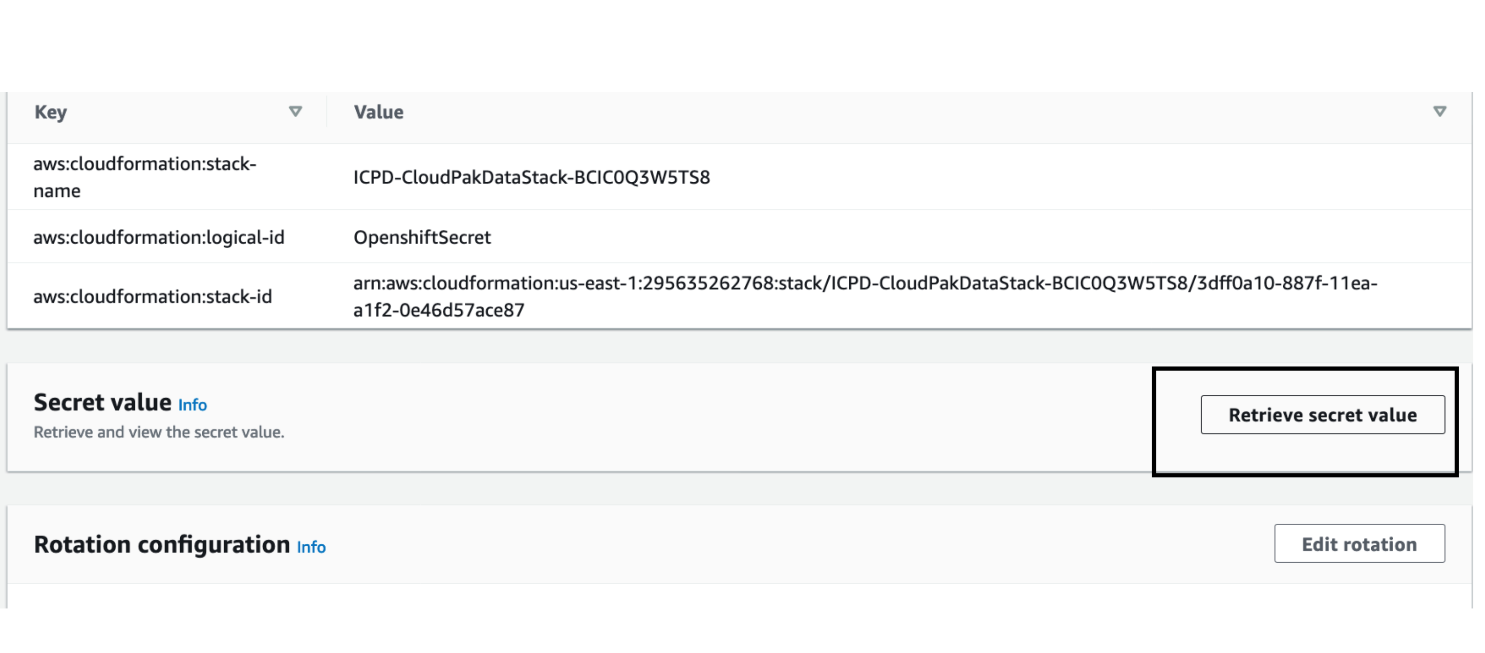
Alternatively, use the default OpenShift administrator kubeadmin. The password can be obtained from the OpenShiftSecret resource.
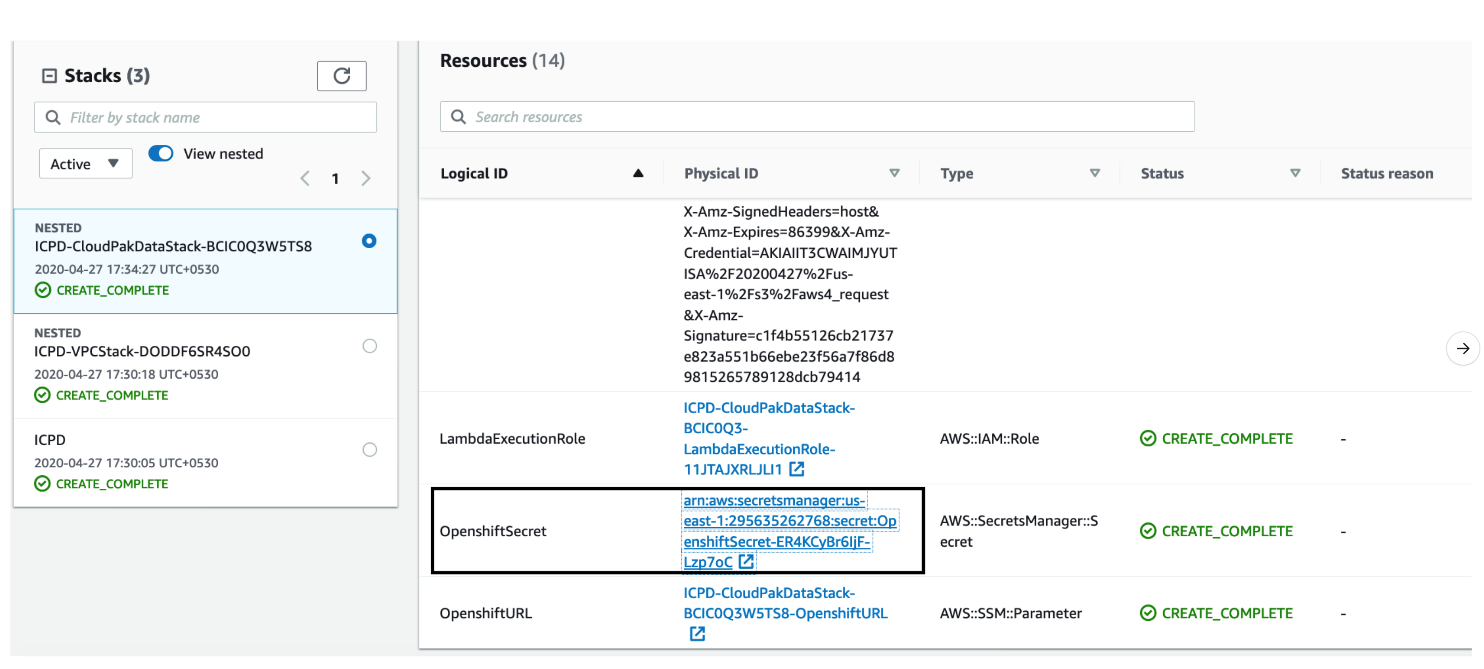
You can retrieve the secret value by choosing Retrieve secret value, as shown. Use the OpenShift console administrative password.
(Optional) Provide boot-node SSH access
The boot-node instance is used for certain command-line cluster administration tasks, such as adding compute nodes. SSH access to the boot node is required for some cluster administrators.
After deployment, you only have access to the boot node. Provide the workstation IP address CIDR as the value of the BootNodeSecurityGroup rule.
This section describes the steps to modify the BootNodeSecurityGroup inbound rules.
Note: These steps assume access to the AWS CloudFormation console for the IBM Cloud Pak for Data deployment.
-
In the list of stacks created viewing the nested stacks, choose the CloudPakDataStack stack.
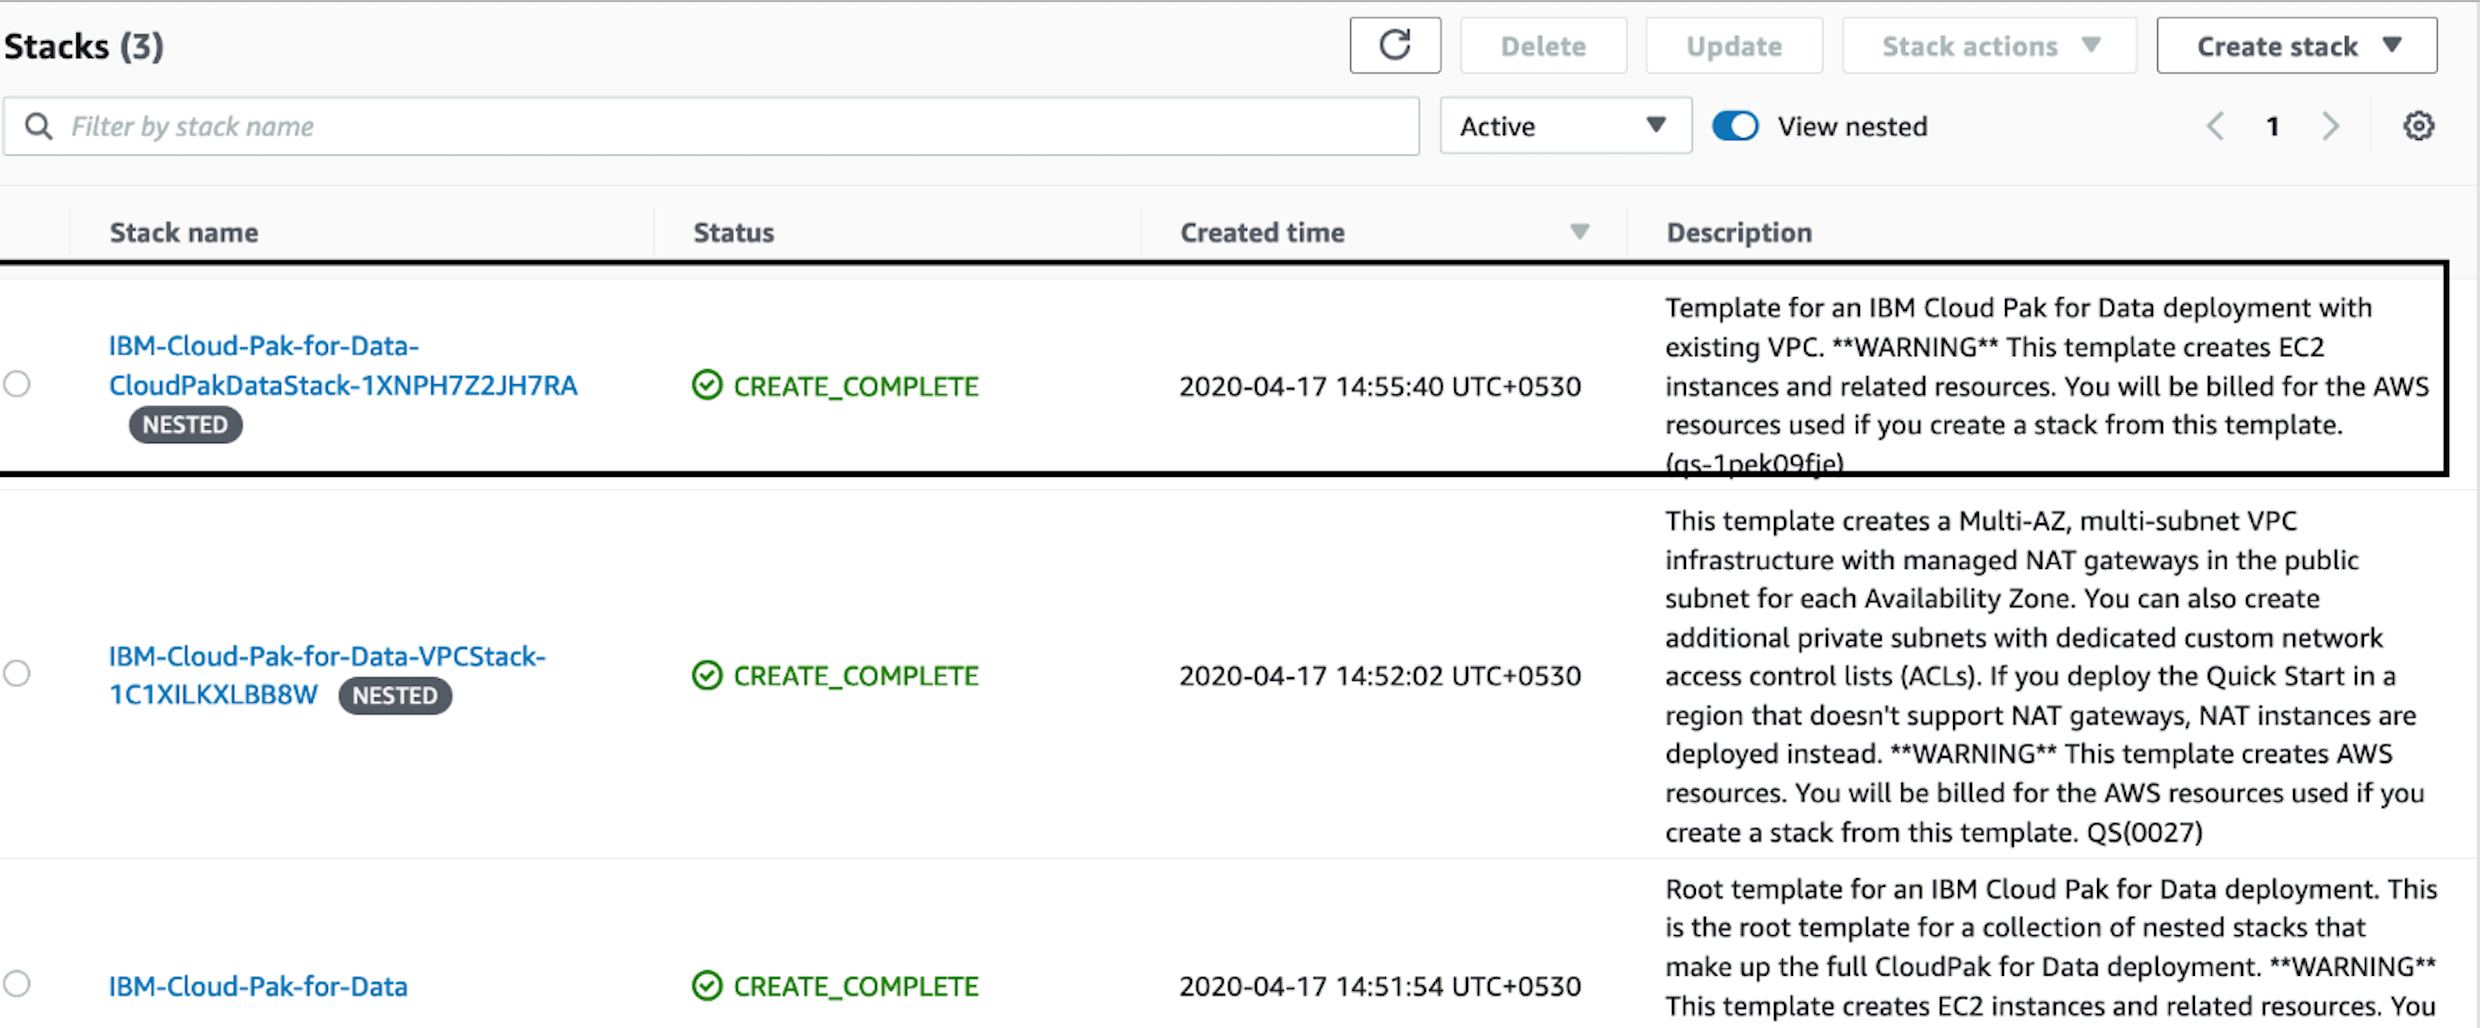 Figure 7. OpenShift stack
 -
In the stack window, choose the Resources tab, and choose BootnodeSecurityGroup.
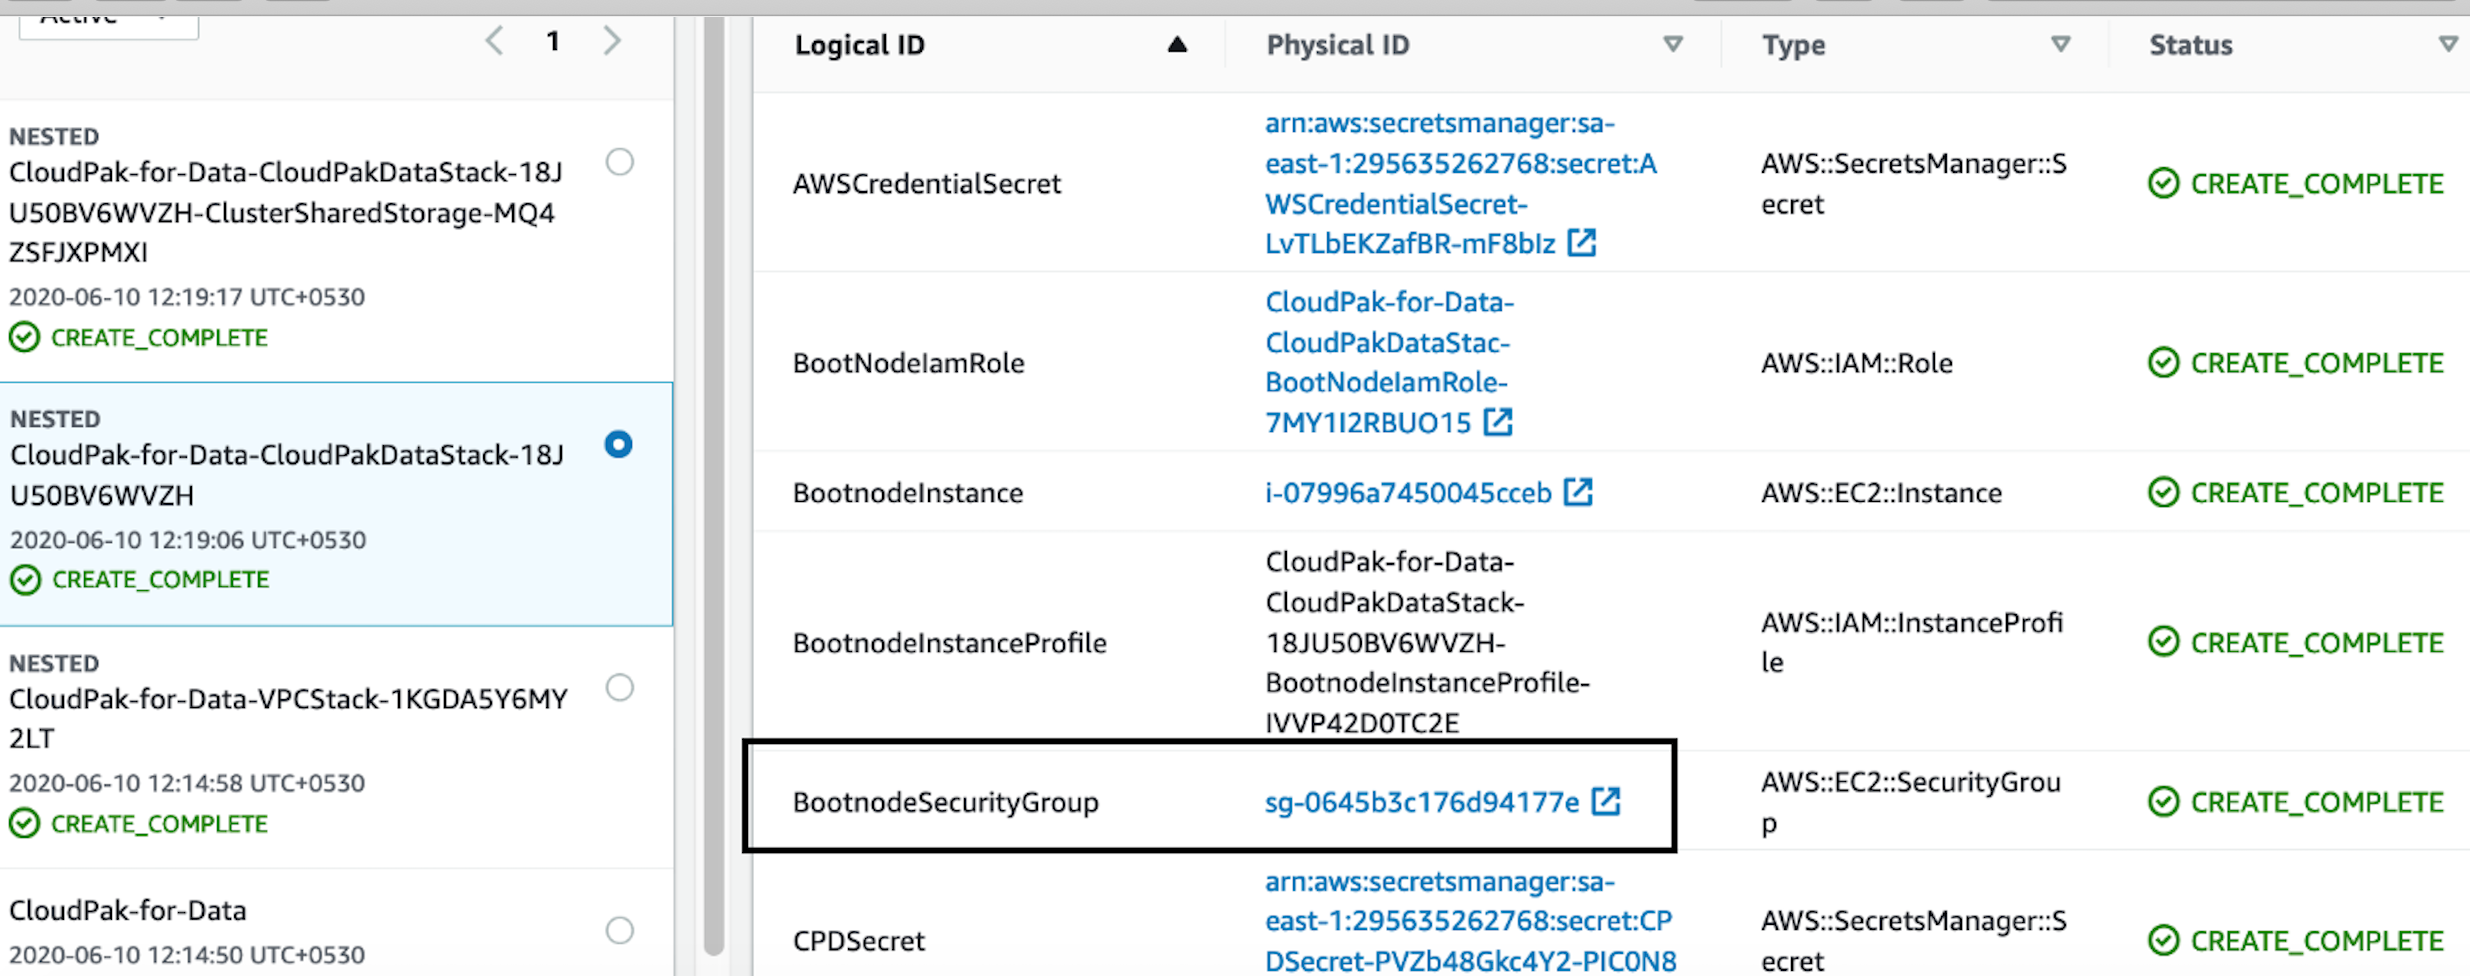 Figure 8. Boot node security group
 -
The security group window displays the ingress rules. On the Inbound tab, choose Edit to bring up the rule editor.
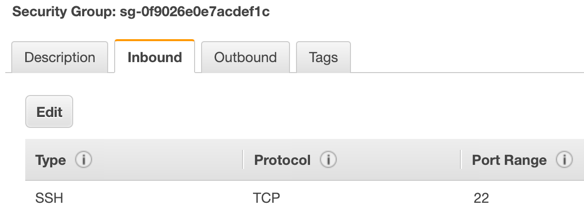 Figure 9. Editing inbound rules
 -
Choose Add rule, and fill in the rule details. Add the network CIDR for the group of IP addresses that you want to permit SSH access to the boot nodes. To allow any IP address, use 0.0.0.0/0.
 Figure 10. Supplying rule details
Accessing the control plane through the boot node
To use SSH access on the OpenShift cluster instances via the bastion host, use SSH agent forwarding, as in the following bash instructions.
-
Run the command
ssh-add -K <your-key.pem>to store the key in your keychain. On Linux, you must omit the-Kflag. -
Retrieve the hostname of the boot node from the Amazon EC2 console.
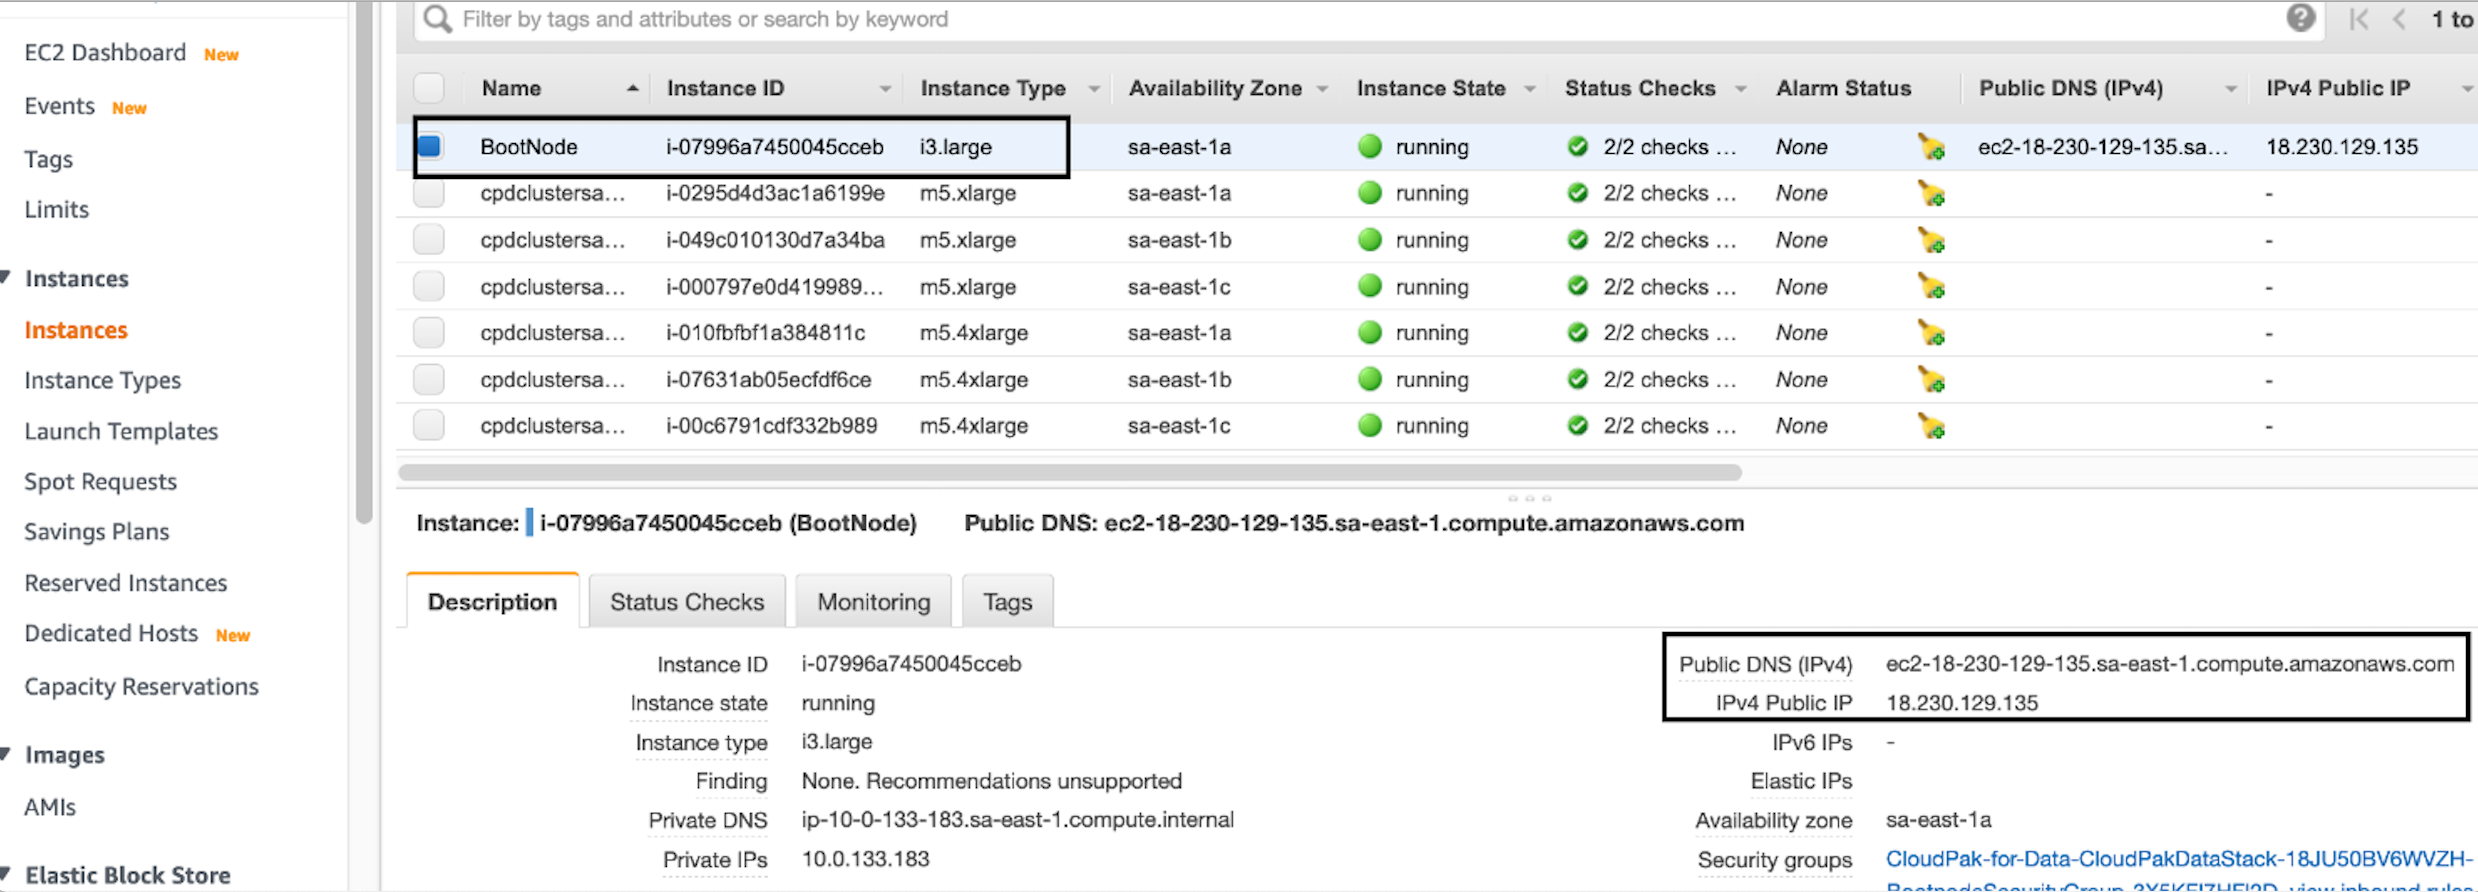 Figure 11. Hostname of the boot node
 -
To log in to the bastion host, run
ssh -A ec2-user@<bootnode-host-name>. -
Run sudo to become root:
$ sudo -s -
To authenticate, run oc login with OpenShift and then oc get pods. Verify that the services are running.
$ oc login
$ oc get pods
Best practices for using Cloud Pak for Data on AWS
Scale up your cluster by adding compute nodes
-
Run
oc nodesto get the current list of nodes. -
Run
oc get machineset -n openshift-machine-apito get the machine sets for each Availability Zone. Figure 12. Machinesets output
 -
From the list returned in the previous command, choose the machine set to scale up.
-
Edit the machine set, and update the replica count.
oc edit machineset cluster-us1-cpd-f6p2l-worker-us-east-1a -n openshift-machine-api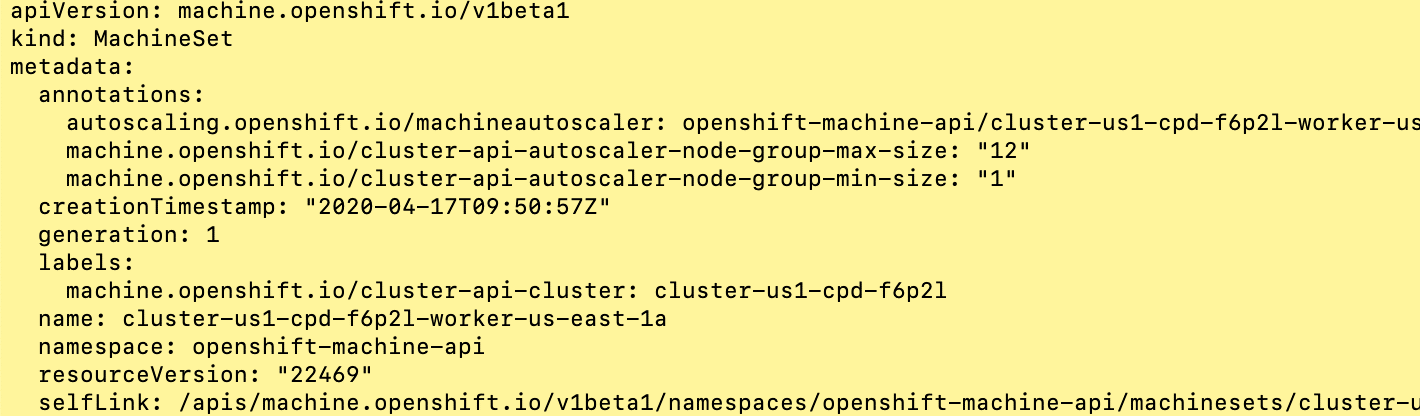 Figure 13. Edit Machineset
 -
An AWS instance is created and desired count and current count are updated to the replica value.
-
After a few minutes, once the node joins the cluster, the available count is updated to the replica value.
| If you choose to scale down your cluster or reduce the number of compute nodes, there is a risk of the cluster becoming unstable because pods must be rescheduled. Scaling down the worker nodes is not a recommended option. |
The cluster auto scaler can overrule scaling activity to maintain the required threshold.
Cloud Pak for Data services
For more information about available services for Cloud Pak for Data, see IBM services in the catalog.
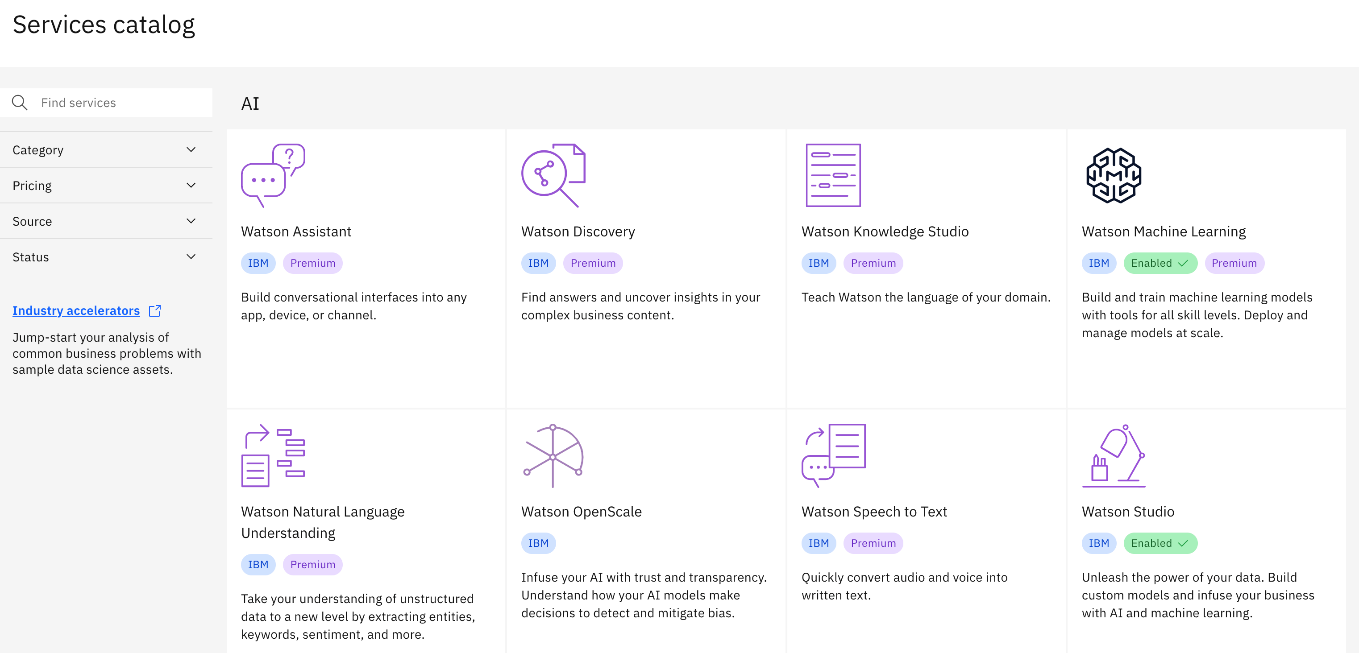
As part of the Quick Start installation, the control plane is installed by default, and the following services can be enabled while creating the stack:
-
Watson Studio
-
Watson Knowledge Catalog
-
Watson Machine Learning
-
Data Virtualization
-
Watson OpenScale
-
Cognos Dashboards Embedded
-
Analytics Engine for Apache Spark
System requirements for each service
| Service name | CPU cores(vCPUs) | Memory |
|---|---|---|
Watson Studio Local (non-HA) |
12 |
48 GB |
Watson Knowledge Catalog (small, non-HA) |
26 |
104 GB |
Watson Machine Learning (small) |
16 |
64 GB |
Data Virtualization (small) |
16 |
64 GB |
Watson OpenScale (small, includes WML) |
30 |
120 GB |
Spark Engine |
7 |
28 GB |
Cognos Dashboard Engine |
4 |
16 GB |
Install a service
-
Log in to your boot-node server as mentioned in access section.
-
Change to the install directory.
-
Run
$ cd /ibm/installDir. -
Run the following commands.
$ cp cpd-service.tpl.yaml cpd-service-<SERVICE_NAME>.yaml

$ vi cpd-service-<SERVICE_NAME>.yaml
$ replace ${SERVICE} with <SERVICE_NAME>
$ replace ${STORAGECLASS} with storageclass value
$ replace ${override-storage} with `portworx` for Portworx storage, `ocs` for Openshift Container Storage and empty for EFS.
$ oc project <PROJECT_NAME> (project name value set via cloudformation)
$ oc create -f cpd-service-<SERVICE_NAME>.yaml
For information about other available services, see the Cloud Pak for Data Service Catalog.
Other useful information
Limitations
-
For the list of supported versions, see the Cloud Pak for Data version (ICPDVersion) parameter in Parameter reference section.
-
The only browsers supported are Google Chrome (version 60 or higher) and Mozilla Firefox (version 54 or higher).
-
Deploying a Cloud Pak for Data cluster with dedicated infrastructure nodes is not currently supported.
-
Review the known issues and limitations for Cloud Pak for Data.
FAQ
Q. I encountered a CREATE_FAILED error when I launched the Quick Start.
A. If AWS CloudFormation fails to create the stack, we recommend that you relaunch the template with Rollback on failure set to Disabled. (This setting is under Advanced in the AWS CloudFormation console, Options page.) With this setting, the stack’s state is retained and the instance remains running, so you can troubleshoot the issue. (Look at the log files in %ProgramFiles%\Amazon\EC2ConfigService and C:\cfn\log.)
Important: When you set Rollback on failure to Disabled, you continue to incur AWS charges for this stack. Ensure to delete the stack when you finish troubleshooting.
For more information, see Troubleshooting AWS CloudFormation.
Q. I encountered a size limitation error when I deployed the AWS CloudFormation templates.
A. We recommend that you launch the Quick Start templates from the links in this guide or from another S3 bucket. If you deploy the templates from a local copy on your computer or from a non-S3 location, you might encounter template size limitations when you create the stack. For more information about AWS CloudFormation limits, see the AWS documentation.
Q. I am not able to delete the stack that I created from the Quick Start.
A. We recommend that you clean up the registry bucket in your S3 account and retry deleting the stack.
Additional resources
AWS resources
AWS services
IBM Cloud Pak for Data documentation * IBM Knowledge Center * Product Hub
Parameter reference
Unless you are customizing the Quick Start templates for your own deployment projects, we recommend that you keep the default settings for the parameters labeled Quick Start S3 bucket name, Quick Start S3 bucket
Region, and Quick Start S3 key prefix. Changing these parameter settings automatically updates code references to point to a new Quick Start location. For more information, see the AWS Quick Start Contributor’s Guide.
|
Parameters for deploying into a new VPC
| Parameter label (name) | Default value | Description |
|---|---|---|
Number of Availability Zones
( |
|
The number of Availability Zones to be used for the deployment. Keep in mind that some regions may be limited to 2 Availability Zones. For a single ICPD cluster to be highly available, 3 Availability Zones are needed to avoid a single point of failure when using 3, 5 or 7 master nodes. With less than 3 Availability Zones, one of the AZs will have more master nodes. |
Availability Zones
( |
|
The list of Availability Zones to use for the subnets in the VPC. The Quick Start uses one or three Availability Zones and preserves the logical order you specify. |
VPC CIDR
( |
|
CIDR block for the VPC |
Private subnet 1 CIDR
( |
|
The CIDR block for the private subnet located in Availability Zone 1. |
Private subnet 2 CIDR
( |
|
The CIDR block for the private subnet located in Availability Zone 2. |
Private subnet 3 CIDR
( |
|
The CIDR block for the private subnet located in Availability Zone 3. |
Public subnet 1 CIDR
( |
|
The CIDR block for the public subnet located in Availability Zone 1. |
Public subnet 2 CIDR
( |
|
The CIDR block for the public subnet located in Availability Zone 2. |
Public subnet 3 CIDR
( |
|
The CIDR block for the public subnet located in Availability Zone 3. |
Boot node external access CIDR
( |
|
The CIDR IP range that is permitted to access boot node instance. We recommend that you set this value to a trusted IP range. The value |
Cluster network CIDR
( |
|
The Cluster Network CIDR IP range that is used as IP address pools for pods. |
| Parameter label (name) | Default value | Description |
|---|---|---|
Domain name
( |
|
Amazon Route 53 base domain configured for your OpenShift Container Platform cluster. Name must consist of lower case alphanumeric characters and must start and end with an alphanumeric character. |
| Parameter label (name) | Default value | Description |
|---|---|---|
Key pair name
( |
|
The name of an existing public/private key pair, which allows you to securely connect to your instance after it launches. |
| Parameter label (name) | Default value | Description |
|---|---|---|
Number of master nodes
( |
|
The desired capacity for the OpenShift master instances. Must be an odd number. A minimum of 3 is required. |
Number of compute nodes
( |
|
The desired capacity for the OpenShift compute instances. Minimum of 3 nodes required. If the number of compute instances exceeds your Red Hat entitlement limits or AWS instance limits, the stack will fail. Choose a number that is within your limits. |
Master instance type
( |
|
The EC2 instance type for the OpenShift master instances. |
Compute instance type
( |
|
The EC2 instance type for the OpenShift compute instances. |
Cloud Pak for Data UI password
( |
|
The password for the Cloud Pak for Data web client. The password must contain at least 8 characters, including letters (with a minimum of one capital letter), numbers, and symbols. |
Cluster name
( |
|
Custom cluster name for kubernetes.io/cluster/tags. |
Enable Fips
( |
|
Enable Fips for Openshift |
Publish the user-facing endpoints of your cluster.
( |
|
Choose Internal to deploy a private cluster. For details visit OpenShift documentation (https://docs.openshift.com/container-platform/4.5/installing/installing_aws/installing-aws-private.html) |
| Parameter label (name) | Default value | Description |
|---|---|---|
Cluster storage type
( |
|
Select either EFS, Portworx or Openshift Container Storage as default Storage class. |
Portworx spec file
( |
|
Update this value if Storage type selected is Portworx. S3 path of Portworx Spec (e.g., s3://my-bucket/path/to/portworxspec.yaml). |
Number of OCS nodes
( |
|
Update this value if Storage type selected is OCS. The desired capacity for the OpenShift container storage instances. Minimum of 3 is required. |
OCS instance type
( |
|
Update this value if Storage type selected is OCS. The EC2 instance type for the OpenShift Container Storage instances. |
| Parameter label (name) | Default value | Description |
|---|---|---|
Red Hat pull secret
( |
|
S3 path of OpenShift Installer Provisioned Infrastructure pull secret(e.g., s3://my-bucket/path/to/pull-secret). |
| Parameter label (name) | Default value | Description |
|---|---|---|
License agreement
( |
|
I have read and agree to the license terms for IBM Cloud Pak for Data (https://ibm.biz/BdfEkc). |
IBM Cloud Pak for Data version
( |
|
The version of Cloud Pak for Data to be deployed. Currently only v3.5 is supported. |
IBM Cloud Pak for Data API user name
( |
|
The IBM Cloud Pak for Data user name to access IBM Container Registry. |
IBM Cloud Pak for Data API key
( |
|
The IBM Cloud Pak for Data API key to access IBM Container Registry. |
OpenShift project
( |
|
The OpenShift project that will be created for deploying Cloud Pak for Data. It can be any lowercase string. |
Output S3 bucket name
( |
|
The name of the S3 bucket where IBM Cloud Pak for Data deployment logs are to be exported. The deployment logs provide a record of the boot strap scripting actions and are useful for problem determination if the deployment fails in some way. |
Watson Knowledge Catalog service
( |
|
Choose True to install the Watson Knowledge Catalog service. |
Watson Machine Learning service
( |
|
Choose True to install the Watson Machine Learning service. |
Data Virtualization service
( |
|
Choose True to install the Data Virtualization service. |
Watson Studio service
( |
|
Choose True to install the Watson Studio service. |
Watson OpenScale and Watson Machine Learning services
( |
|
Choose True to install the Watson OpenScale and Watson Machine Learning services. |
Analytics Engine powered by Apache Spark service
( |
|
Choose True to install the Analytics Engine powered by Apache Spark service. |
Cognos Dashboard service
( |
|
Choose True to install the Cognos Dashboard Engine service. |
| Parameter label (name) | Default value | Description |
|---|---|---|
Quick Start S3 bucket name
( |
|
S3 bucket name for the Quick Start assets. This string can include numbers, lowercase letters, uppercase letters, and hyphens (-). It cannot start or end with a hyphen (-). |
Quick Start S3 bucket region
( |
|
The AWS Region where the Quick Start S3 bucket (QSS3BucketName) is hosted. When using your own bucket, you must specify this value. |
Quick Start S3 key prefix
( |
|
S3 key prefix for the Quick Start assets. Quick Start key prefix can include numbers, lowercase letters, uppercase letters, hyphens (-), and forward slash (/). |
Parameters for deploying into an existing VPC
| Parameter label (name) | Default value | Description |
|---|---|---|
Number of Availability Zones
( |
|
The number of Availability Zones to be used for the deployment. Keep in mind that some regions may be limited to two Availability Zones. For a single IBM Cloud Pak for Data cluster to be highly available, three Availability Zones are needed to avoid a single point of failure when using three, five, or seven master nodes. With fewer than three Availability Zones, one of the AZs will have more master nodes. |
Availability Zones
( |
|
The list of Availability Zones to use for the subnets in the VPC. The Quick Start uses one or three Availability Zones and preserves the logical order you specify. |
VPC ID
( |
|
The ID of your existing VPC for deployment. |
VPC CIDR
( |
|
The CIDR block of the existing VPC. |
Private subnet 1 ID
( |
|
The ID of the private subnet in Availability Zone 1 for the workload (e.g., subnet-a0246dcd). |
Private subnet 2 ID
( |
|
The ID of the private subnet in Availability Zone 2 for the workload (e.g., subnet-b1f432cd). |
Private subnet 3 ID
( |
|
The ID of the private subnet in Availability Zone 3 for the workload (e.g., subnet-b1f4a2cd). |
Public subnet 1 ID
( |
|
The ID of the public subnet in Availability Zone 1 for the ELB load balancer (e.g., subnet-9bc642ac). |
Public subnet 2 ID
( |
|
The ID of the public subnet in Availability Zone 2 for the ELB load balancer (e.g., subnet-e3246d8e). |
Public subnet 3 ID
( |
|
The ID of the public subnet in Availability Zone 3 for the ELB load balancer (e.g., subnet-e324ad8e). |
Boot node external access CIDR
( |
|
The CIDR IP range that is permitted to access boot node instance. We recommend that you set this value to a trusted IP range. The value |
Cluster network CIDR
( |
|
The Cluster Network CIDR IP range that is used as IP address pools for pods. |
| Parameter label (name) | Default value | Description |
|---|---|---|
Domain name
( |
|
Amazon Route53 base domain configured for your OpenShift Container Platform cluster. Name must consist of lower case alphanumeric characters and must start and end with an alphanumeric character. |
| Parameter label (name) | Default value | Description |
|---|---|---|
Key pair name
( |
|
The name of an existing public/private key pair, which allows you to securely connect to your instance after it launches. |
| Parameter label (name) | Default value | Description |
|---|---|---|
Number of master nodes
( |
|
The desired capacity for the OpenShift master instances. Must be an odd number.A minimum of 3 is required. |
Number of compute nodes
( |
|
The desired capacity for the OpenShift compute instances. Minimum of 3 nodes required. If the number of compute instances exceeds your Red Hat entitlement limits or AWS instance limits, the stack will fail. Choose a number that is within your limits. |
Master instance type
( |
|
The EC2 instance type for the OpenShift master instances. |
Compute instance type
( |
|
The EC2 instance type for the OpenShift compute instances. |
Cloud Pak for Data UI password
( |
|
The password for the Cloud Pak for Data web client. The password must contain at least 8 characters, including letters (with a minimum of one capital letter), numbers, and symbols. |
Cluster name
( |
|
Custom cluster name for kubernetes.io/cluster/tags. |
Enable Fips
( |
|
Enable Fips for Openshift |
Publish the user-facing endpoints of your cluster.
( |
|
To Deploy a Private cluster select Internal and External for Public cluster |
| Parameter label (name) | Default value | Description |
|---|---|---|
Cluster storage type
( |
|
Select either Portworx or Openshift Container Storage as default Storage class. |
Portworx spec file
( |
|
Update this value if Storage type selected is Portworx. S3 path of Portworx Spec(e.g., s3://my-bucket/path/to/portworxspec.yaml). |
Number of ocs nodes
( |
|
TUpdate this value if Storage type selected is OCS. he desired capacity for the OpenShift container storage instances. Minimum of 3 is required. |
OCS instance type
( |
|
Update this value if Storage type selected is OCS. The EC2 instance type for the OpenShift Container Storage instances. |
| Parameter label (name) | Default value | Description |
|---|---|---|
Red Hat pull secret
( |
|
Your Red Hat Network (RHN) pull secret(e.g., s3://my-bucket/path/to/portworxspec.yaml). |
| Parameter label (name) | Default value | Description |
|---|---|---|
License agreement
( |
|
I have read and agree to the license terms for IBM Cloud Pak for Data (https://ibm.biz/BdfEkc). |
IBM Cloud Pak for Data version
( |
|
The version of Cloud Pak for Data to be deployed. Currently only v3.5 is supported. |
IBM Cloud Pak for Data API user name
( |
|
The IBM Cloud Pak for Data user name to access IBM Container Registry. |
IBM Cloud Pak for Data API key
( |
|
The IBM Cloud Pak for Data API key to access IBM Container Registry. |
OpenShift project
( |
|
The OpenShift project that will be created for deploying Cloud Pak for Data. It can be any lowercase string. |
Output S3 bucket name
( |
|
The name of the S3 bucket where IBM Cloud Pak for Data deployment logs are to be exported. The deployment logs provide a record of the boot strap scripting actions and are useful for problem determination if the deployment fails in some way. |
Watson Knowledge Catalog service
( |
|
Choose True to install the Watson Knowledge Catalog service. |
Watson Machine Learning service
( |
|
Choose True to install the Watson Machine Learning service. |
Data Virtualization service
( |
|
Choose True to install the Data Virtualization service. |
Watson Studio service
( |
|
Choose True to install the Watson Studio service. |
Watson OpenScale and Watson Machine Learning services
( |
|
Choose True to install the Watson OpenScale and Watson Machine Learning services. |
Analytics Engine powered by Apache Spark service
( |
|
Choose True to install the Analytics Engine powered by Apache Spark service. |
Cognos Dashboard service
( |
|
Choose True to install the Cognos Dashboard Engine service. |
| Parameter label (name) | Default value | Description |
|---|---|---|
Quick Start S3 bucket name
( |
|
S3 bucket name for the Quick Start assets. This string can include numbers, lowercase letters, uppercase letters, and hyphens (-). It cannot start or end with a hyphen (-). |
Quick Start S3 bucket region
( |
|
The AWS Region where the Quick Start S3 bucket (QSS3BucketName) is hosted. When using your own bucket, you must specify this value. |
Quick Start S3 key prefix
( |
|
S3 key prefix for the Quick Start assets. Quick Start key prefix can include numbers, lowercase letters, uppercase letters, hyphens (-), and forward slash (/). |
Send us feedback
To post feedback, submit feature ideas, or report bugs, use the Issues section of the GitHub repository for this Quick Start. To submit code, see the Quick Start Contributor’s Guide.
Quick Start reference deployments
See the AWS Quick Start home page.
GitHub repository
Visit our GitHub repository to download the templates and scripts for this Quick Start, to post your comments, and to share your customizations with others.
Notices
This document is provided for informational purposes only. It represents AWS’s current product offerings and practices as of the date of issue of this document, which are subject to change without notice. Customers are responsible for making their own independent assessment of the information in this document and any use of AWS’s products or services, each of which is provided “as is” without warranty of any kind, whether expressed or implied. This document does not create any warranties, representations, contractual commitments, conditions, or assurances from AWS, its affiliates, suppliers, or licensors. The responsibilities and liabilities of AWS to its customers are controlled by AWS agreements, and this document is not part of, nor does it modify, any agreement between AWS and its customers.
The software included with this paper is licensed under the Apache License, version 2.0 (the "License"). You may not use this file except in compliance with the License. A copy of the License is located at http://aws.amazon.com/apache2.0/ or in the accompanying "license" file. This code is distributed on an "AS IS" BASIS, WITHOUT WARRANTIES OR CONDITIONS OF ANY KIND, either expressed or implied. See the License for specific language governing permissions and limitations.