Industrial Machine Connectivity on the AWS Cloud
Quick Start Reference Deployment

February 2021
Thomas Cummins and Krishna Doddapaneni, AWS IoT Partner team
Shivansh Singh, AWS Integration & Automation team
| Visit our GitHub repository for source files and to post feedback, report bugs, or submit feature ideas for this Quick Start. |
This Quick Start was created by Amazon Web Services (AWS). Quick Starts are automated reference deployments that use AWS CloudFormation templates to deploy key technologies on AWS, following AWS best practices.
Overview
This guide provides instructions for deploying the Industrial Machine Connectivity (IMC) Quick Start reference architecture on the AWS Cloud.
The Quick Start helps you bring data from your Industrial Internet of Things (IIoT) assets to the AWS Cloud in a structured way. It’s for developers and AWS Partners, regional and global systems integrators, independent software vendors, and original equipment manufacturers who want to generate immediate business value from an IIoT architecture.
Industrial Machine Connectivity on AWS
The primary objective of the IMC Quick Start is to help AWS Partners deliver a proof of concept that addresses a use case of high value to the customer. For example, the customer might want to start by visualizing near-real-time operational metrics and analyzing root causes when a line goes down. After a successful proof of concept, the partner and customer may work together to build out the production architecture to address other critical use cases.
The IMC architecture includes AWS managed IoT edge services and AWS-qualified edge hardware. You can use a range of programmable logic controllers (PLCs). And you can publish data over various protocols: HTTPS, MQTT (Message Queuing Telemetry Transport), and OPC Unified Architecture (UA). With this Quick Start, you can automate production rollout of a connected-factory architecture across multiple sites. You can organize, store, and manage your IIoT data in various ways:
-
Create or transfer virtual assets.
-
Create or transfer asset hierarchies.
-
Create a time-series hot-data store.
-
Transfer data from a historian or a SCADA (supervisory control and data acquisition) system.
-
Archive cold data in Amazon Simple Storage Service (Amazon S3).
When you launch the IMC Quick Start, an AWS CloudFormation template automates the deployment of resources into your AWS account. You deploy this Quick Start in either virtual mode (for evaluation and training) or physical mode (for customer deployments). The mode you choose depends on whether your edge hardware is virtual or physical. The architecture for virtual edge hardware includes an Amazon Elastic Compute Cloud (Amazon EC2) instance. The architecture for physical edge hardware includes an industrial PC on the customer’s premises. The mode determines the way you configure connectivity and security. All other cloud-based resources are largely the same for virtual and physical deployments.
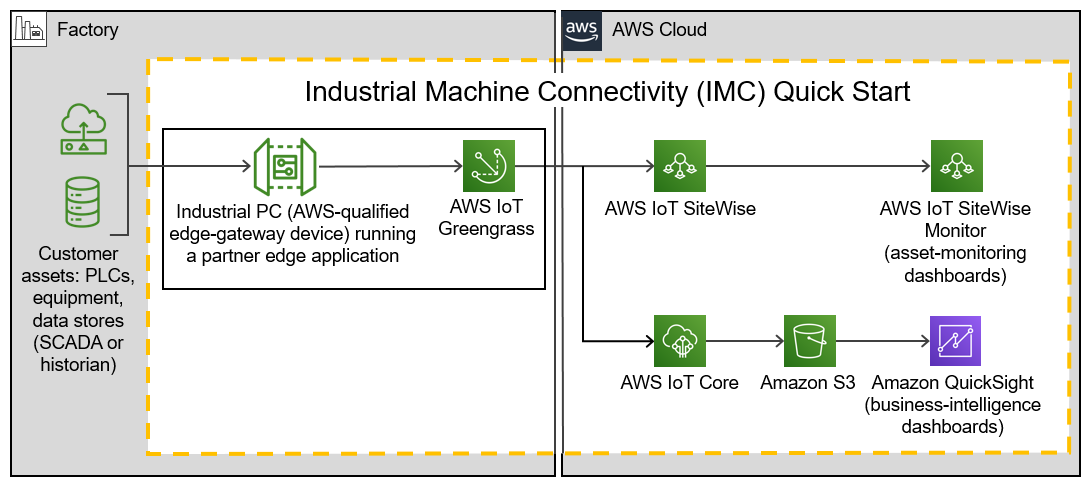
Figure 1 shows a high-level view of a physical deployment. The dotted orange box outlines the IMC Quick Start’s main components.
-
In the factory:
-
AWS IoT Greengrass runs on an industrial PC (an AWS-qualified edge-gateway device). AWS IoT Greengrass ingests data from a partner edge application, such as Inductive Automation’s Ignition or PTC’s KEPServerEX.
-
The partner edge application translates the data from the customer assets—including PLCs, equipment, and data stores (SCADA or historian)—into industrial protocols.
-
-
In the AWS Cloud:
-
AWS IoT SiteWise stores the metadata for the asset-model hierarchy of the industrial assets on the factory floor. It also contains a managed database for the time-series data generated by these assets.
-
After the hierarchy is defined in AWS IoT SiteWise, the partner edge application continuously ingests the asset data and transmits it to the AWS Cloud through a SiteWise connector within AWS IoT Greengrass.
-
AWS IoT SiteWise serves as the hot-storage tier for both time-series data and metadata. All this data, including the metadata, is accessible to applications that can generate business value from it.
-
The AWS IoT SiteWise Monitor feature enables you to build dashboards to visualize near-real-time time-series data stored in AWS IoT SiteWise’s time-series database.
-
-
AWS IoT Core receives and routes MQTT messages either directly from the partner edge application or from the AWS IoT Greengrass core.
-
Amazon S3 can serve as a cold-storage tier for data.
-
Amazon QuickSight lets you build custom business-intelligence dashboards and visualizations for data stored in the S3 bucket.
-
AWS costs
You are responsible for the cost of the AWS services and any third-party licenses used while running this Quick Start. There is no additional cost for using the Quick Start.
The AWS CloudFormation templates for Quick Starts include configuration parameters that you can customize. Some of the settings, such as the instance type, affect the cost of deployment. For cost estimates, see the pricing pages for each AWS service you use. Prices are subject to change.
| After you deploy the Quick Start, create AWS Cost and Usage Reports to deliver billing metrics to an Amazon Simple Storage Service (Amazon S3) bucket in your account. These reports provide cost estimates based on usage throughout each month and aggregate the data at the end of the month. For more information, see What are AWS Cost and Usage Reports? |
Software licenses
No licenses are required to deploy this Quick Start. All AWS service resources consumed during the launch of the Quick Start incur AWS service usage costs.
Some configurations of the IMC Quick Start involve the use of a partner edge application. You are responsible for obtaining a license directly from the software vendor. Applications that integrate with the IMC Quick Start are available from the following vendors:
-
Inductive Automation, vendor for Ignition.
-
Cirrus Link, vendor for the MQTT transmission module for the Ignition software stack.
-
PTC, vendor for KEPServerEX.
-
Other vendors to be added.
Architecture
Virtual deployment
When you deploy this Quick Start in virtual mode, you build the following Industrial Machine Connectivity environment in the AWS Cloud. Elements of the Quick Start are outlined in the dotted orange box.
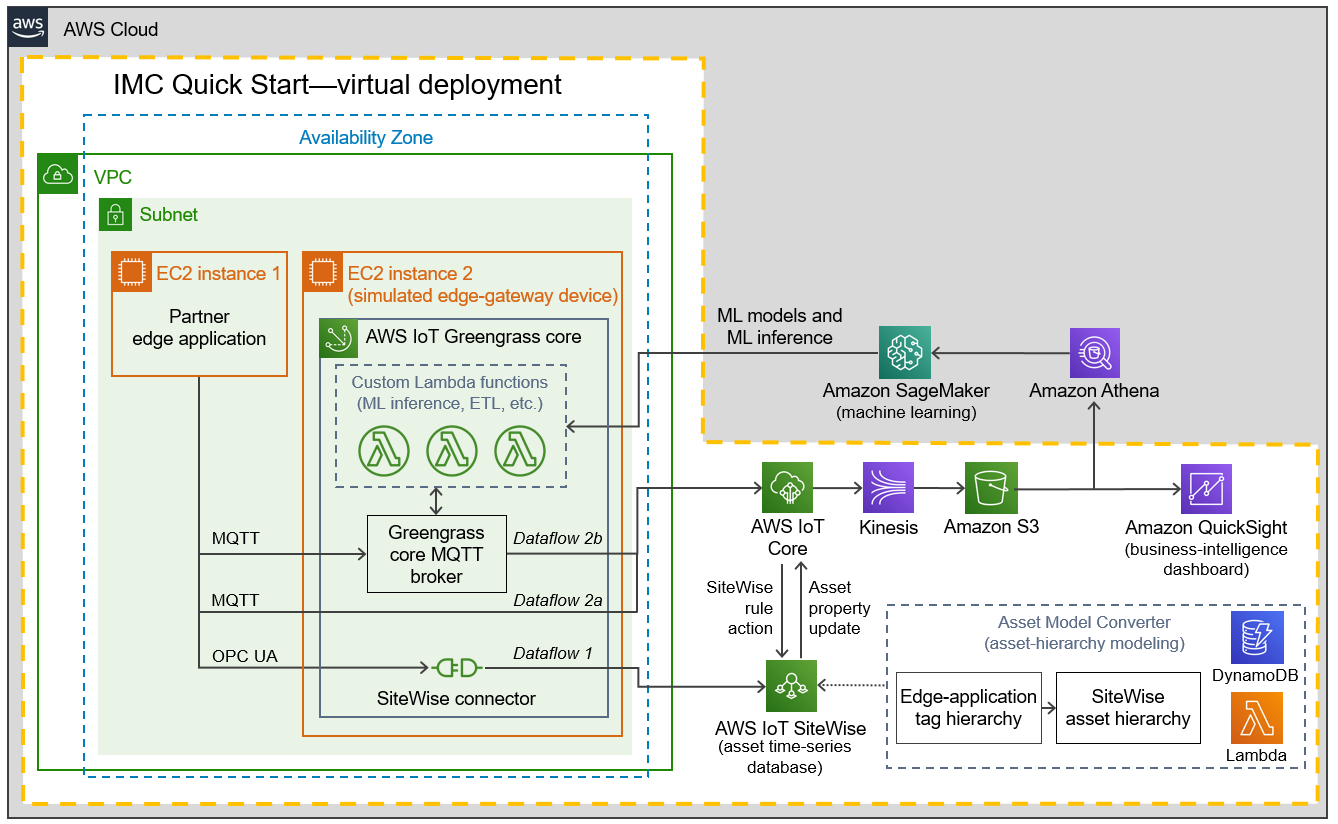
As shown in Figure 2, the virtual deployment of the IMC Quick Start sets up the following:
-
A virtual private cloud (VPC). The VPC is configured with a public subnet within a single Availability Zone. The IMC Quick Start can be launched in the default VPC of your existing AWS infrastructure, or it can generate a new VPC.*
-
In the subnet:
-
EC2 instance 1. This instance is for the partner edge application.
-
EC2 instance 2. This instance is for the AWS IoT Greengrass core.* It simulates the edge-gateway device (industrial PC) that would run on the customer’s premises. When you launch the Quick Start, you configure this Greengrass group for the dataflow option that suits your use case. Dataflow options are the data-ingestion paths available with this architecture. These are the three dataflow options:
-
Dataflow option 1. This path sends data from the partner edge application’s OPC UA server to AWS IoT SiteWise. Data flows through the AWS IoT SiteWise connector running in an AWS IoT Greengrass core.
-
Dataflow option 2a. This path sends data from the partner edge application—for example, Ignition with the Cirrus Link MQTT transmission module—directly to AWS IoT Core.
-
Dataflow option 2b. This path sends data from the partner edge application to the AWS IoT Greengrass core. There, customer-defined AWS Lambda functions can process or filter the data as well as use it for local machine learning (ML) model inference: Greengrass integration with Amazon SageMaker. (While you can use Amazon Athena to create datasets, Athena resources are not created automatically; you would provision them after launching the Quick Start.) Alternatively, the data may be consumed by a containerized Docker application (not shown). Raw and processed data can then be transmitted to the AWS Cloud through a number of paths, including AWS IoT Core, Amazon Kinesis Data Streams, or AWS IoT Analytics. These edge-processing capabilities are not part of the IMC Quick Start, so they aren’t shown in the dotted orange box. You can extend the IMC architecture and add whichever components apply for your use case.
-
-
-
Asset Model Converter. The AMC is a serverless, module-based framework that uses Amazon S3, Amazon DynamoDB, and Lambda to map the partner edge application’s asset-modeling conventions onto AWS IoT SiteWise. When you launch the Quick Start, the AMC automatically converts data from the partner edge application’s asset-hierarchy definition object (a JSON file with definitions for factory, lines, machines, and tags) into AWS IoT SiteWise models and assets. For details, see Figure 4.
-
AWS IoT SiteWise. With this managed service, you can collect, model, analyze, and visualize data from industrial equipment at scale. The service, which maintains the asset hierarchy’s metadata, contains a managed database for all the time-series data generated by the customer assets. It includes a SaaS dashboard-building feature called AWS IoT SiteWise Monitor. You use SiteWise Monitor to build custom dashboards, or portals, to view and share near-real-time data from your connected devices and equipment.
-
AWS IoT Core. This service receives and routes MQTT messages either directly from the partner edge application or from the AWS IoT Greengrass core.
-
Amazon Kinesis Data Firehose. This service routes data messages from AWS IoT Core to an Amazon S3 bucket.
-
Amazon S3. The S3 bucket can serve as a cold-storage tier for data.
-
Amazon QuickSight. You use this service to build custom business-intelligence dashboards and visualizations for data stored in the S3 bucket.
* The template that deploys the Quick Start into an existing VPC skips the components marked by asterisks and prompts you for your existing VPC configuration.
Physical deployment
When you deploy this Quick Start in physical mode (on the customer’s premises, such as in a factory), you build an environment like the one shown in Figure 3. Elements of the Quick Start are outlined in the dotted orange box.
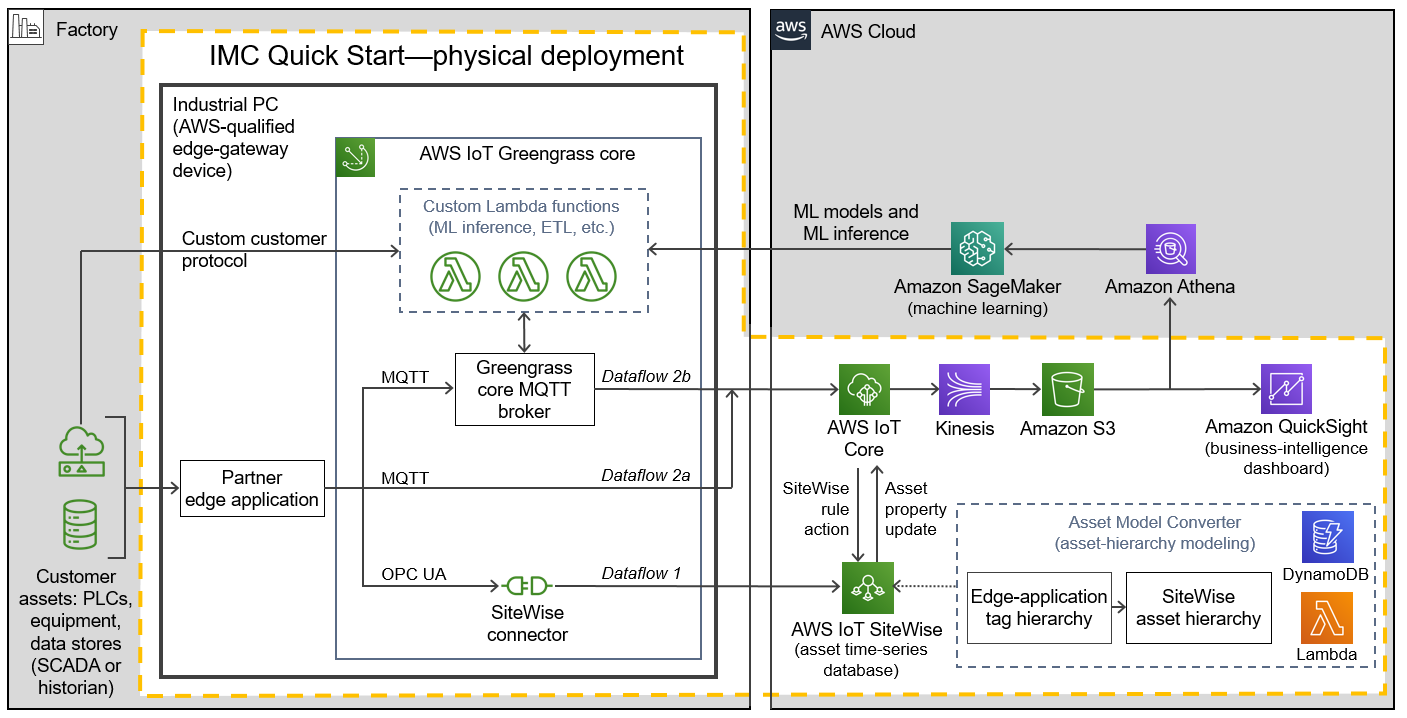
Unlike the virtual deployment (Figure 2), the physical deployment (Figure 3) has the AWS IoT Greengrass core running on an industrial PC on the customer’s premises. The physical deployment uses the same resources as the virtual deployment with the following differences:
-
In physical deployments, no EC2 instances are launched in a VPC. Instead, AWS IoT Greengrass core runs directly onto an industrial PC. IoT Greengrass core is installed by a bootstrap installation script that is created during the IMC Quick Start’s CloudFormation stack launch.
-
In physical deployments, the partner edge application communicates with customer assets—PLCs, equipment, data stores, and other IoT devices—running in the factory.
The Asset Model Converter
For both virtual and physical architectures, at the heart of the IMC Quick Start is the Asset Model Converter (AMC), detailed in Figure 4. The AMC is a serverless, module-based framework. It automatically converts definitions of a customer’s asset hierarchy (factory, lines, machines, and tags) from the partner edge application to equivalent definitions in AWS IoT SiteWise models and assets.
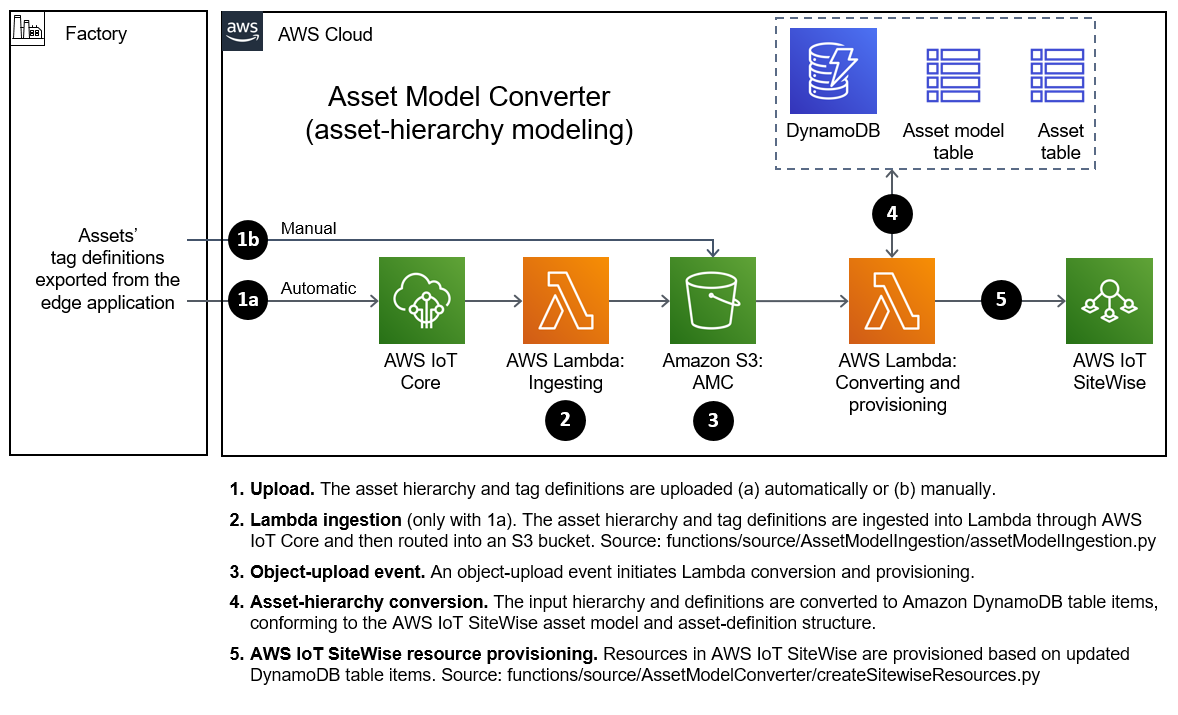
The AMC architecture, shown in Figure 4, has a serverless sequence flow. The AMC ingests asset-hierarchy-definition files or messages generated by the partner edge application and converts them into a schema compatible with AWS IoT SiteWise. It then automatically provisions a matching asset hierarchy (factory, lines, machines, and tags) in AWS IoT SiteWise. With this automatic mapping, application builders have immediate access to the customer’s asset hierarchy within a managed service (AWS IoT SiteWise) in the AWS Cloud. These application builders may be the customer’s own developers, regional or global systems integrators, or an AWS ProServe team.
Planning the deployment
Specialized knowledge
This deployment requires a moderate level of familiarity with AWS services. If you’re new to AWS, see Getting Started Resource Center and AWS Training and Certification. These sites provide materials for learning how to design, deploy, and operate your infrastructure and applications on the AWS Cloud.
This Quick Start also assumes familiarity with AWS IoT Core, AWS IoT SiteWise, AWS IoT Greengrass, and the partner edge application to be used, such as Inductive Automation’s Ignition and PTC’s KEPServerEX.
AWS account
If you don’t already have an AWS account, create one at https://aws.amazon.com by following the on-screen instructions. Part of the sign-up process involves receiving a phone call and entering a PIN using the phone keypad.
Your AWS account is automatically signed up for all AWS services. You are charged only for the services you use.
Technical requirements
Before you launch the Quick Start, review the following information and ensure that your account is properly configured. Otherwise, deployment might fail.
Resource quotas
If necessary, request service quota increases for the following resources. You might need to request increases if your existing deployment currently uses these resources and if this Quick Start deployment could result in exceeding the default quotas. The Service Quotas console displays your usage and quotas for some aspects of some services. For more information, see What is Service Quotas? and AWS service quotas.
| Resource | This deployment uses |
|---|---|
VPC |
1 |
Security group |
1 |
AWS Identity and Access Management (IAM) roles |
12 |
DynamoDB tables |
2 |
Lambda functions |
10 |
AWS IoT topic rules |
6 |
Kinesis Data Firehose streams |
2 |
S3 buckets |
4 |
EC2 instances |
2 |
Supported Regions
This Quick Start supports the following Regions:
-
us-east-1, US East (N. Virginia)
-
us-west-2, US West (Oregon)
-
eu-west-1, Europe (Ireland)
-
eu-central-1, Europe (Frankfurt)
| Certain Regions are available on an opt-in basis. For more information, see Managing AWS Regions. |
EC2 key pairs
Make sure that at least one Amazon EC2 key pair exists in your AWS account in the Region where you plan to deploy the Quick Start. Make note of the key pair name. You need it during deployment. To create a key pair, see Amazon EC2 key pairs and Linux instances.
For testing or proof-of-concept purposes, we recommend creating a new key pair instead of using one that’s already being used by a production instance.
IAM permissions
Before launching the Quick Start, you must sign in to the AWS Management Console with IAM permissions for the resources that the templates deploy. The AdministratorAccess managed policy within IAM provides sufficient permissions, although your organization may choose to use a custom policy with more restrictions. For more information, see AWS managed policies for job functions.
Prepare to deploy
Before you deploy the IMC Quick Start, read the following sections so that you understand the choices that you need to make during deployment: deployment modes, dataflow options, and AMC drivers. Also follow all applicable instructions: enable AWS Single Sign-On (AWS SSO), set up QuickSight, create an EC2 SSH key pair, etc.
Review the deployment modes
When you deploy the IMC Quick Start, you choose between virtual and physical deployment modes.
Virtual deployment
Virtual deployment is intended for demonstration, training, and evaluation of the IMC Quick Start’s capabilities. You launch EC2 instances to simulate edge gateway hardware. In all other respects, the virtual architecture mirrors that of the physical deployment. Virtual mode relies on simulated tag values generated by the partner edge application. No physical PLCs or sensors are connected.
Physical deployment
With physical deployment, you deploy software (AWS IoT Greengrass and a partner edge application) on an industrial PC that’s ready to connect to physical devices (such as PLCs or historians or SCADA systems) on the customer’s factory floor. The physical deployment has two types: greenfield and brownfield.
-
Greenfield. In a greenfield physical deployment, you build from scratch for a new environment. AWS IoT Greengrass and the partner edge application run on a single edge-gateway device (an industrial PC) with Ignition installed alongside AWS IoT Greengrass on the same PC, as shown in Figure 3.
-
Brownfield. In a brownfield physical deployment, you build within an existing environment. A brownfield deployment can demonstrate the capabilities of the IMC Quick Start in cases where the customer already has a application running on premises. AWS IoT Greengrass runs on a standalone industrial PC and connects to the partner edge application, which may be running on a virtual machine in the server room of a factory. Assume that your access to the hardware is limited or nonexistent and that your ability to reconfigure the edge-software server is limited to additive changes.
Review edge devices (physical deployments only)
The IMC Quick Start supports the following edge devices:
-
Lenovo
-
Model: ThinkCentre M90n IoT
-
Architecture: Intel Celeron 4205U (x86)
-
-
ADLINK
-
Model: MXE-211
-
Architecture: Intel Atom processor E3900 (x86)
-
-
OnLogic
-
Model: Karbon 300 compact rugged computer
-
Architecture: Intel Atom E3930 or E3950 processors
-
-
Advantech
-
Model: UNO-2372G
-
Architecture: Intel Atom E3845/Celeron J1900 quad-core processors
-
URL: https://www.advantech.com/products/1-2mlj9a/uno-2372g/mod_f4ff5680-f016-44bd-bff0-e5eddfd82237
-
-
MOXA
-
Model: MC-1112-E4-T
-
Architecture: Intel Atom processor E3845
-
URL: https://www.moxa.com/en/products/industrial-computing/x86-computers/mc-1100-series/mc-1121-e4-t
-
Review the dataflow options
When you deploy the IMC Quick Start, you choose between three dataflow options. Each option ingests data differently from the edge environment into the AWS Cloud. For illustrations of these dataflows in the virtual and physical deployments, see (Figure 2) and (Figure 3).
-
Dataflow option 1 (OPC UA to AWS IoT SiteWise). With this option, you configure the AWS IoT SiteWise connector to connect to the partner edge application OPC UA server. All telemetry data flows directly into AWS IoT SiteWise.
-
Dataflow option 2a (MQTT to AWS IoT Core). With this option, the partner edge-software server connects to AWS IoT Core from MQTT. All telemetry data is pushed from the edge-software server to AWS IoT Core. From there, the data is pushed to Amazon S3 for processing. Data is not forwarded to AWS IoT SiteWise. Custom development is required to populate data in AWS IoT SiteWise.
-
Dataflow option 2b (MQTT to AWS IoT Greengrass to AWS IoT Core). This option is identical to 2a except that the edge-software server pushes MQTT data messages to AWS IoT Greengrass core first. Then those messages are forwarded to AWS IoT Core. Data is not forwarded to AWS IoT SiteWise. Custom development is required to populate data in AWS IoT SiteWise.
For physical deployments, you configure both the deployment type and the dataflow option during the post-deployment steps by using one of the following bootup scripts:
-
BootupScriptGreenfieldOption1 (greenfield deployment, dataflow option 1)
-
BootupScriptGreenfieldOption2a (greenfield deployment, dataflow option 2a)
-
BootupScriptGreenfieldOption2b (greenfield deployment, dataflow option 2b)
-
BootupScriptBrownfieldAllOptions (brownfield deployment, any dataflow option)
Review the AMC drivers
When you deploy the IMC Quick Start, you choose an AMC driver. This driver determines which edge application the IMC Quick Start connects to AWS IoT SiteWise. For the AWS CloudFormation stack AMCDriver parameter, you can choose any of three drivers: IgnitionCirrusLink, IgnitionFileExport, or KepwareFileExport.
-
IgnitionCirrusLink. This is the default AMC driver. It runs automatically and creates the AWS IoT SiteWise resources automatically when you launch the IMC Quick Start virtual option. The Cirrus Link transmission module runs on Ignition to publish birth certificates for all devices defined with Ignition’s tag database. This module follows the Sparkplug version B specification for MQTT. For the AWS CloudFormation stack’s
AMCDriverparameter, you leave the default set toIgnitionCirrusLink. -
IgnitionFileExport. This AMC driver uses the manual tag-definition file-export mechanism within Ignition. With this AMC driver, you manually export the tag-definition file and upload it to an S3 bucket to initiate the AMC process during the post-deployment steps. For the AWS CloudFormation stack’s
AMCDriverparameter, you chooseIgnitionFileExport. -
KepwareFileExport. This AMC driver uses the manual tag-definition file-export mechanism within Kepware. With this AMC driver, you manually export the tag-definition file and upload it to an S3 bucket to initiate the AMC process during the post-deployment steps. For the AWS CloudFormation stack’s
AMCDriverparameter, you chooseKepwareFileExport.
Enable AWS SSO
If AWS SSO has not already been enabled in the Region where you are launching the AWS CloudFormation stack, enable it as follows.
-
Sign in to your AWS account at https://aws.amazon.com with an IAM user role that has the necessary permissions.
-
Sign in to the AWS Management Console, and open the AWS SSO service. Make sure that you are in the Region where you are launching the AWS CloudFormation stack.
-
Choose Enable AWS SSO.
-
If you don’t have an AWS organization set up for your account (as required for AWS SSO usage), you’re prompted to create one. Choose Create AWS organization. For more information, see the Getting Started page in the AWS SSO documentation.
-
Create an AWS SSO group.
-
Open the AWS SSO service in the AWS Management Console.
-
Choose Groups in the navigation bar.
-
If no groups exist, choose Create group.
-
Give the group a name and choose Create.
-
-
Create an AWS SSO user.
-
Open the AWS SSO service in the AWS Management Console.
-
Choose Users in the navigation bar.
-
Choose Add user.
-
Provide a user name, and fill in the remaining boxes.
-
Choose Next, Groups.
-
Choose a group, and then choose Add user. The AWS SSO user is now active. This user will be able to access the AWS IoT SiteWise Monitor dashboards.
-
Set up QuickSight
-
Open the QuickSight console, and choose Sign up for QuickSight.
-
Choose an edition: Standard or Enterprise.
-
Choose the AWS Region that you plan to deploy the IMC Quick Start into. QuickSight is now enabled and is ready for use.
Create an EC2 SSH key pair
If you do not already have an EC2 SSH (Secure Shell) key pair available (PEM file format), create one in the Region where you are launching the AWS CloudFormation stack. For instructions, see Amazon EC2 key pairs and Linux instances.
Create an AWS IoT SiteWise service-linked role
Run the following command from the AWS CLI:
+aws iam create-service-linked-role --aws-service-name iotsitewise.amazonaws.com --description "Service-linked role to support IoT SiteWise"+
For more information about creating service-linked-roles, see Using service-linked roles for AWS IoT SiteWise.
Connect to the edge hardware (physical deployments only)
For physical deployments, connect to the edge hardware as follows:
-
Connect to your hardware running Ubuntu 18.04.
-
Ensure that you can connect to the internet.
-
Using either an SSH command or a connection to the device with a keyboard and monitor, configure the AWS CLI on the hardware to communicate with the AWS account you plan to deploy in. For details, see Configuring the AWS CLI.
-
Ensure that the directory structure of the hardware running Ubuntu 18.04 looks like this:
home/
    ubuntu
-
For physical-brownfield deployments with Ignition, ensure that you are using these minimum software versions:
-
Ignition: 8.0.12
-
Cirrus Link MQTT transmission module: 4.0.4-SNAPSHOT (b2020051210)
-
Deployment options
This Quick Start provides two deployment options:
-
Deploy Industrial Machine Connectivity into a new VPC. This option builds a new AWS environment consisting of the VPC, subnet, security group, and other infrastructure components. It then deploys Industrial Machine Connectivity into this new VPC.
-
Deploy Industrial Machine Connectivity into an existing VPC. This option provisions Industrial Machine Connectivity in the default VPC of your existing AWS infrastructure.
The Quick Start provides separate templates for these options.
Deployment steps
Sign in to your AWS account
-
Sign in to your AWS account at https://aws.amazon.com with an IAM user role that has the necessary permissions. For details, see Planning the deployment earlier in this guide.
-
Make sure that your AWS account is configured correctly, as discussed in the Technical requirements section.
Launch the Quick Start
Each deployment takes about 10 minutes to complete.
-
Sign in to your AWS account, and choose one of the following options to launch the AWS CloudFormation template. For help with choosing an option, see Deployment options earlier in this guide.
Deploy Industrial Machine Connectivity into a new VPC on AWS |
|
Deploy Industrial Machine Connectivity into an existing VPC on AWS |
-
Check the AWS Region that’s displayed in the upper-right corner of the navigation bar, and change it if necessary. This Region is where the network infrastructure for Industrial Machine Connectivity is built. The template is launched in the us-east-1 Region by default. For other choices, see Supported Regions earlier in this guide.
-
On the Create stack page, keep the default setting for the template URL, and then choose Next.
-
On the Specify stack details page, change the stack name if needed. Review the parameters for the template. Provide values for the parameters that require input. For all other parameters, review the default settings and customize them as necessary. For details on each parameter, see the Parameter reference section of this guide. When you finish reviewing and customizing the parameters, choose Next.
-
On the Configure stack options page, you can specify tags (key-value pairs) for resources in your stack and set advanced options. When you’re finished, choose Next.
-
On the Review page, review and confirm the template settings. Under Capabilities, select the two check boxes to acknowledge that the template creates IAM resources and might require the ability to automatically expand macros.
-
Choose Create stack to deploy the stack.
-
Monitor the status of the stack. When the status is CREATE_COMPLETE, the IMC deployment is ready.
-
To view the created resources, see the values displayed in the Outputs tab for the stack.
Post-deployment steps
Stack deployment takes approximately 10 minutes. You can track the progress of the stack launch by viewing the “Events” tab of the CloudFormation stack console. Once the CloudFormation stack is completed, follow the post-deployment steps to configure the IMC Quick Start to make it operational.
| After post-deployment steps, return back to finish the deployment. |
Clean up the AWS CloudFormation stack deployment
Follow these steps to clean up the Quick Start AWS CloudFormation stack deployment.
Clean up cloud assets
-
Open the AWS CloudFormation console, and delete the base stack (not the stack named NESTED) to clean up the account as much as possible. Most of the resources are deleted, but the stack deletion fails due to nonempty S3 buckets and potentially a deployed AWS IoT Greengrass group (for all virtual options by default, and for all physical deployments that have been completed on a piece of hardware).
-
Empty the S3 buckets.
-
Sign in to the AWS Management Console, and open the Amazon S3 service.
-
In the search bar, enter your stack name.
-
For each bucket that is associated with the stack, choose the bucket, and choose Empty under the search bar. This is the bucket-naming convention (replacing the bracketed elements):
`<name_of_stack>-<bucket_identifier>-<unique hash>`
Following are the values for <bucket_identifiers> for each deployment:
-
amcincomingresource
-
amcoutputresource
-
devicesbucketresource
-
imcs3bucket
-
lambdazipsbucket
-
-
-
Force a reset of the AWS IoT Greengrass group.
-
Open the AWS IoT Greengrass console.
-
Choose the AWS IoT Greengrass group with the EdgeDeviceID parameter provided to the stack.
-
Under Actions, choose Reset Deployments.
-
Select the check box indicating that you want to force the reset.
-
Choose Reset Deployment.
-
-
Navigate back to the AWS CloudFormation console, and again delete the base stack—the main stack (the one that does not have NESTED in a gray box associated with it).
-
(Optional) Clean up other resources, such as AWS IoT SiteWise portal, gateway, models, and assets as well as the QuickSight dataset.
Clean up edge hardware
-
Navigate to a terminal on the edge hardware. Run the
sudo sucommand to become the root user. -
Stop and remove Ignition from hardware as follows, replacing the information in brackets. (Not applicable for physical brownfield deployments.)
cd /<path_to_Ignition_download>/Ignition-AWS-Kit-MQTT-v4
./remove.sh
cd ..
rm device.tar.gz group.tar.gz opcclient.der Ignition-AWS-Kit-MQTT-v4.zip physical-greenfield-option<insert_option_here>.sh
rm -rf Ignition-AWS-Kit-MQTT-v4
-
Stop and remove AWS IoT Greengrass:
apt remove aws-iot-greengrass-core
rm -rf /greengrass
rm -rf /var/sitewise
FAQ
Q. I encountered a CREATE_FAILED error when I launched the Quick Start.
A. If AWS CloudFormation fails to create the stack, relaunch the template with Rollback on failure set to Disabled. This setting is under Advanced in the AWS CloudFormation console on the Configure stack options page. With this setting, the stack’s state is retained, and the instance keeps running so that you can troubleshoot the issue. (For Windows, look at the log files in %ProgramFiles%\Amazon\EC2ConfigService and C:\cfn\log.)
| When you set Rollback on failure to Disabled, you continue to incur AWS charges for this stack. Delete the stack when you finish troubleshooting. |
For more information, see Troubleshooting AWS CloudFormation.
Q. I encountered a size-limitation error when I deployed the AWS CloudFormation templates.
A. Launch the Quick Start templates from the links in this guide or from another S3 bucket. If you deploy the templates from a local copy on your computer or from a location other than an S3 bucket, you might encounter template-size limitations. For more information, see AWS CloudFormation quotas.
Q. Can I update a stack to a different deployment type (physical, virtual) or dataflow option (Option1, 2a, 2b)?
A. Updates are not supported. To achieve a different deployment type or dataflow type, deploy a new stack. See the following question and answer for details on deploying more than one stack in an account. Then decide whether to delete your original stack before creating another.
Q. Can I deploy multiple times in the same AWS account?
A. Yes, you may deploy multiple stacks in the same account. Be wary of the following:
-
For Option 1 deployments, AWS IoT SiteWise may receive data from multiple sources if, for example, two instances of Ignition are publishing data onto the topic
/Tag Providers/default/Line1/CNC/Temperature. -
If AWS IoT SiteWise models and assets exist in the Cloud from a previous deployment, a new deployment does not recreate the model or asset hierarchy. Instead, the Asset Model Converter operates by recognizing any changes in the existing models or assets and the new deployment hierarchy. For example:
-
If the previously deployed hierarchy is identical to the newly deployed one, nothing in AWS IoT SiteWise is changed.
-
If the newly deployed hierarchy has an identical structure to the previously deployed hierarchy with additional nodes that follow the hierarchy pattern, the new models or assets are created in AWS IoT SiteWise:
-
Previous:
Line 1/CNC1/Temperature
-
New:
Line 1/CNC1/Temperature
Line 1/CNC2/Temperature
-
-
-
If the newly deployed hierarchy has a different hierarchy than the previously deployed hierarchy altogether, the Asset Model Converter does not create the new models and assets.
-
Refer to the instructions in the appendix showing how to add a line and device with tags to a project in Ignition using Ignition Designer.
Q. Does any hardening of the operating system occur during deployment?
A. Yes. Fail2ban is installed and enabled on the device, which bans IPs that show the following malicious signs:
-
Too many password failures.
-
Seeking exploits.
-
Shared memory on the device is secured by
/etc/fstab.
Q. Can I rerun the AMC to create new models and assets?
A. Yes. Follow these steps:
-
If any of the models or assets you want to create shares a name with the models or assets created in the first pass of the AMC execution, delete the models and assets in AWS IoT SiteWise.
-
Clear out the following DynamoDB tables associated with the initial IMC Quick Start deployment (replacing the information in brackets):
-
Table 1:
<stack-name>-asset-model-table -
Table 2:
<stack-name>-asset-table
-
Depending on the AMC driver you used, take the follow actions to rerun the AMC:
AMC driver: IgnitionCirrusLink
Initiate a rebirth (NBIRTH,DBIRTH) MQTT message that represents the your project hierarchy.
-
Connect to your Ignition server in Ignition Designer.
-
Launch Ignition Designer, open the tag browser, and choose Tag providers, MQTT Transmission, Transmission Control.
-
Choose the Refresh button. A birth message is initiated.
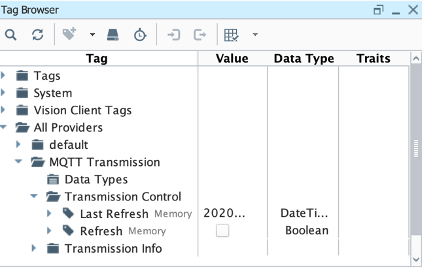
-
This action initiates the IMC Quick Start’s AMC, which creates the models and assets that represent the Ignition hierarchy in AWS IoT SiteWise.
AMC driver: IgnitionFileExport
-
Obtain your JSON file that represents the new hierarchy and drop it into the following S3 bucket (replacing the information in brackets):
-
<name_of_stack>-<amcincomingresource>-<hash>
-
AMC driver: KepServerFileExport
-
Obtain your JSON file that represents the new hierarchy and drop it into the following S3 bucket:
-
<name_of_stack>-<amcincomingresource>-<hash>
-
Q. How do I add a QuickSight visual?
A. You may create Amazon QuickSight visuals for the data that is put in the S3 bucket by the Kinesis Data Firehose. Before you create these visuals, complete the following prerequisite steps:
Prerequisites:
-
Sign in to the AWS Management Console, and open the QuickSight service console.
-
If you have not previously used QuickSight, you are prompted to grant access to QuickSight. See Getting Started with Data Analysis in Amazon QuickSight for additional details.
-
-
Create a QuickSight visual.
-
The data source is the S3 bucket that receives data from the AWS IoT Core rule. The S3 bucket is named
<stack_name>-imcs3bucket-<hash>(replacing the information in brackets). -
Open the Amazon QuickSight console home page, and choose New analysis, New dataset. Then choose the Amazon S3 service icon.
-
Add details for the dataset:
-
Data source name: Provide a name for the IMC dataset, such as IMC-QS-Dataset.
-
Manifest file: Leave the URL radio button chosen for the Upload a manifest file text entry option, and paste the URL of the S3 bucket manifest file. The manifest file is located in the same S3 bucket where the data is stored (S3 bucket name:
<stack_name>-imcs3bucket-<hash>). The manifest file is namedimcquicksightdata.json. The S3 URL follows this naming convention:https:// <stack_name>-imcs3bucket-<hash>.s3.amazonaws.com/imcquicksightdata.json.
-
-
Q. How do I add a QuickSight visual?
A. You may create Amazon QuickSight visuals for the data that is put in the S3 bucket by the Kinesis Data Firehose. Before you create these visuals, complete the following prerequisite steps:
Prerequisites:
-
Sign in to the AWS Management Console, and open the QuickSight service console.
-
If you have not previously used QuickSight, you are prompted to grant access to QuickSight. See Getting Started with Data Analysis in Amazon QuickSight for additional details.
-
-
Create a QuickSight visual.
-
The data source is the S3 bucket that receives data by the AWS IoT Core rule. The S3 bucket is named
<stack_name>-imcs3bucket-<hash>(replacing the information in brackets). -
Open the Amazon QuickSight console, and choose New analysis, New dataset. Choose the Amazon S3 service icon.
-
Add details for the dataset:
-
Data source name: Provide a name for the IMC dataset, such as IMC-QS-Dataset.
-
Manifest file: Leave the URL radio button chosen for the Upload a manifest file text entry option, and paste the URL of the S3 bucket manifest file. The manifest file is located in the same S3 bucket where the data is stored (S3 bucket name:
<stack_name>-imcs3bucket-<hash>). -
The manifest file is named
imcquicksightdata.json. The URL follows this naming convention:
-
-
Troubleshooting
Quarantined certificate in Ignition doesn’t show up (or data doesn’t show up for dataflow option 1 deployments)
First, verify that the Ignition trial period (2 hours) has not expired. If that action does not remediate the issue, repeat the process of refreshing the AWS IoT SiteWise gateway:
-
Open the AWS IoT SiteWise console, and choose Ingest, Gateways.
-
Choose the gateway created during the stack launch (replacing the information in brackets):
-
Naming convention:
<name_of_stack>_Automated_Gateway
-
-
In the Source Configuration for Automated Gateway Config section, choose Edit.
-
Choose Save at the bottom. No changes are necessary. This action activates the AWS IoT SiteWise gateway to make sure that data flows from the OPC UA server.
-
If it hasn’t already been done, navigate to Ignition, and look for and accept the quarantined certificate.
-
If using KepServer for Windows, make sure that your default firewalls have been turned off. They prevent the AWS IoT SiteWise gateway certificates from showing up.
-
Can’t access Ignition web UI
Ensure that you’re attempting to connect from the same network you defined as your public IP while setting up the stack. If you’re attempting from a different network, edit the security group associated with the two EC2 instances. (It’s the same security group.)
-
Open the EC2 console.
-
Highlight one of the two EC2 instances that has been created for your deployment.
-
Scroll to the right and choose the security group associated with the EC2 instance.
-
Edit the inbound rules for the rule associated with port 8088 to match the IP address you’re attempting the connection from.
Narrowing Ignition or AWS IoT Greengrass permissions (for workload template deployments only)
-
Open the EC2 console.
-
Take note of the private IP addresses of the following:
-
The AWS IoT Greengrass EC2 instance for the current deployment
-
The Ignition EC2 instance for the current deployment
-
-
Highlight one of the two EC2 instances that has been created for your deployment.
-
Scroll to the right and choose the security group associated with the EC2 instance.
-
Edit the rule associated with port 8883 and replace 0.0.0.0/0 with the private IP address for the Ignition EC2 instance.
-
Edit the rule associated with port 62541 and replace 0.0.0.0/0 with the private IP address for the AWS IoT Greengrass EC2 instance.
Models and assets weren’t created in AWS IoT SiteWise
If models and assets were not created in AWS IoT SiteWise and the Cirrus Link AMC driver was used, follow these steps to troubleshoot.
-
Open the Ignition console, and navigate to MQTT transmission settings.
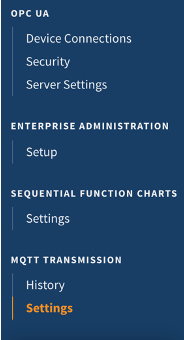
-
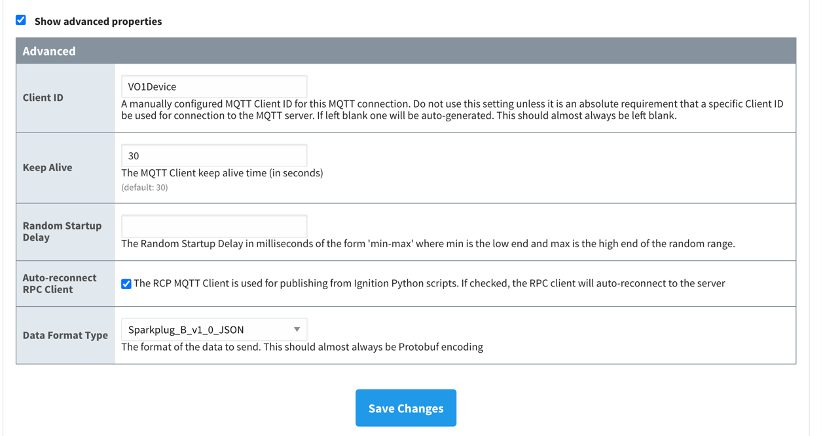
Choose Servers, Settings, Edit.
-
At the bottom of the screen, select the Show advanced properties check box.
-
Under Data Format Type, choose Sparkplug_B_v1_0_JSON.
-
Choose Save Changes.
-
Verify that
tagPathConfigurationis not being filtered out:-
In the MQTT transmission module settings, choose Transmitters, Edit.
-
At the bottom of the screen, select the Show advanced properties check box.
-
Verify that
tagPathConfigurationis not being filtered out.
-

If these settings are as shown in Figure 8 and you’re still receiving errors, check the Lambda function responsible for creating the models and assets in AWS IoT SiteWise for errors:
-
Open the AWS Lambda console, and navigate to the function with this name (replacing the information in brackets):
<name_of_stack>-AssetModelIngestionLambdaResource-<hash> -
Choose the Monitoring tab.
-
Choose View logs in CloudWatch.
-
Click into the most recent log stream, and find the error message to troubleshoot.
Data from the MQTT transmission module doesn’t show up in the IoT cloud
-
Get the public IP address of that instance, and load a URL like this into any browser (replacing the information in brackets):
http://<hardwarePrivateIP>:8088
-
Open the Ignition web UI. Choose the gear-like icon on the left labeled Config. When prompted, log in. If you haven’t already changed your password, do so after you’ve logged in. These are the default credentials:
-
User name: admin
-
Password: password (default password)
-
-
Choose MQTT Transmission, Settings, Server. Confirm that the connectivity shows 1 of 1. If it doesn’t, choose Edit and do the following:
-
Make sure that the URL is in the format:
ssl://<your_aws_account_iot_endpoint>:8883 -
Download the .tar.gz` file that represents the non-GreenGrass IoT thing from the following S3 bucket location (replacing the information in brackets):
-
Bucket name:
<stack_name>-devicesbucketresource-<hash> -
Key name:
<name_for_edge_device_parameter>/<name_for_edge_device_parameter>Device.tar.gz
-
-
Expand the tarball.
-
Replace the CA certificate file with
root.ca.pemfrom the tarball package. -
Replace the client certificate file with the
.pemfile from the tarball package. -
Replace the client private key file with the
.privatefile from the tarball package. -
Choose Save Changes, and make sure that the connectivity says 1 of 1.
-
Customer responsibility
After you successfully deploy this Quick Start, confirm that your resources and services are updated and configured — including any required patches — to meet your security and other needs. For more information, see the AWS Shared Responsibility Model.
Parameter reference
| Unless you are customizing the Quick Start templates for your own deployment projects, keep the default settings for the parameters labeled Quick Start S3 bucket name, Quick Start S3 bucket Region, and Quick Start S3 key prefix. Changing these parameter settings automatically updates code references to point to a new Quick Start location. For more information, see the AWS Quick Start Contributor’s Guide. |
Parameters for deploying into an existing VPC
| Parameter label (name) | Default value | Description |
|---|---|---|
Name for the edge-gateway device
( |
|
If your deployment uses a physical edge-gateway device (industrial PC), enter a name. This string can include numbers, lowercase letters, uppercase letters, and hyphens (-). It cannot start or end with a hyphen (-). |
Type of deployment
( |
|
Type of edge deployment. If your deployment uses physical edge hardware, choose "Physical." |
| Parameter label (name) | Default value | Description |
|---|---|---|
SSH key name
( |
|
Name of an existing EC2 key pair. All instances will launch with this key pair. |
Default VPC ID
( |
|
ID of the VPC that the solution will be hosted in. |
Greengrass EC2 instance type
( |
|
Amazon EC2 instance type for the Greengrass EC2 instances. |
Ignition EC2 instance type
( |
|
Amazon EC2 instance type for the Ignition EC2 instances. |
Availability Zone launch selection
( |
|
Availability Zone that the EC2 instances will be launched into. |
VPC subnet ID
( |
|
Subnet ID where the EC2 instances will be launched. Match the subnet ID with your Availability Zone selection. |
CIDR block for Ignition/Greengrass access
( |
|
You will narrow this down after the stack deploys. |
Asset Model Converter driver
( |
|
The driver that the Asset Model Converter uses to translate hierarchy data. If you’re not using the default driver, choose IgnitionFileExport or KepwareFileExport. |
Email address for the SiteWise portal administrator
( |
|
Enter the email address. |
Your public IP address
( |
|
Enter your public IP for Ignition UI, SSH access to EC2 instances. Format - (x.x.x.x) |
| Parameter label (name) | Default value | Description |
|---|---|---|
Quick Start S3 bucket name
( |
|
Name of the S3 bucket for your copy of the Quick Start assets. Keep the default name unless you are customizing the template. Changing the name updates code references to point to a new Quick Start location. This name can include numbers, lowercase letters, uppercase letters, and hyphens, but do not start or end with a hyphen (-). See https://aws-quickstart.github.io/option1.html. |
Quick Start S3 key prefix
( |
|
S3 key prefix that is used to simulate a directory for your copy of the Quick Start assets. Keep the default prefix unless you are customizing the template. Changing this prefix updates code references to point to a new Quick Start location. This prefix can include numbers, lowercase letters, uppercase letters, hyphens (-), and forward slashes (/). See https://docs.aws.amazon.com/AmazonS3/latest/dev/UsingMetadata.html and https://aws-quickstart.github.io/option1.html. |
Quick Start S3 bucket Region
( |
|
AWS Region where the Quick Start S3 bucket (QSS3BucketName) is hosted. Keep the default Region unless you are customizing the template. Changing this Region updates code references to point to a new Quick Start location. When using your own bucket, specify the Region. See https://aws-quickstart.github.io/option1.html. |
Parameters for deploying into a new VPC
| Parameter label (name) | Default value | Description |
|---|---|---|
VPC CIDR
( |
|
CIDR block for the VPC. |
Public subnet 1 CIDR
( |
|
CIDR block for the public DMZ subnet. |
VPC tenancy
( |
|
Allowed tenancy of instances deployed into the VPC. |
| Parameter label (name) | Default value | Description |
|---|---|---|
Name for the edge-gateway device
( |
|
If your deployment uses a physical edge-gateway device (industrial PC), enter a name. This string can include numbers, lowercase letters, uppercase letters, and hyphens (-). It cannot start or end with a hyphen (-). |
Type of deployment
( |
|
Type of edge deployment. If your deployment uses physical edge hardware, choose "Physical." |
| Parameter label (name) | Default value | Description |
|---|---|---|
SSH key-pair name
( |
|
Name of an existing EC2 key pair. All instances will launch with this key pair. |
Greengrass EC2 instance type
( |
|
Amazon EC2 instance type for the Greengrass EC2 instances. |
Ignition EC2 instance type
( |
|
Amazon EC2 instance type for the Ignition EC2 instances. |
Asset Model Converter driver
( |
|
The driver that the Asset Model Converter uses to translate hierarchy data. If you’re not using the default driver, choose IgnitionFileExport or KepwareFileExport. |
Your public IP address
( |
|
Enter your public IP for Ignition UI, SSH access to EC2 instances. Format - (x.x.x.x) |
Email address for the SiteWise portal administrator
( |
|
Enter the email address. |
| Parameter label (name) | Default value | Description |
|---|---|---|
Quick Start S3 bucket name
( |
|
Name of the S3 bucket for your copy of the Quick Start assets. Keep the default name unless you are customizing the template. Changing the name updates code references to point to a new Quick Start location. This name can include numbers, lowercase letters, uppercase letters, and hyphens, but do not start or end with a hyphen (-). See https://aws-quickstart.github.io/option1.html. |
Quick Start S3 key prefix
( |
|
S3 key prefix that is used to simulate a directory for your copy of the Quick Start assets. Keep the default prefix unless you are customizing the template. Changing this prefix updates code references to point to a new Quick Start location. This prefix can include numbers, lowercase letters, uppercase letters, hyphens (-), and forward slashes (/). See https://docs.aws.amazon.com/AmazonS3/latest/dev/UsingMetadata.html and https://aws-quickstart.github.io/option1.html. |
Quick Start S3 bucket Region
( |
|
AWS Region where the Quick Start S3 bucket (QSS3BucketName) is hosted. Keep the default Region unless you are customizing the template. Changing this Region updates code references to point to a new Quick Start location. When using your own bucket, specify the Region. See https://aws-quickstart.github.io/option1.html. |
Send us feedback
To post feedback, submit feature ideas, or report bugs, use the Issues section of the GitHub repository for this Quick Start. To submit code, see the Quick Start Contributor’s Guide.
Quick Start reference deployments
See the AWS Quick Start home page.
GitHub repository
Visit our GitHub repository to download the templates and scripts for this Quick Start, to post your comments, and to share your customizations with others.
Notices
This document is provided for informational purposes only. It represents AWS’s current product offerings and practices as of the date of issue of this document, which are subject to change without notice. Customers are responsible for making their own independent assessment of the information in this document and any use of AWS’s products or services, each of which is provided “as is” without warranty of any kind, whether expressed or implied. This document does not create any warranties, representations, contractual commitments, conditions, or assurances from AWS, its affiliates, suppliers, or licensors. The responsibilities and liabilities of AWS to its customers are controlled by AWS agreements, and this document is not part of, nor does it modify, any agreement between AWS and its customers.
The software included with this paper is licensed under the Apache License, version 2.0 (the "License"). You may not use this file except in compliance with the License. A copy of the License is located at http://aws.amazon.com/apache2.0/ or in the accompanying "license" file. This code is distributed on an "AS IS" BASIS, WITHOUT WARRANTIES OR CONDITIONS OF ANY KIND, either expressed or implied. See the License for specific language governing permissions and limitations.