Cisco Meraki Virtual MX on the AWS Cloud

Quick Start Reference Deployment

QS

November 2021
Simarbir Singh, Cisco Systems Inc.
Muffadal Quettawala, AWS Partner team
Shivansh Singh, AWS Integration & Automation team

Visit our GitHub repository for source files and to post feedback, report bugs, or submit feature ideas for this Quick Start.

This Quick Start was created by Cisco Systems Inc. in collaboration with Amazon Web Services (AWS). Quick Starts are automated reference deployments that use AWS CloudFormation templates to deploy key technologies on AWS, following AWS best practices.

Overview

This guide provides instructions for deploying the Meraki vMX Quick Start reference architecture on the AWS Cloud. It helps organizations connect software-defined wide area networks (SD-WANs) to applications running on AWS.

Amazon may share user-deployment information with the AWS Partner that collaborated with AWS on the Quick Start.

Cisco Meraki Virtual MX on AWS

Meraki vMX is a virtualized security and SD-WAN network appliance. This Quick Start deploys vMX as a node to extend the common policy, segmentation, and security of SD-WAN environments at scale. The deployment includes an active-active pair of redundant vMX appliances in a highly available configuration. With AWS Transit Gateway as a cloud router, connectivity can be scaled across virtual private clouds (VPCs) with workloads in multiple AWS Regions. You can configure, monitor, and maintain all of your Meraki devices from a single Meraki dashboard.

AWS costs

You are responsible for the cost of the AWS services and any third-party licenses used while running this Quick Start. There is no additional cost for using the Quick Start.

The AWS CloudFormation templates for Quick Starts include configuration parameters that you can customize. Some of the settings, such as the instance type, affect the cost of deployment. For cost estimates, see the pricing pages for each AWS service you use. Prices are subject to change.

After you deploy the Quick Start, create AWS Cost and Usage Reports to deliver billing metrics to an Amazon Simple Storage Service (Amazon S3) bucket in your account. These reports provide cost estimates based on usage throughout each month and aggregate the data at the end of the month. For more information, see What are AWS Cost and Usage Reports?

Software licenses

This deployment is not a warm spare configuration. It requires you to have at least two vMX licenses. If your organization has already reached its vMX license limit, you will be unable to create new vMX networks until a vMX network is deleted or additional licenses are added. For more information, see Add Another License. If you do not have access to a vMX license or require additional vMX licenses, please reach out to your Meraki reseller or sales representative.

The Quick Start requires a subscription to the Amazon Machine Image (AMI) for Meraki vMX, which is available from AWS Marketplace. For more information, see Deployment steps, later in this guide.

Architecture

Deploying this Quick Start for a new virtual private cloud (VPC) with default parameters builds the following Meraki vMX environment in the AWS Cloud.

Architecture
Figure 1. Quick Start architecture for Meraki vMX on AWS

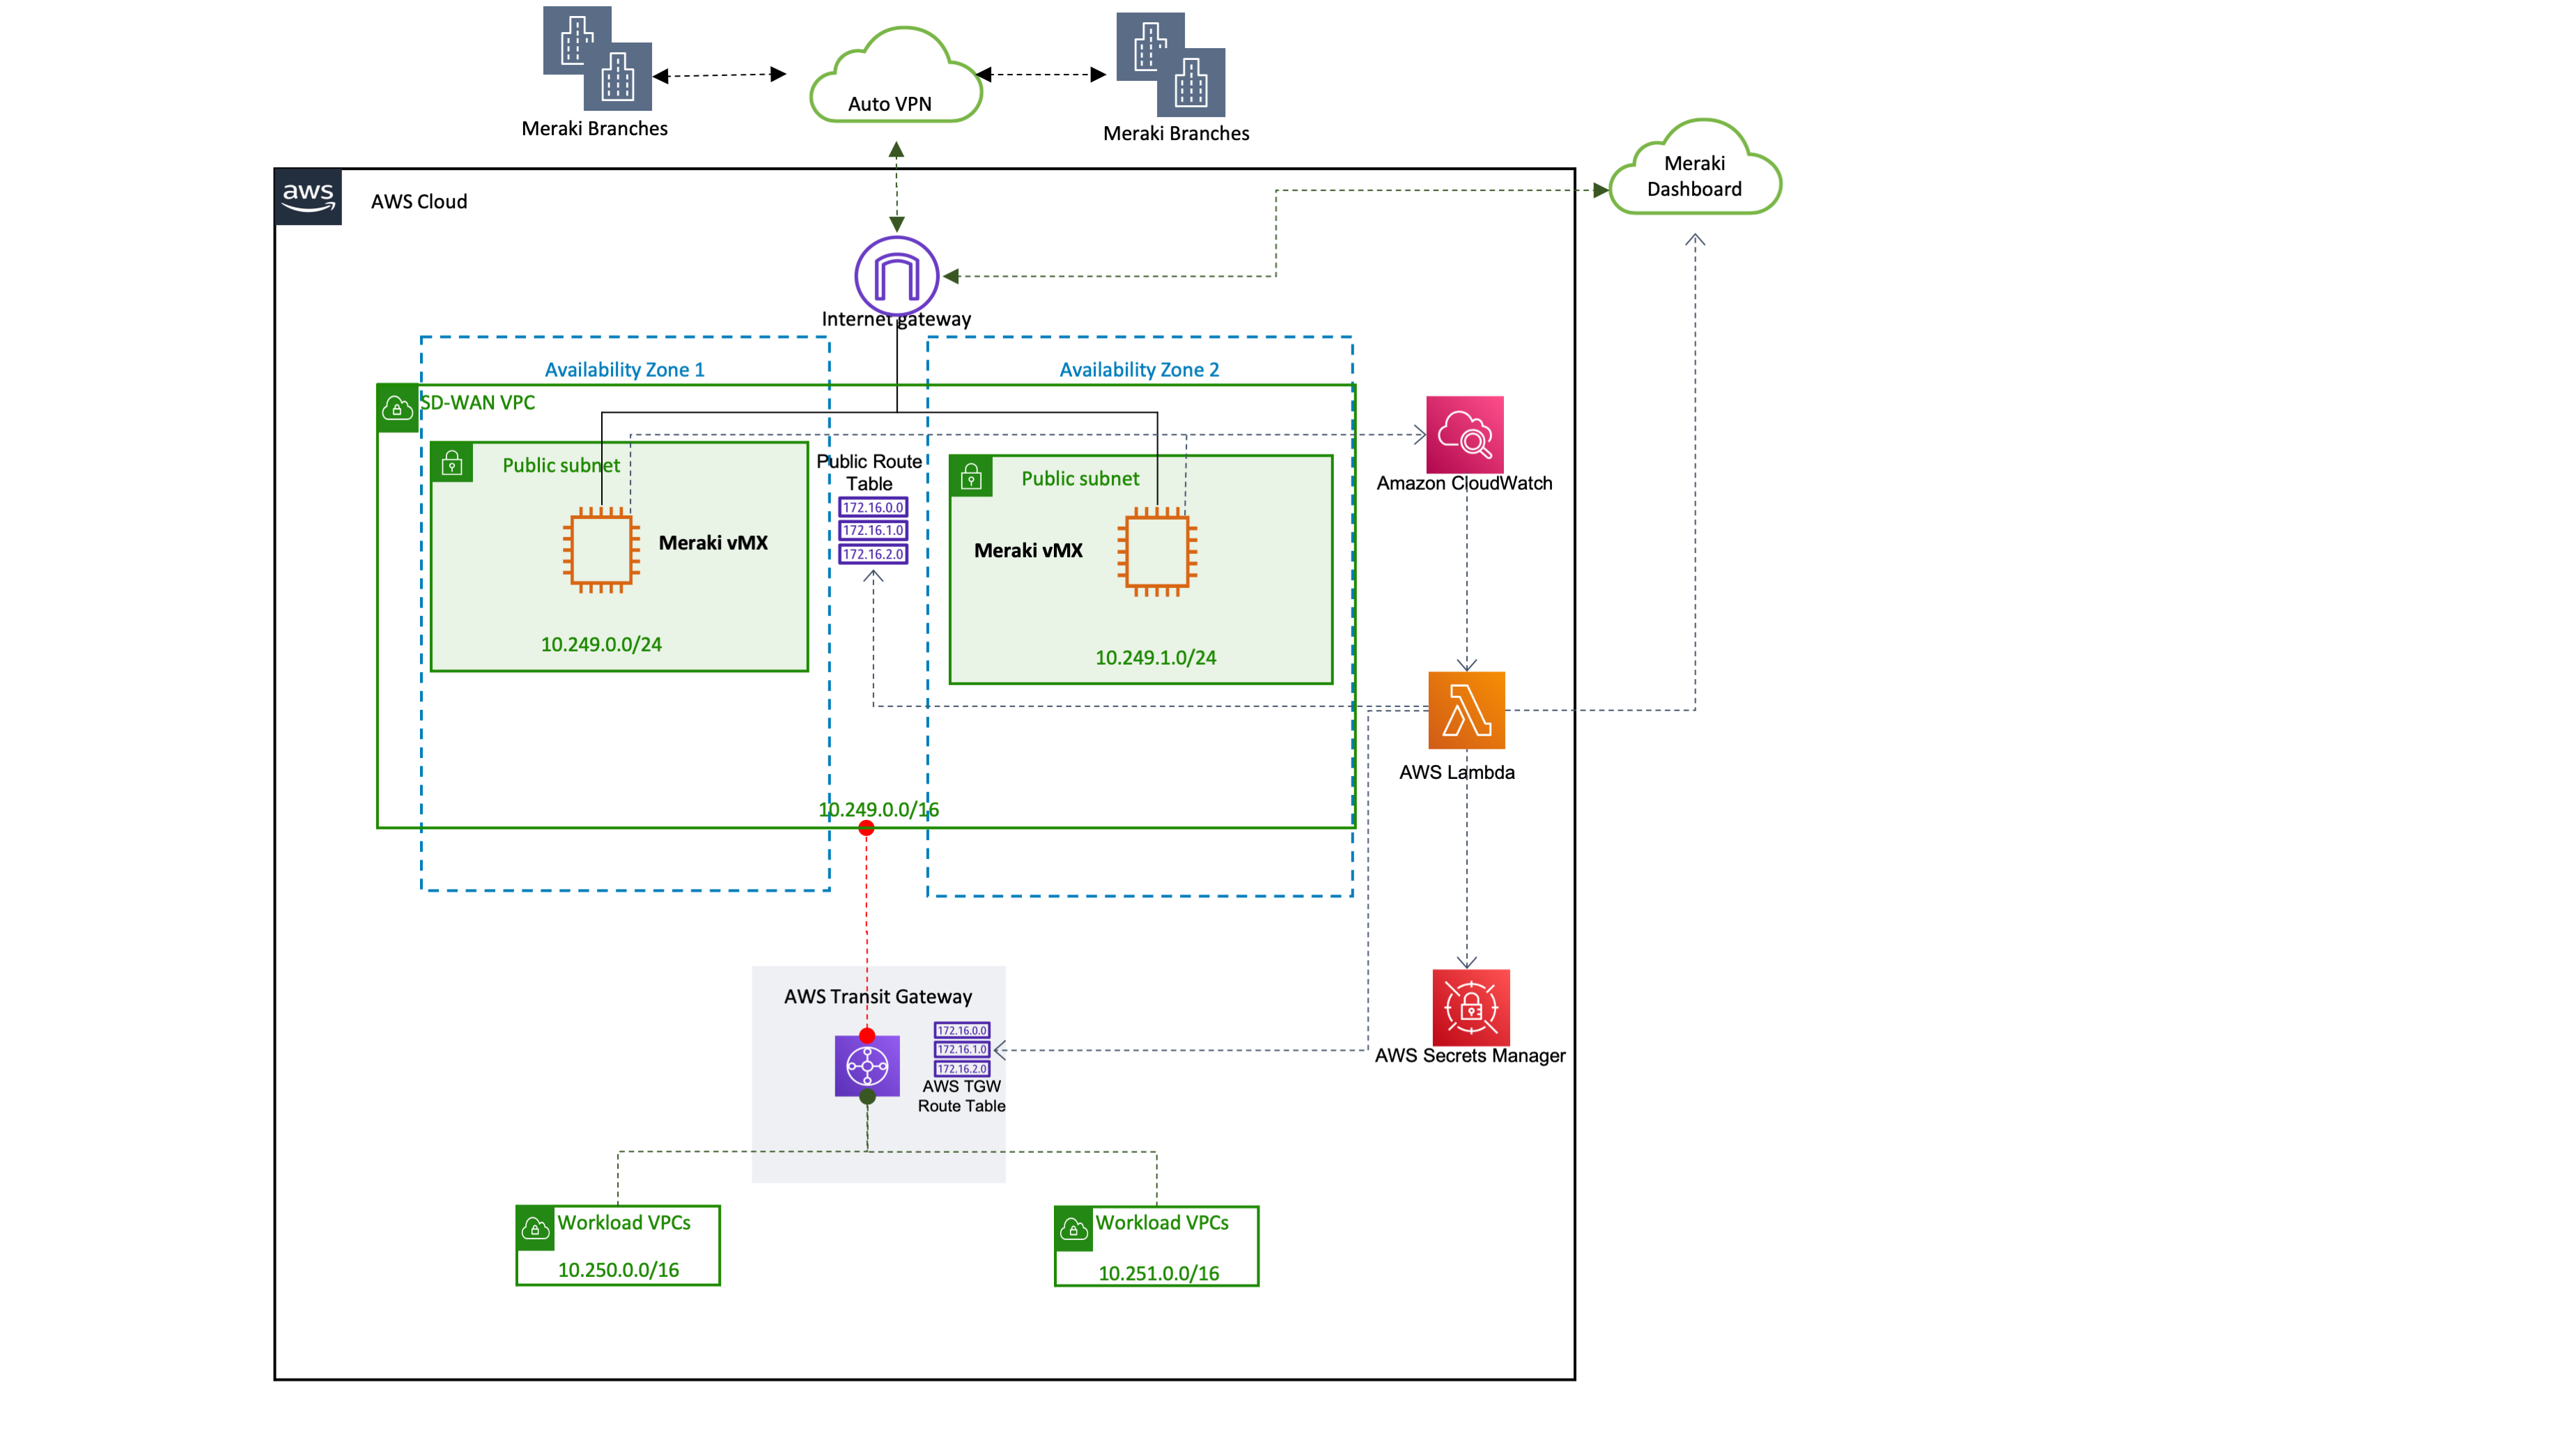
As shown in Figure 1, the Quick Start sets up the following:

  • A highly available architecture that spans two Availability Zones.*

  • A VPC configured with public and private subnets, according to AWS best practices, to provide you with your own virtual network on AWS.*

  • An internet gateway that connects the VPC to the internet.

  • A VPC route table associated with the public subnets to specify routing rules for outbound internet traffic.

  • In the public subnets, Meraki vMX appliances on Amazon Elastic Compute Cloud (Amazon EC2) instances.

  • In the private subnets, elastic network interfaces to enable traffic routing from all subnets in the Availability Zone to AWS Transit Gateway.

  • AWS Transit Gateway attached to the VPC, enabling connectivity to attached workload VPCs in other AWS Regions.

  • A transit gateway route table associated with the VPC for routing rules to AWS Transit Gateway.

  • Amazon CloudWatch to collect logs of vMX instance performance.

  • AWS Lambda to monitor the state of the vMX instances. If an instance fails, AWS Lambda updates route tables to point to a healthy instance and logs the event in CloudWatch.

  • AWS Secrets Manager to store a Meraki API key. AWS Lambda uses the API key to access the Meraki dashboard when updating route tables.

*The template that deploys the Quick Start into an existing VPC skips the components marked by asterisks and prompts you for your existing VPC configuration.

Planning the deployment

Specialized knowledge

This deployment requires a moderate level of familiarity with AWS services. If you’re new to AWS, see Getting Started Resource Center and AWS Training and Certification. These sites provide materials for learning how to design, deploy, and operate your infrastructure and applications on the AWS Cloud.

This Quick Start also assumes familiarity with the Meraki dashboard and setting up a vMX appliance on AWS. For more information, see vMX setup guide for Amazon Web Services (AWS).

AWS account

If you don’t already have an AWS account, create one at https://aws.amazon.com by following the on-screen instructions. Part of the sign-up process involves receiving a phone call and entering a PIN using the phone keypad.

Your AWS account is automatically signed up for all AWS services. You are charged only for the services you use.

Technical requirements

Before you launch the Quick Start, review the following information and ensure that your account is properly configured. Otherwise, deployment might fail.

Resource quotas

If necessary, request service quota increases for the following resources. You might need to request increases if your existing deployment currently uses these resources and if this Quick Start deployment could result in exceeding the default quotas. The Service Quotas console displays your usage and quotas for some aspects of some services. For more information, see What is Service Quotas? and AWS service quotas.

Resource This deployment uses

VPCs

1

Elastic IP addresses

2

Security groups

1

AWS Identity and Access Management (IAM) roles

1

EC2 instances

2

AWS Lambda functions

1

AWS Secrets Manager secrets

1

CloudWatch event rules

1

EC2 key pairs

1

Supported AWS Regions

For any Quick Start to work in a Region other than its default Region, all the services it deploys must be supported in that Region. You can launch a Quick Start in any Region and see if it works. If you get an error such as “Unrecognized resource type,” the Quick Start is not supported in that Region.

For an up-to-date list of AWS Regions and the AWS services they support, see AWS Regional Services.

Certain Regions are available on an opt-in basis. For more information, see Managing AWS Regions.

IAM permissions

Before launching the Quick Start, you must sign in to the AWS Management Console with IAM permissions for the resources that the templates deploy. The AdministratorAccess managed policy within IAM provides sufficient permissions, although your organization may choose to use a custom policy with more restrictions. For more information, see AWS managed policies for job functions.

Deployment options

This Quick Start provides the following deployment option:

  • Deploy Meraki vMX into a new VPC. This option builds a new AWS environment consisting of the VPC, subnets, Internet Gateways, security groups, and other infrastructure components. It then deploys Meraki vMX into this new VPC along with the AWS Lambda function.

  • Deploy Meraki vMX into an existing VPC. This option deploys Meraki vMX into an existing VPC along with the AWS Lambda function.

Prepare your AWS account

Prepare your Cisco Systems Inc. account

For more information on how to obtain licenses, see Software licenses, previously in this guide.

Deployment steps

Confirm your AWS account configuration

  1. Sign in to your AWS account at https://aws.amazon.com with an IAM user role that has the necessary permissions. For details, see Planning the deployment earlier in this guide.

  2. Make sure that your AWS account is configured correctly, as discussed in the Technical requirements section.

Subscribe to the Meraki vMX AMI

This Quick Start requires a subscription to the AMI for Meraki vMX in AWS Marketplace.

  1. Sign in to your AWS account.

  2. Open the page for the Cisco Meraki vMX AMI in AWS Marketplace, and then choose Continue to Subscribe.

  3. Review the terms and conditions for software usage, and then choose Accept Terms.
    A confirmation page loads, and an email confirmation is sent to the account owner. For detailed subscription instructions, see the AWS Marketplace documentation.

  4. When the subscription process is complete, exit out of AWS Marketplace without further action. Do not provision the software from AWS Marketplace—the Quick Start deploys the AMI for you.

Meraki dashboard configuration

Before deploying the Quick Start, do the following:

  1. Complete the instructions in the "Meraki Dashboard Configuration" section of the vMX Setup Guide for Amazon Web Services (AWS). During configuration, you generate authentication tokens for the vMX appliances. Copy and save the tokens. You must enter them in the vMX1Token and vMX2Token parameters in the AWS CloudFormation console during Quick Start deployment.

  2. Set network tags vMX-1 and vMX-2 to identify vMX nodes as the primary and secondary hub, respectively. To set network tags in the Meraki dashboard, see Manage Tags.

  3. Configure your branch sites as Meraki Auto VPN spokes with the vMX instances as the primary and secondary hubs. For more information, see Meraki Auto VPN - Configuration and Troubleshooting.

Launch the Quick Start

Each deployment takes about 15 minutes to complete.

  1. Sign in to your AWS account, and choose one of the following options to launch the AWS CloudFormation template. For help with choosing an option, see Deployment options earlier in this guide.

    Deploy Meraki vMX into a VPC on AWS

    View template

    Deploy Meraki vMX into an existing VPC on AWS

    View template

  2. Check the AWS Region that’s displayed in the upper-right corner of the navigation bar, and change it if necessary. This Region is where you build the network infrastructure. The template is launched in the us-east-1 Region by default. For other choices, see Supported Regions earlier in this guide.

  3. On the Create stack page, keep the default setting for the template URL, and then choose Next.

  4. On the Specify stack details page, change the stack name if needed. Review the parameters for the template. Provide values for the parameters that require input. For all other parameters, review the default settings and customize them as necessary. For details on each parameter, see the Parameter reference section of this guide. When you finish reviewing and customizing the parameters, choose Next.

  5. On the Configure stack options page, you can specify tags (key-value pairs) for resources in your stack and set advanced options. When you finish, choose Next.

  6. On the Review page, review and confirm the template settings. Under Capabilities, select the two check boxes to acknowledge that the template creates IAM resources and might require the ability to automatically expand macros.

  7. Choose Create stack to deploy the stack.

  8. Monitor the status of the stack. When the status is CREATE_COMPLETE, the Meraki vMX deployment is ready.

  9. To view the created resources, see the values displayed in the Outputs tab for the stack.

Postdeployment steps

After deployment, you must do the following:

vMX HA architecture

The deployment architecture is fault tolerant with two vMX instances in different Availability Zones. An AWS Lambda function handles instance-level failures by checking the state of vMX EC2 instances. For software-level failures, it checks the vMX health state on the Meraki vMX dashboard. In the case of a vMX instance failure, the AWS Lambda function logs the error in CloudWatch and updates the VPC and transit gateway routes to point to a healthy instance.

To recover a failed Meraki vMX instance

  1. Sign in to the Meraki dashboard.

  2. Generate a new authentication token for the failed instance. For more information, see step 4 in the Meraki Dashboard Configuration section, previously in this guide.

  3. Deploy a new vMX stack. For deployment links, see Launch the Quick Start, previously in this guide. On the Specify Stack Details page in the CloudFormation console, specify the following parameters:

    • InstanceType. Choose the same Amazon EC2 instance type that you specified during the previous deployment.

    • KeyPairName. Enter the name of an existing EC2 key pair.

    • SubnetID. Select the SubnetID to deploy the vMX instance.

    • vMXNetworkTag. Specify the network tag associated with the vMX instance on the Meraki dashboard.

    • vMXToken. Enter the new authentication token generated from the Meraki dashboard.

Best practices for using Meraki vMX on AWS

FAQ

Q. I encountered a CREATE_FAILED error when I launched the Quick Start.

A. If AWS CloudFormation fails to create the stack, relaunch the template with Rollback on failure set to Disabled. This setting is under Advanced in the AWS CloudFormation console on the Configure stack options page. With this setting, the stack’s state is retained, and the instance keeps running so that you can troubleshoot the issue. (For Windows, look at the log files in %ProgramFiles%\Amazon\EC2ConfigService and C:\cfn\log.)

When you set Rollback on failure to Disabled, you continue to incur AWS charges for this stack. Delete the stack when you finish troubleshooting.

For more information, see Troubleshooting AWS CloudFormation.

Q. I encountered a size-limitation error when I deployed the AWS CloudFormation templates.

A. Launch the Quick Start templates from the links in this guide or from another S3 bucket. If you deploy the templates from a local copy on your computer or from a location other than an S3 bucket, you might encounter template-size limitations. For more information, see AWS CloudFormation quotas.

Troubleshooting

Customer responsibility

After you successfully deploy this Quick Start, confirm that your resources and services are updated and configured — including any required patches — to meet your security and other needs. For more information, see the AWS Shared Responsibility Model.

Parameter reference

Unless you are customizing the Quick Start templates for your own deployment projects, keep the default settings for the parameters labeled Quick Start S3 bucket name, Quick Start S3 bucket Region, and Quick Start S3 key prefix. Changing these parameter settings automatically updates code references to point to a new Quick Start location. For more information, see the AWS Quick Start Contributor’s Guide.

Launch into a new VPC

Table 1. Meraki configuration
Parameter label (name) Default value Description

Meraki organization ID (MerakiOrgID)

Requires input

Meraki organization ID.

Meraki organization API key (MerakiAPIKey)

Requires input

Meraki organization API key.

Number of vMX instances (NumberOfvMXs)

2

Number of vMX instances to deploy.

Authentication token, first vMX instance (vMX1Token)

change_to_match_the_token_from_meraki_dashboard

Onboarding token for the first vMX instance. You can obtain the token from the Meraki dashboard.

Authentication token, second vMX instance (vMX2Token)

change_to_match_the_token_from_meraki_dashboard

Onboarding token for the second vMX instance. You can obtain the token from the Meraki dashboard.

Meraki network tag, first vMX instance (vMX1MerakiNetworkTag)

vMX1

On the Meraki dashboard, the vMX network tag for the first vMX instance.

Meraki network tag, second vMX instance (vMX2MerakiNetworkTag)

vMX2

On the Meraki dashboard, the vMX network tag for the second vMX instance.

Table 2. Network configuration
Parameter label (name) Default value Description

Availability Zones to use for the SD-WAN VPC subnets (AvailabilityZones)

Requires input

List of Availability Zones to use for the VPC subnets. Two Availability Zones are used for this deployment.

CIDR block for the VPC (VPCCIDR)

10.249.0.0/16

CIDR block for the SD-WAN VPC.

CIDR block for public subnet 1 (AvailabilityZone1CIDR)

10.249.0.0/24

CIDR block for public subnet 1, located in Availability Zone 1.

CIDR block for public subnet 2 (AvailabilityZone2CIDR)

10.249.1.0/24

CIDR block for public subnet 2, located in Availability Zone 2.

Transit gateway ASN (AmazonSideASN)

Requires input

Autonomous System Number (ASN) for the transit gateway.

Table 3. EC2 configuration
Parameter label (name) Default value Description

Amazon EC2 instance type (InstanceType)

c5.large

Amazon EC2 instance type for the vMX instances. For recommended and supported instance types, see vMX Setup Guide for Amazon Web Services (AWS).

Table 4. AWS Lambda configuration
Parameter label (name) Default value Description

CloudWatch Events rule rate (LambdaRate)

rate(10 minutes)

How often the CloudWatch Events rule runs. The rule invokes AWS Lambda to update the VPC and transit gateway route tables.

Table 5. AWS Quick Start configuration
Parameter label (name) Default value Description

Quick Start S3 bucket name (QSS3BucketName)

aws-quickstart

Name of the S3 bucket for your copy of the Quick Start assets. Keep the default name unless you are customizing the template. Changing the name updates code references to point to a new Quick Start location. This name can include numbers, lowercase letters, uppercase letters, and hyphens, but do not start or end with a hyphen (-). See https://aws-quickstart.github.io/option1.html.

Quick Start S3 key prefix (QSS3KeyPrefix)

quickstart-cisco-meraki-sd-wan-vmx/

S3 key prefix that is used to simulate a directory for your copy of the Quick Start assets. Keep the default prefix unless you are customizing the template. Changing this prefix updates code references to point to a new Quick Start location. This prefix can include numbers, lowercase letters, uppercase letters, hyphens (-), and forward slashes (/). End with a forward slash. See https://docs.aws.amazon.com/AmazonS3/latest/dev/UsingMetadata.html and https://aws-quickstart.github.io/option1.html.

Quick Start S3 bucket Region (QSS3BucketRegion)

us-east-1

AWS Region where the Quick Start S3 bucket (QSS3BucketName) is hosted. Keep the default Region unless you are customizing the template. Changing this Region updates code references to point to a new Quick Start location. When using your own bucket, specify the Region. See https://aws-quickstart.github.io/option1.html.

Key pair name (KeyPairName)

Requires input

EC2 key pair name.

Launch into an existing VPC

Table 6. Meraki configuration
Parameter label (name) Default value Description

Meraki organization ID (MerakiOrgID)

Requires input

Meraki organization ID.

Meraki organization API key (MerakiAPIKey)

Requires input

Meraki organization API key.

Number of vMX instances (NumberOfvMXs)

2

Number of vMX instances to deploy.

Authentication token, first vMX instance (vMX1Token)

change_to_match_the_token_from_meraki_dashboard

Onboarding token for the first vMX instance. You can obtain the token from the Meraki dashboard.

Authentication token, second vMX instance (vMX2Token)

change_to_match_the_token_from_meraki_dashboard

Onboarding token for the second vMX instance. You can obtain the token from the Meraki dashboard.

Meraki network tag, first vMX instance (vMX1MerakiNetworkTag)

vMX1

On the Meraki dashboard, the vMX network tag for the first vMX instance.

Meraki network tag, second vMX instance (vMX2MerakiNetworkTag)

vMX2

On the Meraki dashboard, the vMX network tag for the second vMX instance.

Table 7. Network configuration
Parameter label (name) Default value Description

VPC ID (VPCID)

Requires input

ID of the existing VPC for deployment (e.g., vpc-0343606e).

NO_LABEL (AZ1PublicSubnetID)

Requires input

ID of the public subnet in Availability Zone 1 of the existing VPC (e.g., subnet-z0376dab).

NO_LABEL (AZ2PublicSubnetID)

Requires input

ID of the public subnet in Availability Zone 2 of the existing VPC (e.g., subnet-a29c3d84).

Transit gateway ASN (AmazonSideASN)

Requires input

Autonomous System Number (ASN) for the transit gateway.

Existing VPC route table ID (VPCRouteTableID)

Requires input

ID of the existing VPC main route table (e.g., rt-0343606e).

Table 8. EC2 configuration
Parameter label (name) Default value Description

Amazon EC2 instance type (InstanceType)

c5.large

Amazon EC2 instance type for the vMX instances. For recommended and supported instance types, see vMX Setup Guide for Amazon Web Services (AWS).

Table 9. AWS Lambda configuration
Parameter label (name) Default value Description

CloudWatch Events rule rate (LambdaRate)

rate(10 minutes)

How often the CloudWatch Events rule runs. The rule invokes AWS Lambda to update the VPC and transit gateway route tables.

Table 10. AWS Quick Start configuration
Parameter label (name) Default value Description

Quick Start S3 bucket name (QSS3BucketName)

aws-quickstart

Name of the S3 bucket for your copy of the Quick Start assets. Keep the default name unless you are customizing the template. Changing the name updates code references to point to a new Quick Start location. This name can include numbers, lowercase letters, uppercase letters, and hyphens, but do not start or end with a hyphen (-). See https://aws-quickstart.github.io/option1.html.

Quick Start S3 key prefix (QSS3KeyPrefix)

quickstart-cisco-meraki-sd-wan-vmx/

S3 key prefix that is used to simulate a directory for your copy of the Quick Start assets. Keep the default prefix unless you are customizing the template. Changing this prefix updates code references to point to a new Quick Start location. This prefix can include numbers, lowercase letters, uppercase letters, hyphens (-), and forward slashes (/). End with a forward slash. See https://docs.aws.amazon.com/AmazonS3/latest/dev/UsingMetadata.html and https://aws-quickstart.github.io/option1.html.

Quick Start S3 bucket Region (QSS3BucketRegion)

us-east-1

AWS Region where the Quick Start S3 bucket (QSS3BucketName) is hosted. Keep the default Region unless you are customizing the template. Changing this Region updates code references to point to a new Quick Start location. When using your own bucket, specify the Region. See https://aws-quickstart.github.io/option1.html.

Key pair name (KeyPairName)

Requires input

EC2 key pair name.

Send us feedback

To post feedback, submit feature ideas, or report bugs, use the Issues section of the GitHub repository for this Quick Start. To submit code, see the Quick Start Contributor’s Guide.

Quick Start reference deployments

GitHub repository

Visit our GitHub repository to download the templates and scripts for this Quick Start, to post your comments, and to share your customizations with others.


Notices

This document is provided for informational purposes only. It represents AWS’s current product offerings and practices as of the date of issue of this document, which are subject to change without notice. Customers are responsible for making their own independent assessment of the information in this document and any use of AWS’s products or services, each of which is provided “as is” without warranty of any kind, whether expressed or implied. This document does not create any warranties, representations, contractual commitments, conditions, or assurances from AWS, its affiliates, suppliers, or licensors. The responsibilities and liabilities of AWS to its customers are controlled by AWS agreements, and this document is not part of, nor does it modify, any agreement between AWS and its customers.

The software included with this paper is licensed under the Apache License, version 2.0 (the "License"). You may not use this file except in compliance with the License. A copy of the License is located at http://aws.amazon.com/apache2.0/ or in the accompanying "license" file. This code is distributed on an "AS IS" BASIS, WITHOUT WARRANTIES OR CONDITIONS OF ANY KIND, either expressed or implied. See the License for specific language governing permissions and limitations.