AMMOS SmallSat Toolkit on the AWS Cloud
Quick Start Reference Deployment

September 2021
Michael Fedell and Steven Liu, NASA Multimission Ground Systems and Services
Andrew Glenn, AWS Integration & Automation team
| Visit our GitHub repository for source files and to post feedback, report bugs, or submit feature ideas for this Quick Start. |
This Quick Start was created by NASA Multimission Ground Systems and Services in collaboration with Amazon Web Services (AWS). Quick Starts are automated reference deployments that use AWS CloudFormation templates to deploy key technologies on AWS, following AWS best practices.
Overview
This guide provides instructions for deploying the AMMOS SmallSat Toolkit Quick Start on the AWS Cloud.
This Quick Start deploys NASA’s Advanced Multi-Mission Operations System (AMMOS) suite of capabilities for small satellite, CubeSat, and instrument missions. The AMMOS SmallSat Toolkit offers advanced sequence generation, command uplink and downlink, telemetry processing, and data visualization. Using this Quick Start, your team can rapidly deploy a foundational ground data system (GDS) that is built on mission-proven capabilities and maintained by NASA. The AMMOS suite comprises open-source products that are available in the NASA-AMMOS GitHub repository, where contributions are welcomed and encouraged.
| Amazon may share user-deployment information with the AWS Partner that collaborated with AWS on the Quick Start. |
AMMOS SmallSat Toolkit on AWS
The toolkit includes the following:
-
AMMOS Instrument Toolkit (AIT), a Python-based software suite that handles GDS, electrical ground support equipment (EGSE), commanding, telemetry uplink and downlink, and sequencing.
-
Open Mission Control Technologies (Open MCT) software, providing visualization and dashboarding capabilities.
-
AIT Sequence Editor, a Microsoft Visual Studio Code (VS Code) extension that provides a centralized, browser-based environment for generating and editing spacecraft command sequence files.
-
A set of basic test data so you can test the software capabilities upon installation.
-
Instructions for adapting the deployment for your operation’s needs both at launch and as your mission evolves.
This Quick Start is designed to meet the core demands of your mission with minimal adaptation.
AWS costs
You are responsible for the cost of the AWS services and any third-party licenses used while running this Quick Start. There is no additional cost for using the Quick Start.
The AWS CloudFormation templates for Quick Starts include configuration parameters that you can customize. Some of the settings, such as the instance type, affect the cost of deployment. For cost estimates, see the pricing pages for each AWS service you use. Prices are subject to change.
| After you deploy the Quick Start, create AWS Cost and Usage Reports to deliver billing metrics to an Amazon Simple Storage Service (Amazon S3) bucket in your account. These reports provide cost estimates based on usage throughout each month and aggregate the data at the end of the month. For more information, see What are AWS Cost and Usage Reports? |
Software licenses
No licenses are required to deploy this Quick Start.
Architecture
Deploying this Quick Start for a new virtual private cloud (VPC) with default parameters builds the following AMMOS SmallSat Toolkit environment in the AWS Cloud.
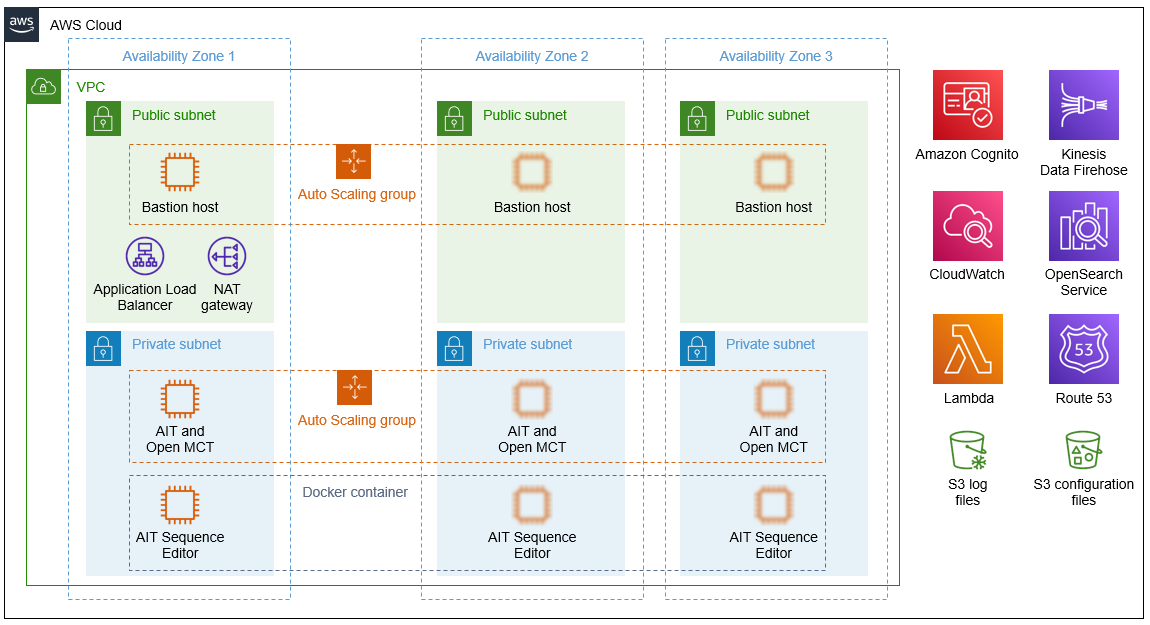
As shown in Figure 1, the Quick Start sets up the following:
-
A highly available architecture that spans three Availability Zones.*
-
A VPC configured with public and private subnets, according to AWS best practices, to provide you with your own virtual network on AWS.*
-
In the public subnets:
-
A Linux bastion host in an Auto Scaling group to allow inbound Secure Shell (SSH) access to Amazon Elastic Compute Cloud (Amazon EC2) instances in public and private subnets.*
-
An Application Load Balancer to route traffic from the web to the EC2 instances in the private subnets.
-
A managed network address translation (NAT) gateway to provide outbound internet access for resources in the private subnets.*
-
-
In the private subnets:
-
An EC2 instance that serves the AIT and Open MCT applications using Apache HTTP Server. This instance runs in an Auto Scaling group.
-
An EC2 instance that serves the AIT Sequence Editor application. This application runs in a Docker container on the instance to mitigate the impact of system commands that are run from the VS Code–integrated terminal that’s exposed in the browser.
-
-
Amazon Cognito to manage identities and authenticate users.
-
Amazon CloudWatch to receive log data from the EC2 instances in the private subnets using Amazon CloudWatch Logs agents.
-
AWS Lambda to process logs for Amazon Kinesis Data Firehose.
-
Kinesis Data Firehose to deliver log data from CloudWatch Logs to Amazon S3 and Amazon OpenSearch Service.
-
Amazon Route 53 to provide a canonical name (CNAME) record, an alias for the Application Load Balancer.
-
Two S3 buckets, one for long-term storage of log files and the other for application-configuration files.
* The template that deploys the Quick Start into an existing VPC skips the components marked by asterisks and prompts you for your existing VPC configuration.
Planning the deployment
Specialized knowledge
This deployment requires a moderate level of familiarity with AWS services. If you’re new to AWS, see Getting Started Resource Center and AWS Training and Certification. These sites provide materials for learning how to design, deploy, and operate your infrastructure and applications on the AWS Cloud.
This Quick Start also assumes familiarity with spacecraft ground data systems. The applications deployed in this Quick Start require extensive knowledge of mission parameters, common standards, operating procedures, and terminology related to spacecraft operations.
AWS account
If you don’t already have an AWS account, create one at https://aws.amazon.com by following the on-screen instructions. Part of the sign-up process involves receiving a phone call and entering a PIN using the phone keypad.
Your AWS account is automatically signed up for all AWS services. You are charged only for the services you use.
Technical requirements
Before you launch the Quick Start, review the following information and ensure that your account is properly configured. Otherwise, deployment might fail.
Resource quotas
If necessary, request service quota increases for the following resources. You might need to request increases if your existing deployment currently uses these resources and if this Quick Start deployment could result in exceeding the default quotas. The Service Quotas console displays your usage and quotas for some aspects of some services. For more information, see What is Service Quotas? and AWS service quotas.
| Resource | This deployment uses |
|---|---|
VPCs |
1 |
Subnets |
6 |
Route tables |
2 |
Internet gateways |
1 |
NAT gateways |
1 |
Security groups |
5 |
AWS Identity and Access Management (IAM) roles |
5 |
Auto Scaling groups |
2 |
EC2 instances* |
3 |
Application Load Balancers |
1 |
Amazon Cognito user pools |
1 |
Amazon OpenSearch Service domains |
1 |
S3 buckets |
2 |
CloudWatch Logs log groups |
5 |
Route 53 records |
5 |
Kinesis Data Firehose delivery streams |
1 |
Lambda functions |
3 |
* During deployment, you can choose the AIT instance type to fit your workload. The default instance type, m5.large, contains enough compute and memory resources for most workloads, as suggested by the AIT development team. The best choice for your mission depends on expected telemetry throughput, level of message processing required, and latency requirements defined by the mission. We recommend 2–4 cores and 4–8 GiB of memory for the AIT instance.
Supported AWS Regions
For any Quick Start to work in a Region other than its default Region, all the services it deploys must be supported in that Region. You can launch a Quick Start in any Region and see if it works. If you get an error such as “Unrecognized resource type,” the Quick Start is not supported in that Region.
For an up-to-date list of AWS Regions and the AWS services they support, see AWS Regional Services.
| Certain Regions are available on an opt-in basis. For more information, see Managing AWS Regions. |
IAM permissions
Before launching the Quick Start, you must sign in to the AWS Management Console with IAM permissions for the resources that the templates deploy. The AdministratorAccess managed policy within IAM provides sufficient permissions, although your organization may choose to use a custom policy with more restrictions. For more information, see AWS managed policies for job functions.
Deployment options
This Quick Start provides two deployment options:
-
Deploy AMMOS SmallSat Toolkit into a new VPC. This option builds a new AWS environment consisting of the VPC, subnets, NAT gateways, security groups, bastion hosts, and other infrastructure components. It then deploys AMMOS SmallSat Toolkit into this new VPC.
-
Deploy AMMOS SmallSat Toolkit into an existing VPC. This option provisions AMMOS SmallSat Toolkit in your existing AWS infrastructure.
This Quick Start provides one template that covers both of these options. It also lets you configure Classless Inter-Domain Routing (CIDR) blocks, instance types, and AMMOS SmallSat Toolkit settings, as discussed later in this guide.
Prepare your AWS account
Before you launch the Quick Start, prepare your AWS account by completing the following tasks.
Create a service-linked role for Amazon OpenSearch Service
Amazon OpenSearch Service uses a service-linked role to call other necessary AWS services on your behalf during the Amazon OpenSearch Service provisioning process. To create the role, follow the instructions under Creating a service-linked role. Specify the service name as es.amazonaws.com.
For more information, see the Using service-linked roles to provide Amazon OpenSearch Service access to resources.
Deploy and customize the configuration files
The preconfiguration (prerequisite) stack for this Quick Start contains an S3 bucket that’s populated with base configuration files for AIT, AIT Sequence Editor, and Open MCT. Deploy this stack and customize the configuration files as follows:
-
Sign in to the AWS Management Console, and open the AWS CloudFormation console.
-
Select the preconfiguration stack, choose the Outputs tab, and note the S3 bucket name (the value of the ConfigBucket key).
-
Copy, customize, and overwrite files of the same name in the S3 configuration bucket.
For details on customizing these files, see the following section: About the configuration files.
| Use the correct syntax and format in your configuration files so that the applications deploy. |
About the configuration files
The configuration files in the S3 bucket are organized by application with the following structure:
configs
├── ait
│   ├── cloudwatch-agent-ait.json
│   ├── config
│   │   ├── bsc.yaml
│   │   ├── ccsds_header.yaml
│   │   ├── cmd.yaml
│   │   ├── config.yaml
│   │   ├── core_set_op_mode.yaml
│   │   ├── evr.yaml
│   │   ├── leapseconds.dat
│   │   ├── limits.yaml
│   │   ├── table.yaml
│   │   └── tlm.yaml
│   └── httpd_proxy.conf
├── editor
│   └── cloudwatch-agent-editor.json
└── modules
    └── openmct-static.tgz
Review the descriptions in the following sections to determine which files you need to modify before you deploy the Quick Start.
During deployment, the Quick Start retrieves the AIT configuration files (the ones in the configs/ait/config S3 folder) and places them in /home/ec2-user/AIT-Core/config on the AIT EC2 instance.
For more information, see Introduction to AIT Configuration.
configs/ait/
This S3 folder contains configuration files for the AIT deployment within this Quick Start.
cloudwatch-agent-ait.json
This file configures the CloudWatch agent that runs on the AIT EC2 instance. Modify this file if you need to add sources for logs to send to CloudWatch Logs.
For more information, see Manually create or edit the CloudWatch agent configuration file.
configs/ait/config/
This S3 folder contains configuration files for the AIT application.
config.yaml
This is the main configuration file for AIT.
During deployment, the Quick Start retrieves this file along with the other AIT configuration files (the files in the configs/ait/config S3 folder) and places them in the folder /home/ec2-user/AIT-Core/config on the AIT EC2 instance.
This file references other configuration files (file paths are relative) as well as enabling a default set of AIT plugins: AIT GUI, the Data Archive plugin for InfluxDB, and the AIT Open MCT plugin.
For more information, see config.yaml in the AIT documentation.
httpd_proxy.conf
This configuration file defines how Apache HTTP Server proxies requests to either AIT or Open MCT. Both applications are set up as virtual hosts in Apache. Requests to AIT get proxied to the AIT backend Python process. Requests to Open MCT are handled directly by the Apache web server that serves Open MCT’s static files.
Modify this file if you need a nonstandard configuration for routing traffic between applications.
For more information, see Apache HTTP Server Project.
configs/editor/
This S3 folder contains configuration files for the AIT Sequence Editor deployment within this Quick Start.
cloudwatch-agent-editor.json
This file configures the CloudWatch agent that runs on the AIT Sequence Editor EC2 instance. Modify this file if you need to configure additional sources for logs to send to CloudWatch Logs.
For more information, see Manually create or edit the CloudWatch agent configuration file.
configs/modules/
This S3 folder contains a tarball of the static files that are served by Apache HTTP Server for Open MCT.
openmct-static.tgz
This file is a tarball of the static files for Open MCT. The JavaScript files in the tarball have been minified and bundled.
Modify these files if you need to edit the Open MCT framework or configure or install plugins for Open MCT. Make your changes, create a new tarball, and then upload the new file to overwrite the existing file in S3.
(Optional) Configure Route 53 as your DNS service
This deployment relies on a fully qualified domain name (FQDN) that you provide. This FQDN is used to discover the Application Load Balancer and subdomains to identify each application. If you configure Route 53 as your Domain Name System (DNS) service, the Quick Start deploys the following records in your Route 53 hosted zone for each application (where <fqdn> represents your FQDN URL):
<fqdn> |
→ Application Load Balancer |
ait.<fqdn> |
→ AIT Auto Scaling group [Apache → AIT application] |
mct.<fqdn> |
→ AIT Auto Scaling group [Apache → Open MCT static files] |
editor.<fqdn> |
→ AIT Sequence Editor EC2 instance [Docker container] |
logs.<fqdn> |
→ Amazon OpenSearch Service |
For more information, see Configuring Amazon Route 53 as your DNS service.
If you choose not to use Route 53, you are responsible for deploying the appropriate name records in your DNS. For details, see (Optional) Deploy DNS records later in this guide.
Import or generate an SSL certificate
You must have a valid Secure Sockets Layer (SSL) certificate for your FQDN because HTTPS is enabled on the Application Load Balancer. The certificate needs to be available in AWS Certificate Manager (ACM) for attachment to the Application Load Balancer.
You can import this certificate into ACM manually. Alternatively, you can generate it during deployment by populating both the FQDN and HostedZoneID parameters. The deployment method, which uses DNS validation, creates all the necessary DNS records related to the ACM certificate.
Ensure that your certificate includes the following Subject Alternative Names (SANs). You can use *.<fqdn> (where <fqdn> represents your FQDN URL).
-
ait.<fqdn> -
mct.<fqdn> -
editor.<fqdn> -
logs.<fqdn>
For more information, see the following:
Deployment steps
Confirm your AWS account configuration
-
Sign in to your AWS account at https://aws.amazon.com with an IAM user role that has the necessary permissions. For details, see Planning the deployment earlier in this guide.
-
Make sure that your AWS account is configured correctly, as discussed in the Technical requirements section.
Launch the Quick Start
| If you’re deploying AMMOS SmallSat Toolkit into an existing VPC, make sure that your VPC has at least two private subnets in different Availability Zones for the application EC2 instances and that the subnets aren’t shared. This Quick Start doesn’t support shared subnets. These subnets require NAT gateways in their route tables to allow the instances to download packages and software without exposing them to the internet. The NAT gateway itself should be deployed to one of the public subnets in your VPC. You provide your VPC settings when you launch the Quick Start. |
Each deployment takes about 60 minutes to complete.
-
Sign in to your AWS account, and launch the AWS CloudFormation template to deploy AMMOS SmallSat Toolkit into a new or existing VPC. (View template.) For details, see Deployment options earlier in this guide.
-
Check the AWS Region that’s displayed in the upper-right corner of the navigation bar, and change it if necessary. This Region is where you build the infrastructure. The template is launched in the us-east-1 Region by default. Supported Regions include the AWS GovCloud (US) Regions. For more information, see Supported AWS Regions earlier in this guide.
-
On the Create stack page, keep the default setting for the template URL, and then choose Next.
-
On the Specify stack details page, change the stack name if needed. Review the parameters for the template. Provide values for the parameters that require input. For all other parameters, review the default settings and customize them as necessary. For details on each parameter, see the Parameter reference section of this guide. When you finish reviewing and customizing the parameters, choose Next.
-
On the Configure stack options page, you can specify tags (key-value pairs) for resources in your stack and set advanced options. When you finish, choose Next.
-
On the Review page, review and confirm the template settings. Under Capabilities, select the two check boxes to acknowledge that the template creates IAM resources and might require the ability to automatically expand macros.
-
Choose Create stack to deploy the stack.
-
Monitor the status of the stack. When the status is CREATE_COMPLETE, the AMMOS SmallSat Toolkit deployment is ready.
-
To view the created resources, see the values displayed in the Outputs tab for the stack.
Post-deployment tasks
Complete any of the following post-deployment tasks that are relevant your mission. You can do these tasks in any order.
(Optional) Deploy DNS records
If you aren’t using Route 53 for domain management, as described under Prepare your AWS account earlier in this guide, you are responsible for deploying the appropriate name records to your DNS.
Deploy the following records:
CNAME         fqdn            →    Application Load Balancer
Alias    |    ait.fqdn        →    fqdn
Alias    |    mct.fqdn        →    fqdn
Alias    |    editor.fqdn     →    fqdn
Alias    |    logs.fqdn       →    fqdn
To view the Application Load Balancer DNS name, see the value displayed in the Outputs tab for the stack.
The Application Load Balancer handles redirection based on the host header in request. It’s sufficient to deploy a single CNAME record pointing to the Application Load Balancer and to deploy all subdomains as aliases that redirect to the Application Load Balancer CNAME record.
For guidance on this process, see your DNS provider’s documentation.
Create Amazon Cognito user identities
The Application Load Balancer defines an authentication action to protect the AIT, Open MCT, and AIT Sequence Editor applications. To access the applications, you authenticate using an identity that’s managed by Amazon Cognito. Create user identities in the Amazon Cognito user pool or set up federation with an existing identity provider.
For more information, see the following:
Adapt AIT to your mission
Adapt AIT for your operation’s needs both at launch and as your mission evolves. You can make changes directly on the AIT EC2 instance over an SSH- or SSM-managed session.
The following sections describe some common adaptations.
Activate the virtual Python environment
The Quick Start deployment installs AIT-Core, several plugins, and various dependencies to a virtual Python environment on the AIT EC2 instance using the virtualenvwrapper Python tool.
Activate the environment by running the command workon ait.
For more information on installing and configuring AIT Core, see Installation and Environment Configuration.
Customize AIT with extensions and plugins
AIT is an extensible framework that your mission team can adapt to your use cases. Use extensions and plugins as appropriate. You can install existing plugins or develop your own.
For more information, see the following:
Manage the configuration files
The Quick Start deployment retrieves configuration files from an S3 bucket and places them in /home/ec2-user/AIT-Core/config. You can modify configuration files directly on the AIT EC2 instance or replace them by uploading new files to the S3 bucket.
After you modify AIT configuration files, you must restart the ait-server systemd service (as described under Adapt the systemd services later in this guide).
To retrieve new files from the S3 bucket, run the following command with your bucket name in place of the bracketed text:
aws s3 sync s3://<bucket_name>/ait/config /home/ec2-user/AIT-Core/config
For more information, see sync in the AWS CLI command reference.
(Optional) Upgrade the deployed applications
If you upgrade AIT-Core or any of the other deployed applications, you are responsible for any impact that upgrading may have. This Quick Start supports only those versions listed under Software version requirements.
To upgrade any of the applications, refer to that application’s documentation. Back up the config folder and any modified files. Then update and reinstall the cloned application repositories to the virtual environment.
Modify the Open MCT static built files
The Open MCT framework is written in JavaScript. You can bundle it into a set of static assets that can be served from a web server. In this Quick Start, the latest version of Open MCT has been packaged and uploaded to an S3 bucket as a .zip file. The Quick Start deployment downloads the .zip file from the S3 bucket and extracts it so that it can be served by Apache HTTP Server. On the EC2 instance, the static files are extracted and located in var/www/html/openmct.
Save any configuration changes and additional plugins for Open MCT to var/www/html/openmct.
For more information, see Building Applications With Open MCT.
Adapt the systemd services
The systemd daemon on the AIT EC2 instance manages the following services:
-
Apache HTTPD Server (httpd.service)
-
InfluxDB (influxdb.service)
-
AIT-Core (ait-server.service)
You can stop and restart the AIT EC2 instance as needed. When you restart, these systemd services come back online.
For details on adapting these services, see the following sections.
Apache HTTPD Server (httpd.service)
Apache HTTP Server is installed and managed as a systemd service. It routes incoming traffic to both AIT and Open MCT. The service file can be found at`/usr/lib/systemd/system/httpd.service`. Apache configuration files are located at /etc/httpd. The base configuration can be found at /etc/httpd/conf/httpd.conf, and supplemental configuration files can be found at /etc/httpd/conf.d.
To verify whether the service is running after deployment, use the command sudo systemctl status httpd.
To adapt this service, modify the configuration files found in the locations noted here, and then restart the service with the command sudo systemctl restart httpd.
InfluxDB (influxdb.service)
InfluxDB is installed and managed as a systemd service. InfluxDB acts as a data-storage layer for the AIT application. The Quick Start uses a default configuration of InfluxDB with a few changes. The service file can be found at /usr/lib/systemd/system/influxdb.service.
To verify whether the service is running after deployment, use the command sudo systemctl status influxdb.
To adapt this service, modify the InfluxDB service file identified here, and then restart the service with the command sudo systemctl restart influxdb.
AIT-Core (ait-server.service)
AIT-Core is installed and managed as a systemd service. It runs the AIT EC2 instance, listening for, processing, and exposing telemetry. Configured plugins, such as AIT-GUI, are run according to the main AIT configuration file. The service file is located at /etc/systemd/system/ait-server.service.
To verify whether the service is running after deployment, use the command sudo systemctl status ait-server.
To adapt this service, modify the main configuration file identified here or any associated files referenced from the main configuration file, and then restart the service with the command sudo systemctl restart ait-server.
Whenever you change an AIT configuration file, you must restart this service using the command sudo systemctl restart ait-server.
Set up the CloudWatch agent
This Quick Start installs an Amazon CloudWatch agent (cloudwatch-agent-ait.json) on all deployed EC2 instances. This agent is initialized by a default configuration file that tells the agent which files to monitor and where to direct the logs in CloudWatch. See About the configuration files earlier in this guide.
Modify this file as detailed in the following section.
For more information, see Collecting metrics and logs from Amazon EC2 instances and on-premises servers with the CloudWatch agent.
(Optional) Modify the CloudWatch agent configuration file
The CloudWatch agent monitors the specified log files and sends them to CloudWatch Logs. The CloudWatch agent configuration file is stored in /opt/aws/amazon-cloudwatch-agent/etc/amazon-cloudwatch-agent.json. To monitor additional files or change the configuration settings, modify the agent configuration file.
After editing the file, restart the agent and apply your changes using the following command:
/opt/aws/amazon-cloudwatch-agent/bin/amazon-cloudwatch-agent-ctl \
    -a fetch-config -s -m ec2 \
    -c file:/opt/aws/amazon-cloudwatch-agent/etc/amazon-cloudwatch-agent.json
For more information, see Manually create or edit the CloudWatch agent configuration file.
(Optional) Change the log-retention period
The CloudWatch Logs log groups that receive application logs are configured with the default log-retention period of 30 days. You can choose a different retention period during deployment using the CloudWatchLogsRetentionPeriod parameter. Increasing the log-retention period results in higher log-storage costs.
For more information, see Change log data retention in CloudWatch Logs.
Test the deployment
Verify that all the components have been deployed by doing the following tests in the documented order.
Verify the deployment of the application EC2 instances
-
Sign in to the AWS Management Console, and open the Amazon EC2 console.
-
Choose Instances from the left navigation bar. Verify that the AitAutoScalingGroup and EditorServer EC2 instances appear.
-
For each instance, ensure that there are no failed checks in the Status checks column.
-
Use AWS Systems Manager (formerly known as SSM) to verify that you can connect to each instance.
-
On the AIT Sequence Editor instance, run
docker ps. Verify that the Docker container is running. -
On the AIT instance, verify that the Apache HTTPD Server and AIT-Core systemd services are active by running the following commands:
-
service httpd status -
service ait-server status
-
In the AIT documentation, the core AIT functionality is sometimes called a "server," specifically AIT Server. This is where the file ait-server gets its name.
|
Verify the deployment of the applications
-
Open a web browser, and enter your FQDN URL.
A landing page opens showing links to the AIT, Open MCT, and AIT Sequence Editor applications.
-
Choose each link. Verify that each application opens.
You may be prompted for login credentials the first time you open the applications. Login credentials are managed by Amazon Cognito. For more information, see Create Amazon Cognito user identities later in this guide.
Verify that telemetry is flowing
The AIT software includes two scripts that generate sample telemetry: ait-example and ait-tlm-simulate. Verify the telemetry by running both of these command line interface (CLI) programs on the AIT EC2 instance as follows.
-
Connect to the AIT EC2 instance. For details, see Verify access to the application EC2 instances earlier in this guide.
-
Activate the Python virtual environment where AIT and the sample telemetry scripts are installed.
The scripts are installed in a virtual environment named
aiton the AIT instance. As part of the activation, the virtual environment modifies yourPATHvariable to include a few AIT scripts that you can run. -
Use the commands
ait-exampleandait-tlm-simulateto run each script.The two scripts generate sample telemetry.
ait-example, which has a hardcoded packet structure, sends telemetry for 100 seconds.ait-tlm-simulate, which can simulate different packet types, emits telemetry once per second indefinitely. -
Open the AIT application. In most cases, it’s
ait.<fqdn>(where <fqdn> represents your FQDN URL). -
Choose the Telemetry tab.
If you’re using the default AIT configuration files, you see two graphs: one for voltages and one for currents.
-
While the scripts are running, verify that you see new data points on the graphs and a line plot forming. This indicates that telemetry is flowing through the AIT software.
Verify that CloudWatch is receiving logs
Quick Start deployment installs CloudWatch agents on both application EC2 instances. The agents send agent and syslog logs to CloudWatch. Verify that CloudWatch is receiving logs as follows:
-
Open the CloudWatch console.
-
In the left navigation bar, under Logs, choose Log groups. Locate the following log groups:
-
/cloudwatch-agent/ait-editor/agent -
/cloudwatch-agent/ait-editor/syslog -
/cloudwatch-agent/ait-server/agent -
/cloudwatch-agent/ait-server/syslog
-
-
Verify that each of these log groups contains a few log streams and that each stream contains log data. If you deployed the Quick Start recently, you may see only a small amount of log data.
Security
IAM
To facilitate compliance with your organization’s restrictions on IAM role creation, the following parameters are available on all stacks that create IAM roles. If the parameter is not supplied, these attributes are not set.
-
PermissionsBoundaryArn: Amazon Resource Name (ARN) of a managed policy in your account to be used as the permissions boundary for the created role. For more information, see Permissions boundaries for IAM entities. -
RolePath: String used as the path attribute for the created role. For more information, see Friendly names and paths.
Security groups
As part of the Quick Start deployment, you specify security groups that define inbound and outbound network traffic rules. You create inbound rules for the security groups and define appropriate CIDR/IP ranges that are allowed for inbound access to various deployed resources.
For more information, see Amazon EC2 security groups for Linux instances.
Private subnets
The Quick Start deploys application EC2 instances to a private subnet in a VPC. An Application Load Balancer, which is deployed to a public subnet in the same VPC, routes requests to these instances, minimizing the publicly exposed footprint of deployed resources.
To access the EC2 instances in the private subnets, see documentation section on SSM (Systems Manager) elsewhere in this guide.
SELinux
Security-Enhanced Linux (SELinux) is enabled and enforced on the application EC2 instances. Apache HTTP Server and the various application processes have been configured for SELinux compatibility and can be run without disabling SELinux.
Side effects may occur if you modify or move settings or configuration files after the initial deployment of the application. If you have any issues with SELinux file and process contexts, refer to a fresh deployment of the Quick Start or redeploy the Quick Start.
| Do not disable SELinux unless you are aware of unintended security consequences or must disable SELinux for compatibility or debugging purposes. |
Amazon OpenSearch Service
This Quick Start deploys a domain under Amazon OpenSearch Service. This domain, which is deployed within a VPC, contains logging data that’s received from application EC2 instances. All primary and data (secondary) nodes reside within private subnets. Encryption for data at rest is enabled by default.
| The Amazon OpenSearch Service domain uses an open-access policy with access controlled by an EC2 security group. For more security, use fine-grained access control or modify the access policy to specify IAM users or roles. |
For more information, see the following:
Authentication
The Application Load Balancer, which is deployed to a public subnet, brokers access to the application resources deployed in private subnets. Each application is accessible through a listener rule, which directs traffic according to the host header and performs an authentication action prior to forwarding the traffic to the appropriate target group.
This authentication action is configured with the deployed Amazon Cognito user pool as an OpenID Connect (OIDC) provider. Access is granted on a full-access basis. Users who can authenticate as known identities are allowed through the Application Load Balancer to the underlying resource.
For more information, see the following:
Code-server access
The AIT Sequence Editor EC2 instance runs the cdr/code-server Docker image published on Docker Hub. When you use Visual Studio Code’s integrated terminal, you can run system-level commands from a browser.
The AIT Sequence Editor instance runs in a Docker container with volumes mounted to the following locations:
-
$HOME/.ait-editor-config:/home/coder/.config -
$HOME/project:/home/coder/project -
$HOME/extensions:/home/coder/extra-extensions
Additionally, a simple password can be set to restrict interface access. For more information, see How do I change the password?
SSL/TLS protocol
Clients that access applications through the Application Load Balancer have their traffic encrypted using the SSL/TLS protocol. The Application Load Balancer uses HTTPS listeners. Any normal HTTP traffic going to the Application Load Balancer is redirected to the HTTPS listener.
To configure the Application Load Balancer for SSL/TLS, you must provide an X.509 certificate during Quick Start deployment.
SSL termination occurs at the Application Load Balancer. Communication to the EC2 instance targets behind the Application Load Balancer is unencrypted, albeit through private VPC subnets.
AWS Systems Manager
For improved security and monitoring, use AWS Systems Manager to connect to the application EC2 instances. The deployment installs AWS Systems Manager Agent (SSM Agent) on all instances. Additionally, each instance profile is assigned the AWS managed service role AmazonSSMManagedInstanceCore.
You can provide the SshKeyName parameter to the relevant templates to enable standard SSH connections. The EC2 instances are deployed in a private subnet and therefore not discoverable directly from the internet. To connect using SSH, you must provision a bastion host (jump server).
For more information, see Start a session.
Resources
AIT:
Open MCT:
Community:
-
AMMOS Instrument Toolkit Development and Users (mailing group)
-
NASA Open MCT (GitHub discussions)
Software version requirements
Operating system and dependency versions
The Quick Start deploys AIT, Open MCT, and AIT Sequence Editor on EC2 instances running Red Hat Enterprise Linux 8 (RHEL8). These applications do not require RHEL8, but RHEL8 is the officially supported operating system for all AMMOS applications.
The Quick Start builds and installs Python 3.7.x on the application EC2 instances. This is the version that AIT software supports. Python 3.7 is not part of the official Red Hat Enterprise Linux 8 software repositories or Red Hat Software collections.
For more information on installing and configuring AIT Core, see Installation and Environment Configuration.
Supported application software versions
This Quick Start deploys and supports AIT Core v2.3.5 and OpenMCT v1.6.2.
InfluxDB versions
This Quick Start deploys InfluxDB version 1.2.4 on the AIT EC2 instance. The influxdb Python library that AIT uses to interface with InfluxDB is compatible only with InfluxDB versions 1.x.
FAQ
Q. I encountered a CREATE_FAILED error when I launched the Quick Start.
A. If AWS CloudFormation fails to create the stack, relaunch the template with Rollback on failure set to Disabled. This setting is under Advanced in the AWS CloudFormation console on the Configure stack options page. With this setting, the stack’s state is retained, and the instance keeps running so that you can troubleshoot the issue. (For Windows, look at the log files in %ProgramFiles%\Amazon\EC2ConfigService and C:\cfn\log.)
| When you set Rollback on failure to Disabled, you continue to incur AWS charges for this stack. Delete the stack when you finish troubleshooting. |
For more information, see Troubleshooting CloudFormation.
Q. I encountered a size-limitation error when I deployed the AWS CloudFormation templates.
A. Launch the Quick Start templates from the links in this guide or from another S3 bucket. If you deploy the templates from a local copy on your computer or from a location other than an S3 bucket, you might encounter template-size limitations. For more information, see AWS CloudFormation quotas.
Customer responsibility
After you successfully deploy this Quick Start, confirm that your resources and services are updated and configured — including any required patches — to meet your security and other needs. For more information, see the AWS Shared Responsibility Model.
Parameter reference
| Unless you are customizing the Quick Start templates for your own deployment projects, keep the default settings for the parameters labeled Quick Start S3 bucket name, Quick Start S3 bucket Region, and Quick Start S3 key prefix. Changing these parameter settings automatically updates code references to point to a new Quick Start location. For more information, see the AWS Quick Start Contributor’s Guide. |
Pre-Configure your AWS account
| Parameter label (name) | Default value | Description |
|---|---|---|
Project Name
( |
|
Name of your project |
Permissions Boundary ARN
( |
|
Will be attached to all created IAM Roles to satisfy security requirements |
Role Path
( |
|
Will be attached to all created IAM Roles to satisfy security requirements |
| Parameter label (name) | Default value | Description |
|---|---|---|
Quick Start S3 bucket name
( |
|
S3 bucket name for the Quick Start assets. This string can include numbers, lowercase letters, uppercase letters, and hyphens (-). It cannot start or end with a hyphen (-). |
Quick Start S3 key prefix
( |
|
S3 key prefix for the Quick Start assets. Quick Start key prefix can include numbers, lowercase letters, uppercase letters, hyphens (-), and forward slash (/). |
Quick Start S3 bucket region
( |
|
The AWS Region where the Quick Start S3 bucket (QSS3BucketName) is hosted. When using your own bucket, you must specify this value. |
Launch into a new VPC
| Parameter label (name) | Default value | Description |
|---|---|---|
AIT Instance Type
( |
|
Instance type to be used for AIT Server instances; see deployment guide for recommendations |
Elasticsearch Domain Name
( |
|
Name of the Elasticsearch domain |
CloudWatch Retention Period
( |
|
The number of days to retain log events in CloudWatch log groups |
Key Pair Name
( |
|
A public/private key pair, which allows you to connect securely to your instance after it launches. |
FQDN
( |
|
Fully Qualified Domain Name to use for project resources root. |
SSL Certificate ARN
( |
|
The ARN of the SSL certificate to use for the load balancer. Use 'SSLCertificateArn' if you are not using 'FQDN' and 'HostedZoneID'. |
Hosted Zone ID
( |
|
Route 53 Hosted Zone ID of the domain name. Used in conjunction with a 'FQDN'. |
Project Name
( |
|
Name of your project |
| Parameter label (name) | Default value | Description |
|---|---|---|
Role Path
( |
|
Will be attached to all created IAM Roles to satisfy security requirements |
Permissions Boundary ARN
( |
|
Will be attached to all created IAM Roles to satisfy security requirements |
| Parameter label (name) | Default value | Description |
|---|---|---|
Availability Zones
( |
|
List of Availability Zones to use for the subnets in the VPC. This deployment uses two Availability Zones, and the logical order of your selections is preserved. |
VPC CIDR
( |
|
The CIDR block for the VPC. |
Private subnet 1 CIDR
( |
|
The CIDR block used for the private subnet located in Availability Zone 1. |
Private subnet 2 CIDR
( |
|
The CIDR block used for the private subnet located in Availability Zone 2. |
Private subnet 3 CIDR
( |
|
The CIDR block used for the private subnet located in Availability Zone 2. |
Public subnet 1 CIDR
( |
|
The CIDR block used for the public subnet located in Availability Zone 1. |
Public subnet 2 CIDR
( |
|
The CIDR block used for the public subnet located in Availability Zone 2. |
Public subnet 3 CIDR
( |
|
The CIDR block used for the public subnet located in Availability Zone 2. |
RemoteAccessCIDR
( |
|
The CIDR IP range that is permitted to access the instances. We recommend that you set this value to a trusted IP range. |
| Parameter label (name) | Default value | Description |
|---|---|---|
Quick Start S3 bucket name
( |
|
S3 bucket name for the Quick Start assets. This string can include numbers, lowercase letters, uppercase letters, and hyphens (-). It cannot start or end with a hyphen (-). |
Quick Start S3 key prefix
( |
|
S3 key prefix for the Quick Start assets. Quick Start key prefix can include numbers, lowercase letters, uppercase letters, hyphens (-), and forward slash (/). |
Quick Start S3 bucket region
( |
|
The AWS Region where the Quick Start S3 bucket (QSS3BucketName) is hosted. When using your own bucket, you must specify this value. |
Send us feedback
To post feedback, submit feature ideas, or report bugs, use the Issues section of the GitHub repository for this Quick Start. To submit code, see the Quick Start Contributor’s Guide.
Quick Start reference deployments
See the AWS Quick Start home page.
GitHub repository
Visit our GitHub repository to download the templates and scripts for this Quick Start, to post your comments, and to share your customizations with others.
Notices
This document is provided for informational purposes only. It represents AWS’s current product offerings and practices as of the date of issue of this document, which are subject to change without notice. Customers are responsible for making their own independent assessment of the information in this document and any use of AWS’s products or services, each of which is provided “as is” without warranty of any kind, whether expressed or implied. This document does not create any warranties, representations, contractual commitments, conditions, or assurances from AWS, its affiliates, suppliers, or licensors. The responsibilities and liabilities of AWS to its customers are controlled by AWS agreements, and this document is not part of, nor does it modify, any agreement between AWS and its customers.
The software included with this paper is licensed under the Apache License, version 2.0 (the "License"). You may not use this file except in compliance with the License. A copy of the License is located at http://aws.amazon.com/apache2.0/ or in the accompanying "license" file. This code is distributed on an "AS IS" BASIS, WITHOUT WARRANTIES OR CONDITIONS OF ANY KIND, either expressed or implied. See the License for specific language governing permissions and limitations.