Amazon Marketing Cloud Insights on AWS
Partner Solution Deployment Guide

November 2022
Arpan Shah, Ronak Parikh, and Chaitra Nayak, Amazon Ad Tech Solutions
Ramesh Jetty, Brian Maguire, and Gerry Louw, AWS Solutions Architecture | Bret Pontillo, Noah Paige, Naomi Joshi and Anmol Gandhi, AWS Professional Services | Eric Beard, AWS Partner Core | Chip Reno and Clark Fredricksen, AWS Advertising & Marketing Industry
Troy Ameigh, AWS Integration & Automation

| Refer to the GitHub repository to view source files, report bugs, submit feature ideas, and post feedback about this Partner Solution. To comment on the documentation, refer to Feedback. |
This Partner Solution was created by the Amazon Ad Tech Solutions team in collaboration with Amazon Web Services (AWS). Partner Solutions are automated reference deployments that help people deploy popular technologies on AWS according to AWS best practices. If you’re unfamiliar with AWS Partner Solutions, refer to the AWS Partner Solution General Information Guide.
Overview
This guide covers the information you need to deploy the Amazon Marketing Cloud (AMC) Insights on AWS solution using the AWS Cloud Development Kit (AWS CDK) and DataOps Development Kit (DDK).
For information on using this solution after it’s deployed, refer to the Amazon Marketing Cloud Insights on AWS Partner Solution Operational Guide.
Costs and licenses
No licenses are required to deploy this solution. There is no cost to use this solution, but you will be billed for any AWS services or resources that this solution deploys.
Architecture
Deploying this solution with default parameters builds the following environment in the AWS Cloud.
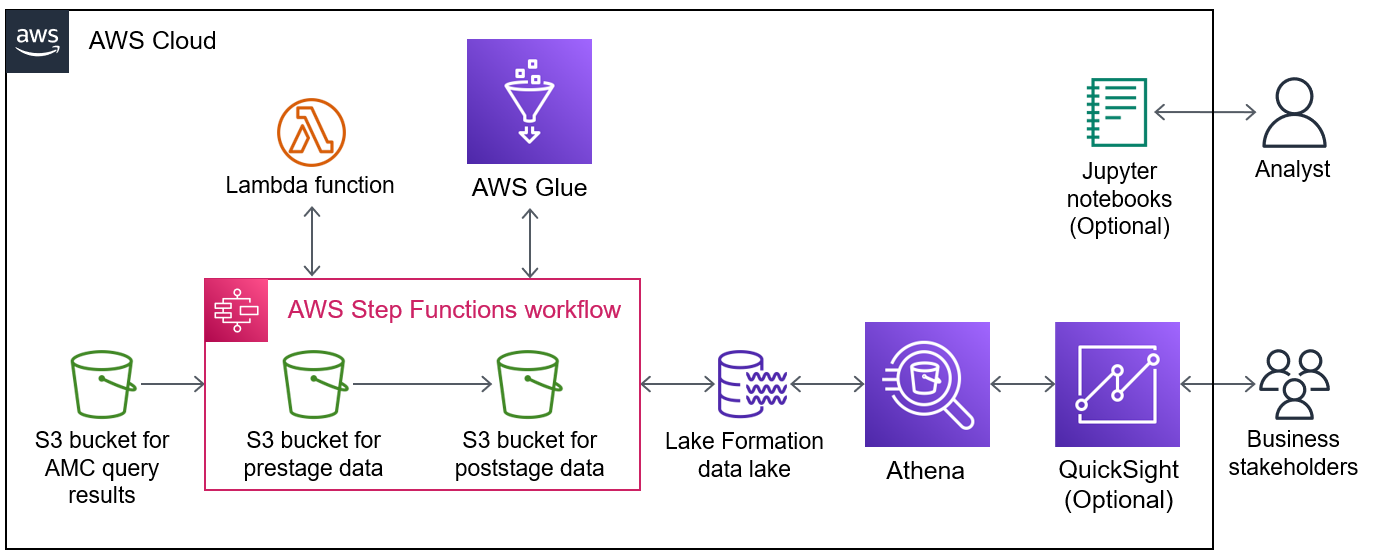
As shown in Figure 1, this solution sets up the following:
-
Three Amazon Simple Storage Service (Amazon S3) buckets to store AMC query results, prestage data, and poststage data.
-
AWS Step Functions for loading and orchestrating data.
-
An AWS Lambda function for loading raw data to prestage, partitioning prestage data, and managing S3 file metadata.
-
AWS Glue for converting Parquet files and partitioning poststage data.
-
An AWS Lake Formation data lake for governance and security.
-
Amazon Athena to query the data lake and access the poststage data.
-
(Optional) Amazon QuickSight for business-intelligence analytics, interactive dashboards, and visualizations that business stakeholders can use.
-
(Optional) Amazon SageMaker with sample Jupyter notebooks that analysts can use to provision tenants and manage workflows.
Predeployment steps
Confirm your AMC instance
To confirm that you have an AMC instance provisioned and active, go to Register for Amazon Ads, and choose switch to your advertising account.
Set up your environment
You must set up an environment with programmatic access to your AWS account and with various tools at appropriate versions. You can set up your environment locally (option A) or in AWS Cloud9 (option B), as detailed in the following sections.
| Deploy this architecture into the same account as your AMC instance. You can find the account ID on the AMC instance under Additional Info in the Connected AWS Account ID box. |
Option A: Set up a local environment
-
Confirm that your local environment has Python version 3.7 or later and its package manager, pip, version 9.0.3 or later.
$ python --version $ pip --version -
Confirm that the AWS Command Line Interface (AWS CLI) is installed and configured.
$ aws --version -
Confirm that you have AWS CDK version 2.10 or later.
$ cdk --version -
Confirm that Git is installed and configured.
$ git --version -
If this is your first time using Git, set your user name and email address as follows, replacing the information in brackets.
$ git config --global user.name <YOUR NAME> $ git config --global user.email <YOU@EMAIL.COM> -
Confirm that Git is configured.
$ git config --list
Option B: Set up an AWS Cloud9 environment
-
Sign in to the AWS Management Console in the correct account you are deploying into using the Admin role, and choose an AWS Region. Choose a mature Region where most services are available, such as eu-west-1 or us-east-1.
-
Open the AWS Cloud9 console, and create an EC2 environment in your chosen AWS Region. Choose instance type t3.small or larger, Amazon Linux 2. For details refer to Creating an EC2 Environment.
By default, Python, pip, AWS CLI, AWS CDK, and Git are installed and configured for you in your AWS Cloud9 environment.
-
Confirm that the packages are all installed by entering the following commands:
$ python --version $ pip --version $ aws --version $ cdk --version $ git --version -
Verify the following versions:
-
Python 3.7 or later.
-
pip 9.0.3 or later.
-
AWS CDK version 2.10 or later.
-
Clone the repo
After your environment is set up, clone the Amazon Marketing Cloud Insights repository as follows, replacing the information in brackets.
$ git clone <GITHUB-PATH>
$ cd quickstart-amazon-marketing-cloud
$ rm -rf .git
Install and set up the DDK
Through the rest of this document, some of the steps differ depending on whether you chose local or Cloud9 deployment. For those steps, use the commands indicated by the [Local] or [Cloud9] notations. Do all the other steps for both environment types.
-
Install the DataOps Development Kit.
$ pip install aws-ddk -
Verify the installation.
$ ddk --help -
Create and activate a virtual environment.
$ python -m venv .venv && source .venv/bin/activate -
Install the application’s dependencies.
$ pip install -r requirements.txt --no-cache-dirThe DataOps Development Kit (DDK) Core, a library of AWS CDK constructs, is installed.
-
If your AWS account hasn’t been used to deploy DDK apps before, bootstrap your environment as follows, replacing the information in angle brackets.
[Local]:
$ ddk bootstrap --profile <AWS_PROFILE> --trusted-accounts <AWS_ACCOUNT_ID>[Cloud9]:
$ ddk bootstrapYou might recognize a number of files typically found in an AWS CDK Python application, such as
app.pyandcdk.json. In addition,ddk.jsonholds configuration information about DDK constructs. -
Edit the required parameters in
ddk.json. Enter your account ID, the name of the AWS CodeCommit repository to reference (you’ll create this repository in a later step), and names of data pipeline parameters such asapp,org,team,dataset, andpipeline.$ vi ddk.json -
Initialize Git for the repository.
$ git init --initial-branch main -
Create a new CodeCommit repository as follows. Replace the information in angle brackets, using the repository name value from the
ddk.jsonconfiguration file. The template is launched in the us-east-1 Region by default; change this Region if necessary in the following command.[Local]:
$ ddk create-repository <AMC_REPO_NAME> --profile <AWS_PROFILE> --region <AWS_REGION>[Cloud9]:
$ ddk create-repository <AMC_REPO_NAME> --region <AWS_REGION> -
Add and push the initial commit to the repository as follows, replacing the information in angle brackets.
[Local]:
$ git config --global credential.helper "!aws codecommit --profile <my-profile> credential-helper $@" $ git config --global credential.UseHttpPath true $ git add . $ git commit -m "Configure AMC Insights on AWS" $ git push --set-upstream origin main[Cloud9]:
$ git add .
$ git commit -m "Configure AMC Insights on AWS"
$ git push --set-upstream origin main
Deployment steps
Deploying this solution takes about 1.5 hours to complete.
-
Run the
deploycommand as follows, replacing the information in angle brackets.[Local]:
$ ddk deploy --profile <AWS_PROFILE>[Cloud9]:
$ ddk deploy -
If the status is FAILED in the assets stage of deploying AWS CodePipeline (due to the limited number of file assets that AWS CodeBuild can publish concurrently), choose the Retry button. This prompts CodePipeline to continue building the file assets.
Postdeployment steps
Set AWS Lake Formation permissions
Follow these steps to enable AWS Lake Formation to control your AWS Glue Data Catalog resources and to give your AWS Identity and Access Management (IAM) role permission to access the tables in the Data Catalog.
-
Sign in to the AWS Management Console, and open the AWS Lake Formation console.
-
Grant Lake Formation administrative permissions to your IAM role.
-
In the navigation pane, under Permissions, choose Administrative roles and tasks
-
Click on Choose administrators and enter your current IAM role
-
-
Enable Lake Formation to control your Data Catalog resources.
-
In the navigation pane, under Data catalog, choose Settings.
-
Clear both check boxes and choose Save.
-
-
Give your IAM role permission to access the tables in the Data Catalog.
-
In the navigation pane, under Permissions, choose Data Lake Permissions.
-
Choose Grant in the upper right, and do the following:
-
For IAM users and roles, enter enter your current IAM role.
-
For LF-Tags or catalog resources, choose Named data catalog resources.
-
For Databases, choose your database:
aws_datalake_<environment>_<team>_<name>_db"(defaultaws_datalake_dev_demoteam_amcdataset_db). -
For Tables, choose All Tables.
-
Keep Data Filters - Optional empty.
-
For Table Permissions, choose Super.
-
-
Choose Grant at the bottom.
-
-
Repeat the previous step for any other users who need permission to access the tables in the Data Catalog.
View the operational guide
For help getting started using the solution, refer to the Amazon Marketing Cloud Insights on AWS Partner Solution Operational Guide.
Troubleshooting
For troubleshooting common issues, refer to Troubleshooting CloudFormation.
Q: I encountered a CREATE_FAILED error in CloudFormation when I deployed this solution.
A: Ensure that you have bootstrapped the AWS accounts in use by running the following command, replacing the information in brackets.
ddk bootstrap --profile <AWS_PROFILE> --trusted-accounts <AWS_ACCOUNT_ID>
Also ensure that the ddk.json file specifies the correct AWS account for the child environment used to deploy (for example, default is set to dev).
Q: I can’t find the configuration for my AMC instance.
A: When you’re signed in to AMC, refer to the Instance Information page. You’ll find details on the AMC instance’s S3 bucket, endpoint URL, data-upload account, advertiser IDs, and entity IDs.
Customer responsibility
After you deploy a Partner Solution, confirm that your resources and services are updated and configured—including any required patches—to meet your security and other needs. For more information, refer to the Shared Responsibility Model.
Feedback
To submit feature ideas and report bugs, use the Issues section of the GitHub repository for this Partner Solution. To submit code, refer to the Partner Solution Contributor’s Guide. To submit feedback on this deployment guide, use the following GitHub links:
Notices
This document is provided for informational purposes only. It represents current AWS product offerings and practices as of the date of issue of this document, which are subject to change without notice. Customers are responsible for making their own independent assessment of the information in this document and any use of AWS products or services, each of which is provided "as is" without warranty of any kind, whether expressed or implied. This document does not create any warranties, representations, contractual commitments, conditions, or assurances from AWS, its affiliates, suppliers, or licensors. The responsibilities and liabilities of AWS to its customers are controlled by AWS agreements, and this document is not part of, nor does it modify, any agreement between AWS and its customers.
The software included with this paper is licensed under the Apache License, version 2.0 (the "License"). You may not use this file except in compliance with the License. A copy of the License is located at https://aws.amazon.com/apache2.0/ or in the accompanying "license" file. This code is distributed on an "as is" basis, without warranties or conditions of any kind, either expressed or implied. Refer to the License for specific language governing permissions and limitations.